Use the FTEInput node
to receive files from an existing WebSphere® MQ
File Transfer Edition network.
Before you begin
- Read about WebSphere MQ
File Transfer Edition.
- Ensure that WebSphere MQ is
installed on the same machine as your integration node. Information
about file transfers is held on storage queues that are controlled
by WebSphere MQ, so you must install WebSphere MQ on the same computer as your
integration node if you want to use the capabilities provided by the FTEInput node.
- Ensure that a queue manager has been specified on the
integration node; this queue manager will own the system queues that
store information about the file transfer. For information about specifying
a queue manager on the integration node, see mqsicreatebroker command.
- Create the system queues that will store the file transfer information. For more
information about creating the system queues, see Creating the default IBM Integration Bus queues on a WebSphere MQ queue manager.
- Prepare the environment.
About this task
Complete the following steps to create an FTEInput node message flow
using the default settings. The task includes some optional steps
for additional configuration, but detailed information about configuring
the FTEInput node is given
on the property panels for the node, in the IBM Integration Toolkit.
Procedure
- Drag an FTEInput node
onto a message flow and wire its Out terminal to an output node of
your choice.
- Optional: To process only a defined subset
of files sent to an agent, configure the Basic panel.
This action allows multiple
FTEInput nodes in the same
integration server to receive specific files, depending on the directory
or file filters specified.
You can also specify whether, after
processing, the file should be left in its directory, renamed, or
deleted.
- To change how the node handles a message flow failure,
configure the Retry panel.
- Optional: To change how records are identified
in the input file, configure the Record
detection property on the Records and Elements panel.
For example, you might want to specify that a record is fixed
length, and set the record length.
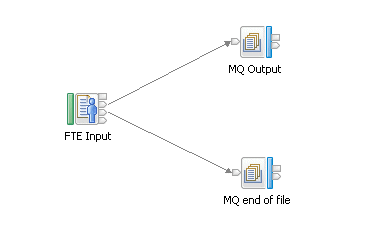
- If you set the Record
detection property to anything other than Whole File, drag an additional
output node to the flow, such as the MQOutput node. Wire the End
of Data terminal on the FTEInput node
to the In terminal of the MQOutput node,
as shown in the following figure: The node connected to the End of Data terminal receives an
empty message when the last record in the file is read.
- Optional: To process the file based on details
of the transfer, place a node such as the Route node after the FTEInput node.
Details
of the transfer are stored in the local environment, at LocalEnvironment.FTE.
- Add the flow to a BAR file
and deploy the BAR file.
- Optional: Change the coordination
queue manager; see Preparing the environment for WebSphere MQ File Transfer Edition nodes.
The
queue manager for the integration node is the default coordination
queue manager. The default might be adequate for testing; for production,
consider changing it. A warning is written to the log if the coordination
queue manager is not changed from the default.
