About this task
Lifecycles contain ordered lists of phases, and each phase represents the stages of work on the release applications. You can customize the phases in a lifecycle to match how your applications move from the beginning to the end of the release cycle. In this way, the lifecycle is a template for the work in a release. When you create a release, you must select a lifecycle for it before you can assign release environments to the lifecycle phases.
Each lifecycle phase can have a gate. The gate contains requirements that must be met before an application can move to the next phase. You define quality statuses to include in the gates. See Creating and assigning quality statuses.
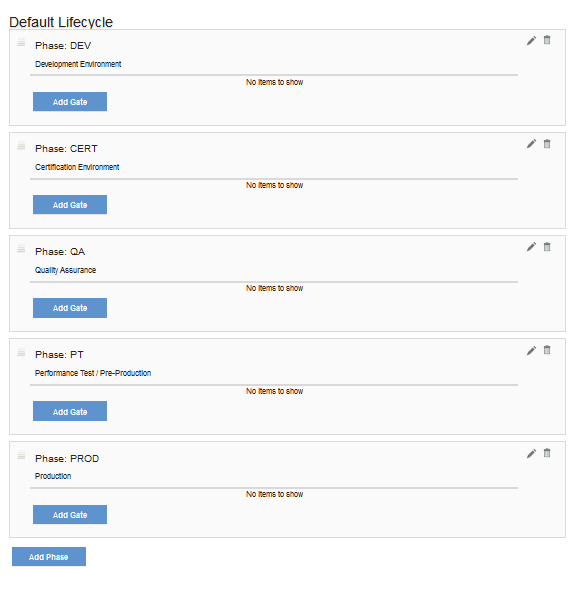
The following figure shows the default lifecycle, which has five phases, including a development phase, testing and certification phases, and a production phase. By default, this lifecycle has no gates, but you can add gates manually.
If the default lifecycle does not accommodate your release process, you can modify it or create one.
Procedure
- From the Homepage, click Release Process.
- On the Lifecycles tab, click Add New .
- In the Add New dialog box, specify a name for the lifecycle. The name can include letters, numbers, spaces, and special characters.
- Optional: Enter a description for the lifecycle.
- Optional: To derive the lifecycle from another lifecycle, select the original lifecycle in the Derived From list. A derived lifecycle initially contains the same phases as the original lifecycle. If the original lifecycle changes, then the derived lifecycles are marked as non-compliant and you must update the derived lifecycles to match the original lifecycle.
- Optional: From the Process Checklist Template list, select a process checklist template to use with the lifecycle. The process checklist template contains milestones that you define. If you do not want to apply a process checklist template to the lifecycle, you can still apply it to an individual release. See Creating process checklist templates.
- Click Save.
- In the list of lifecycles, click the new lifecycle to display it.
- Add one or more phases to the lifecycle by clicking Add Phase.
- Order the phases by clicking and dragging them into position in the list.
- Optional: Add a gate to a phase by clicking Add Gate and selecting each quality status to include in the gate.