Defining transactions for profiles
Define transactions that you want to associate with applications and profiles for monitoring.
In the Application Management Configuration Editor, a transaction represents the monitored business exchange from the perspective of the end user. A transaction might occur between a workstation and a program, between two workstations, or between two programs. You can define transactions to specify what to monitor, and then group these transactions into applications, and reuse these definitions in one or more profiles. There are two types of transactions: real end-user and robotic. See Application Management Configuration Editor terminology for definitions of these and other terms used in the Application Management Configuration Editor.
Before you begin
- Determining the transaction name: By default, this is the name by which data is reported in the Application Management Console. The transaction name is limited to 128 characters when it is displayed in the Application Management Configuration Editor.
- Determining the type of monitoring agent: See the Best Practices chapter of the Administrator's Guide for information about choosing the right monitoring agent to use.
- Robotic scripts: If you are defining robotic transactions, you might need to create and upload robotic scripts. See Working with the Multi File Uploader for more information about creating and uploading robotic scripts for use with robotic transactions.
Procedure: Creating real end-user transactions
- Access the Applications view, if you have not already done so (see Procedure: Accessing the Applications view).
- To create a new transaction for a selected application, take any
of the following actions from the Applications navigation view:
- Right-click the application name in the list, and select Create New Transaction from the list of available options.
- Click the application name in the list, and then click the
 icon to the left of the view selection field.
 - If the selected application already has one or more transactions
defined, you can click the
 icon next to
the application name and expand the node tree to display the associated
transactions, grouped by agent type. Within this expanded node tree
under the selected application, you can do any of the following options:
icon next to
the application name and expand the node tree to display the associated
transactions, grouped by agent type. Within this expanded node tree
under the selected application, you can do any of the following options:- Right-click the agent type and select Create New Transaction.
- Expand the agent type node, right-click the
 icon next to an existing transaction name, and select Create
New Transaction or Create Another Transaction (which limits
the new transaction to the same agent and transaction type as the
selected transaction) from the available list of options.
icon next to an existing transaction name, and select Create
New Transaction or Create Another Transaction (which limits
the new transaction to the same agent and transaction type as the
selected transaction) from the available list of options.
The Create Transaction window is displayed, similar to the following example:
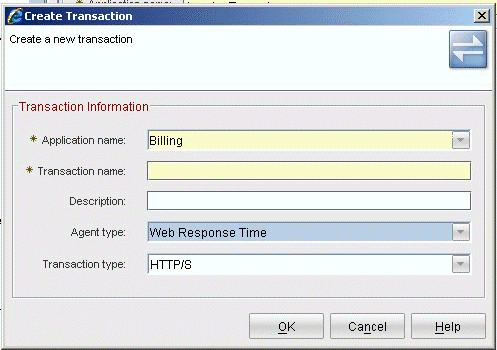
- In the Application Name field, click
 and select the application that you want to monitor. You
also can type in the name of a new application that you want to define
(see Defining applications for profiles for more information
about defining applications).
and select the application that you want to monitor. You
also can type in the name of a new application that you want to define
(see Defining applications for profiles for more information
about defining applications). - In the Transaction Name field, type a meaningful name to
identify this transaction. The name you select identifies this transaction
in workspaces.
The name of a transaction must be unique within an application. Transactions created under different applications can have the same name.
- Optional: In the Description field, type a meaningful description to further describe the transaction.
- In the Agent Type field, click and select the monitoring agent to monitor this transaction.
Choose one of the following agents:
- Transaction Tracking
- Web Response Time
You should select Robotic Response Time only if you are creating a transaction based on CLI scripts. See Procedure: Creating transactions based on CLI scripts for more information about defining CLI transactions.
- In the Transaction Type field, click and select the type of transaction that you want to monitor.
Depending on the type of agent you selected, you can choose from the
following types of transactions:
- Transaction Tracking
- .NET
ARM
ARM (DB2®)
ARM (Siebel Application Server)
ARM (WebSphere® Apache IHS IIS Plugin)
ARM (WebSphere - EJB)
ARM (WebSphere - JCA)
ARM (WebSphere - JDBC)
ARM (WebSphere - JMS)
ARM (WebSphere - JNDI)
ARM (WebSphere - Web Services Providers)
ARM (WebSphere)
CICS®
CICS TG
DB2 via CICS/IMS
IMS™
IMS Connect
ITCAM for WebSphere/J2EE
Optim™ (DB2)
Other
Tuxedo
WebSphere Message Broker
WebSphere MQ
- Web Response Time
- HTTP/S
- Click OK. A configuration window is displayed, similar
to the following example:
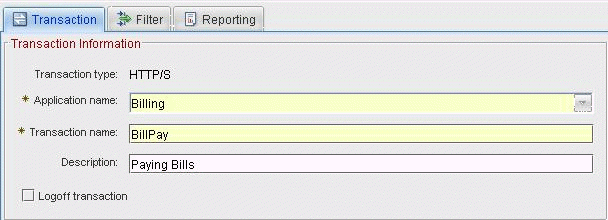 The Transaction tab is displayed by default, and contains the names of the selected application and transaction, along with optional descriptive text. The Transaction Information section includes the following information:
- The Transaction type is displayed and cannot be modified.
- You can optionally click in the Application
name field and select a different application name. You also can
type in the name of a new application that you want to define (see Defining applications for profiles for more information about defining
applications).
- You can optionally type over the name in the Transaction name field to change it to another preferred name.
- You can optionally modify the descriptive text to further define the application and associated transaction.
- The Logoff transaction check box is displayed only for Web Response Time agent transactions. It signifies whether the transaction is a logoff transaction. When such a transaction is encountered during an active session, the logoff transaction effectively ends the session. Use this check box to differentiate between a session that ends in a logout and a session that times out from lack of user activity.
- Click the Filter tab to configure filters for this transaction.
See Using filters for more information about
using this tab.Note: If you create a transaction and do not configure any filters, no monitoring data is collected.
- Click the Reporting tab to define how you want to name
the collected data that is displayed in workspaces. See Defining reporting rules for more information
about using this tab.Tip: You can change these settings when you set up the profile.
- Click Apply to save your changes and continue using the Application Management Configuration Editor.
- When you are finished, click OK to close the Application Management Configuration Editor.
Procedure: Creating transactions based on CLI scripts
The Application Management Configuration Editor supports transactions that are based on either robotic scripts or Command Line Interface (CLI) scripts to be monitored by the Robotic Response Time monitoring agent.
Robotic scripts: Robotic scripts for Rational Performance Tester, Rational Functional Tester, Rational® Robot, and Mercury LoadRunner are automatically created and defined as transactions when you upload them to the Application Management Console, and you can add these robotic transactions to a profile without any further definition. You can optionally modify these transactions by changing default properties, such as the application name, but this is not required.
CLI scripts: Before you can create transactions based on CLI scripts, you must create and upload the CLI scripts, because the transaction definition includes the CLI command that runs the script. To see a list of all the available CLI scripts, look at the Robotic Response Time workspace.
- Access the Applications view, if you have not already done so (see Procedure: Accessing the Applications view).
- To create a new CLI transaction for a selected application, do
any of the following options from the Applications navigation view:
- Right-click the application name in the list, and select Create New Transaction from the list of available options.
- Click the application name in the list, and then click the icon to the left of the view selection field.
- If the selected application already has one or more transactions
defined, you can click the icon next to
the application name and expand the node tree to display the associated
transactions, grouped by agent type. Within this expanded node tree
under the selected application, you can do any of the following options:
- Right-click the agent type and select Create New Transaction.
- Expand the agent type node, right-click the icon next to an existing transaction name, and select Create
New Transaction or Create Another Transaction (which limits
the new transaction to the same agent and transaction type as the
selected transaction) from the available list of options.
The Create Transaction window is displayed, similar to the following example:
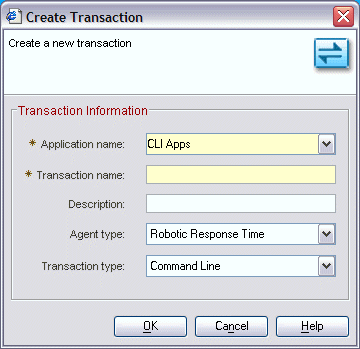
- In the Application Name field, the name of the selected
application is already displayed. You can optionally click and select a different application name. You also can type
in the name of a new application that you want to define (see Defining applications for profiles for more information about defining
applications).
- In the Transaction Name field, type a meaningful name to identify this transaction. The name you select identifies this transaction in workspaces.
- Optional: In the Description field, type a meaningful description to further describe the transaction.
- In the Agent Type field, click and select the Robotic Response Time monitoring
agent to monitor this transaction.
You should select one of the other agent types only if you are creating a real end-user transaction. See Procedure: Creating real end-user transactions for more information about defining real end-user transactions.
- Accept the only available selection in the Transaction Type field, which is Command Line.
- Click OK. A configuration window is displayed, similar
to the following example:
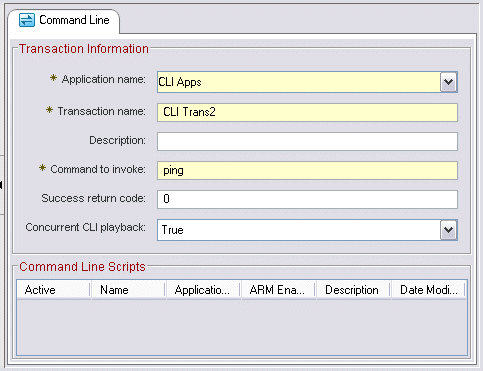
- Modify the information in these fields for the transaction as
needed. The following list describes each field:
- Application name
- Specifies the name that you assigned to this application. See Defining applications for profiles for more information about applications.
- Transaction name
- Specifies the name of a transaction that you want to monitor.
- Description
- Optional: Provides more descriptive detail about the application and transaction.
- Command to invoke
- Specifies the command that either runs an uploaded script or runs
a command on the system. Uploading a script does not tell the software
how to run the script. For example the uploaded script might be exractme.zip,
and the command to run the script is runme.bat. The Command
to invoke field tells the software how to run the script and what
to run.
- To run an uploaded script, type the command and options that run the script.
- To run a command, type the command and any options that you want to run. Provide the full path name to the command if it is not in the SYSTEM PATH. For example: c:\<directory_name>\wget http://www.ibm.com
- Success Return Code (CLI only)
- Specifies the expected completion code to be returned by the CLI command. The default expected return code for most executable commands and scripts is 0. A script might exit with an unexpected return code to indicate that an error occurred. If the command returns a value that does not match the expected return code value, then the monitor fails the transaction and sends an Expected Return Code failure event if one is defined for the monitor.
- Concurrent CLI Playback
- Specifies if several instances of the same command can be run concurrently. Valid values are True or False. If concurrent playback causes performance or other problems, set this option to False. If you select False, all non-concurrent CLI commands are queued and run sequentially. All concurrent CLI commands are run simultaneously and are not affected by non-concurrent CLI commands.
- Command Line Scripts
- This section of the display shows a list of all CLI scripts that have been uploaded with Multi File Uploader. To run a script, select the script that corresponds to the command that you specified in the Command to invoke field. You can choose only one script for the transaction.
- Click Apply to save your changes and continue using the Application Management Configuration Editor.
- When you are finished, click OK to close the Application Management Configuration Editor.
Procedure: Modifying an existing transaction
- Access the Applications view, if you have not already done so (see Procedure: Accessing the Applications view).
- Click and expand the list of applications until you display
the one associated with the transaction you want to modify.
- Click the transaction that you want to edit. The tabbed window
for the selected application is displayed. The actual contents of
the window depend on the type of agent associated with the transaction.
- For a Transaction Tracking transaction:
The tabbed window for the selected application is displayed, similar to the following example:
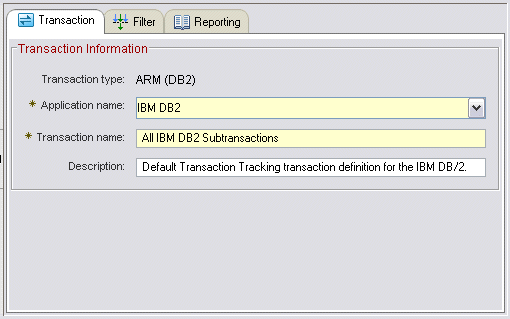 The Transaction tab is displayed by default, and contains the names of the selected application and transaction, along with optional descriptive text. The Transaction Information section includes the following information:
- The Transaction type is displayed and cannot be modified.
- You can optionally click in the Application
name field and select a different application name. You also can
type in the name of a new application that you want to define (see Defining applications for profiles for more information about defining
applications).
- You can optionally type over the name in the Transaction name field to change it to another preferred name.
- You can optionally modify the descriptive text to further define the application and associated transaction.
Click the Filter tab to configure filters for this transaction. See Using filters for more information about using this tab.Note: If you create a transaction and do not configure any filters, no monitoring data is collected.Click the Reporting tab to define how you want to name the collected data that is displayed in workspaces. See Defining reporting rules for more information about using this tab.Tip: You can change these settings when you set up the profile. - For a Web Response Time transaction:
The tabbed window for the selected application is displayed, similar to the following example:
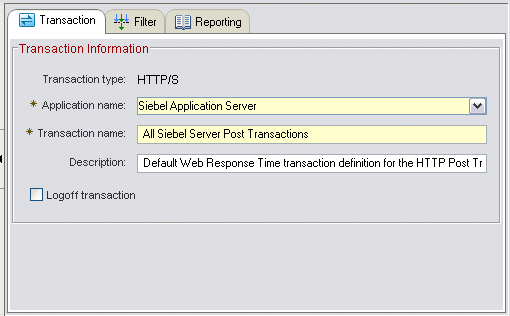 The Transaction tab is displayed by default, and contains the names of the selected application and transaction, along with optional descriptive text. The Transaction Information section includes the following information:
- The Transaction type is displayed as HTTP/S and cannot be modified.
- You can optionally click in the Application
name field and select a different application name. You also can
type in the name of a new application that you want to define (see Defining applications for profiles for more information about defining
applications).
- You can optionally type over the name in the Transaction name field to change it to another preferred name.
- You can optionally modify the descriptive text to further define the application and associated transaction.
- The Logoff transaction check box is displayed only for Web Response Time agent transactions. It signifies whether the transaction is a logoff transaction. When such a transaction is encountered during an active session, the logoff transaction effectively ends the session. Use this check box to differentiate between a session that ends in a logout and a session that times out from lack of user activity.
Click the Filter tab to configure filters for this transaction. See Using filters for more information about using this tab.Note: If you create a transaction and do not configure any filters, no monitoring data is collected.Click the Reporting tab to define how you want to name the collected data that is displayed in workspaces. See Defining reporting rules for more information about using this tab.Tip: You can change these settings when you set up the profile. - For a Robotic Response Time robotic
script transaction:
The tabbed window for the selected application is displayed, similar to the following example:
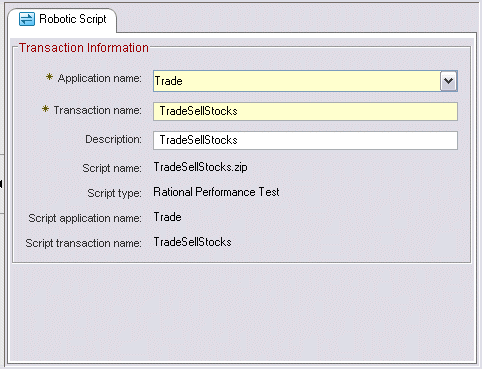 The Robotic Script tab is displayed, and contains the names of the selected application and transaction, along with optional descriptive text, and information about the robotic script. The Transaction Information section includes the following information:
- You can optionally click in the Application
name field and select a different application name. You also can
type in the name of a new application that you want to define (see Defining applications for profiles for more information about defining
applications).
- You can optionally type over the name in the Transaction name field to change it to another preferred name.
- You can optionally modify the descriptive text to further define the application and associated transaction.
- The Script name specifies the name of the script that you want to run to collect monitoring data for this application. This is a script previously uploaded to the Application Management Console. Whenever you upload a robotic script, the software implicitly defines it and associates with a previously undefined application. You cannot change this property. it is applied when the script is uploaded.
- The Script type specifies what software created the script, such as Rational Performance Tester, Rational Functional Tester, Mercury LoadRunner, etc. You cannot change this property. It is applied when the script is uploaded.
- The Script application name specifies the name of the application.
- The Script transaction name specifies the name of the transaction.
- You can optionally click
- For a Robotic Response Time robotic
transaction for a CLI script:
The tabbed window for the selected application is displayed, similar to the following example:
The Robotic Script tab is displayed, and contains the names of the selected application and transaction, along with optional descriptive text, and information about the robotic script. The Transaction Information section includes the following information:- You can optionally click in the Application
name field and select a different application name. You also can
type in the name of a new application that you want to define (see Defining applications for profiles for more information about defining
applications).
- You can optionally type over the name in the Transaction name field to change it to another preferred name.
- You can optionally modify the descriptive text to further define the application and associated transaction.
- The Command to invoke field specifies the command that
either runs an uploaded script or runs a command on the system.
Uploading a script does not tell the software how to run the script.
For example the uploaded script might be exractme.zip,
and the command to run the script is runme.bat. The Command
to invoke field tells the software how to run the script and what
to run.
- To run an uploaded script, type the command and options that run the script.
- To run a command, type the command and any options that you want to run. Provide the full path name to the command if it is not in the SYSTEM PATH. For example: c:\<directory_name>\wget http://www.ibm.com
- The Success Return Code field specifies the expected completion code to be returned by the CLI command. The default expected return code for most executable commands and scripts is 0. A script might exit with an unexpected return code to indicate that an error occurred. If the command returns a value that does not match the expected return code value, then the monitor fails the transaction and sends an Expected Return Code failure event if one is defined for the monitor.
- The Concurrent CLI Playback field specifies if several instances of the same command can be run concurrently. Valid values are True or False. If concurrent playback causes performance or other problems, set this option to False. If you select False, all non-concurrent CLI commands are queued and run sequentially. All concurrent CLI commands are run simultaneously and are not affected by non-concurrent CLI commands.
The Command Line Scripts section of the display shows a list of all CLI scripts that have been uploaded with Multi File Uploader. To run a script, select the script that corresponds to the command that you specified in the Command to invoke field. You can choose only one script for the transaction.
- You can optionally click
- For a Transaction Tracking transaction:
- Click Apply to save your changes and continue using the Application Management Configuration Editor.
- When you are finished, click OK to close the Application Management Configuration Editor.
Procedure: Deleting an existing transaction
Use this procedure to delete an existing transaction from the Application Management Configuration Editor.
- Access the Applications view, if you have not already done so (see Procedure: Accessing the Applications view).
- Click and expand the list of applications until you display
the one associated with the transaction you want to modify.
- To delete an existing transaction, do either of the following
steps:
- Right-click the transaction name in the list, and select Delete Transaction from the list of available options.
- Click the transaction name in the list, and then click the
 icon to the left of the view selection field.
- Confirm your intention by clicking Yes when prompted. The
selected transaction is deleted from the list.Note: When you delete a Robotic transaction, the corresponding Robotic script file is removed from the depot.
- Click Apply to continue using the Application Management Configuration Editor.
- When you are finished, click OK to close the Application Management Configuration Editor.
Follow-up or related tasks
The application and its associated transactions are listed in the Application view of the Application Management Configuration Editor. It is now available to be associated with profiles.
- Define transaction filters that further refine what data is collected. See Using filters
- Define a profile to determine what agents monitor the transactions. See Defining profiles.