Defining applications for profiles
This section describes how to define applications that you want to monitor, so you can later assign transactions and logically group them for distribution and scheduling with profiles.
In the Application Management Configuration Editor, an application is considered as a group of transactions that represents a business application. See Application Management Configuration Editor terminology for definitions of these and other terms used in the Application Management Configuration Editor.
A single application might have transactions that are monitored by different monitoring agents. For example, both Robotic Response Time and Web Response Time might monitor the same transaction on the Websphere Application Server to collect performance data for assessing the health of e-business components and configurations. Web Response Time monitors how real users experience the application, while Robotic Response Time helps you try robotic scenarios that simulate customer transactions. Together, these agents help you measure how users experience websites and applications under different conditions and at different times.
The application is the highest level reporting group in the Tivoli Enterprise Portal and the Application Management Console. All transaction data is aggregated into the application. You can create situations to alert you to problems at the application level, and view application trends in the Application Management Console.
You can define applications at any time, but you might find it most convenient to define a new application whenever you deploy a new application to monitor, or when you choose to monitor an existing application for the first time.
Before you begin
- Determining the application name: By default, this is the
name by which data is reported in the Application Management Console. The application
name is limited to 128 characters when it is displayed in the Application Management Configuration Editor.
When reporting data is displayed in the Application Management Console in the Tivoli Enterprise Portal, the combined length of the application name and the host name where Application Management Console is located cannot exceed 26 characters, otherwise the application name is truncated. For example, suppose you have an application named WebSpherePlants, and the host name is EastCoastNY1234. In this case the application name is displayed in the Navigator view of the Tivoli Enterprise Portal as WebSpherePl. You can minimize this truncation effect by locating the Application Management Console on a system with a short host name.
If you define an application name and change it later, after monitoring data has been collected, the name change applies only to new data.
- Determining the type of monitoring agent: See the Best Practices chapter of the Administrator's Guide for information about choosing the right monitoring agent to use.
Procedure: Accessing the Applications view
- Access the Tivoli Enterprise Portal.
- Click
 in the toolbar.
Previously defined applications, transactions, clients, and profiles are retrieved from the repository and loaded into the Application Management Configuration Editor. The Application Management Configuration Editor is displayed in a separate window.
- By default, the list of all previously defined applications is
displayed when the Application Management Configuration Editor is first
opened. If needed, click
 and select Applications to
display the list of applications in the navigation view.
Procedure: Creating a new application
- Access the Applications view, if you have not already done so (see Procedure: Accessing the Applications view).
- To create a new application, do any of the following from the
Applications navigation view:
- If the top Applications node is highlighted, do either
of the following:
- Right-click the
 icon next to the top Application node
and select Create New Application.
 - Click the
 icon to the left of the view selection
field and select Create New Application.
- Right-click the
- If one of the application names in the list is highlighted, do
either of the following:
- Right-click the
 icon to the left of
any application name in the list and select Create Another Application.
 - Click the
 icon to the left of the view selection
field and select Create Another Application.
- Right-click the
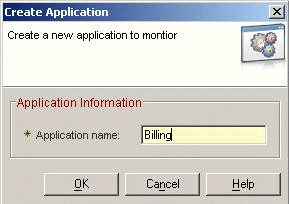
The Create Application window is displayed, similar to the following example:

- If the top Applications node is highlighted, do either
of the following:
- In the Application name field, type the name of the application to be created.
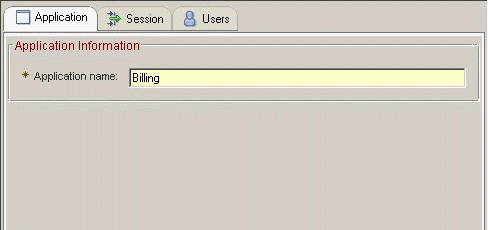
- Click OK. A configuration window is displayed, similar
to the following example:

The Application tab is displayed by default, and contains the name of the selected application. You can optionally type over this name in the Application name field to change it to another preferred name.
The Session and Users tabs are used to configure user and session tracking to monitor transactions associated with specific users. See Monitoring unique users and sessions for Web Response Time for more information about configuring monitoring for user and session tracking.
- Click Apply to save your changes and continue using the Application Management Configuration Editor.
- When you are finished, click OK to close the Application Management Configuration Editor.
Procedure: Modifying an existing application
- Access the Applications view, if you have not already done so (see Procedure: Accessing the Applications view).
- To modify an existing application, click the application name
in the list. The tabbed window for the selected application is displayed,
similar to the following example:

The Application tab is displayed by default, and contains the name of the selected application. You can type over this name in the Application name field to change it to another preferred name.
The Session and Users tabs are used to configure user and session tracking to monitor transactions associated with specific users. See Monitoring unique users and sessions for Web Response Time for more information about configuring monitoring for user and session tracking.
- Click Apply to save your changes and continue using the Application Management Configuration Editor.
- If the selected application already has associated transactions
and profiles defined, you can click the
 icon next to
the application name and expand the node tree to select transactions
and profiles as needed. See Defining transactions for profiles and Defining profiles for more information about creating
and modifying transactions and profiles.
 - When you are finished, click OK to close the Application Management Configuration Editor.
Procedure: Deleting an existing application
- Access the Applications view, if you have not already done so (see Procedure: Accessing the Applications view).
- To delete an existing application, do either of the following
steps:
- Right-click the application name in the list, and select Delete Application from the list of available options.
- Click the application name in the list, and then click the
 icon to the left of the view selection field.
- Confirm your intention by clicking Yes when prompted. The selected application is deleted from the list.
- Click Apply to continue using the Application Management Configuration Editor.
- When you are finished, click OK to close the Application Management Configuration Editor.
Follow-up or related tasks
- Create transactions for the selected application. See Defining transactions for profiles.
- Configure monitoring for tracking unique users and sessions. See Monitoring unique users and sessions for Web Response Time.