Monitoring unique users and sessions for Web Response Time
You might need to identify the unique user name associated with a client that is experiencing performance or availability problems, to help isolate the problem and resolve it quickly for that user. You might also need to track the HTTP or HTTPS sessions used by a particular user, so you can see how many sessions there are, and, when a session is experiencing performance or availability problems, assess the impact and address any issues for a particular user. The Application Management Configuration Editor provides unique user and session tracking capabilities that you can use instead of relying on IP addresses and host names to try to locate user-specific Web Response Time transaction data.
- HTTP form post data
- An HTTP header
- A query string property that identifies the user
- An XML tag
- Basic authorization
- An HTTP cookie
- An HTTP header
- An HTTP query string entry
- An XML tag
- You can specify whether to include or exclude a filter match on a user or session type.
- You can specify a particular value for a user to be tracked.
- You can specify conditions by which instance data is stored for
the transaction. User filters are applied in the following order of
precedence:
- Always: Always collect session instance data for the user (this is the default).
- On Failure: Collect instance data for this session only if at least one of the instances is an availability failure.
- On Slow: Collect instance data for this session only if at least one of the instances has a response time greater than the minimum response time threshold. This filter also accounts for failed sessions.
- Never: Never collect session instance data for this user.
Case matching is insensitive for user filters.
- You can define and display the application name.
- You can enable or disable user or session tracking.
- You can set a session timeout value per monitored application, after which any session tracking information is discarded.
- For the Siebel Application Server application provided with the product, default values are provided for tracking sessions on Siebel servers.
- For the web Applications application provided with the product, standard session tracking values are provided for WebSphere-based user and session tracking.
Configuring the application name
From the default Applications view in the Application Management Configuration Editor, you can click the name of an application in the panel on the left to display the Application tab.
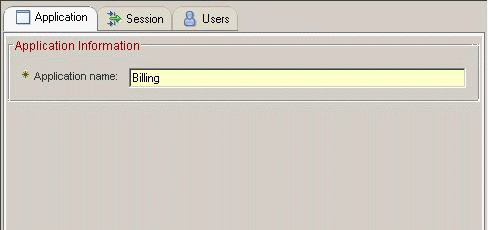
You can edit the Application name field and change the name if needed. When you click Apply, the new name of the application is displayed in the list of applications in the left panel.
Configuring for session tracking
From the default Applications view in the Application Management Configuration Editor, click the name of an application in the panel on the left, and then click the Session tab to display the Session Identification configuration dialog box.
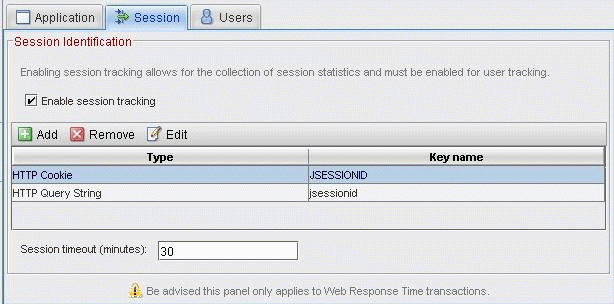
- Enable or disable session tracking
- Add one or more types of session tracking to the table.
- Remove one or more types of session tracking from the table.
- Edit entries in the table to change the type of session tracking or the key name of a selected session tracking type.
- Specify a session timeout, in minutes.
Procedure: Enabling and disabling session tracking
To enable session tracking for the types of sessions that you have defined in the table, select the Enable session tracking check box. If this check box is not selected, you cannot add, remove, or edit entries in the table. Session tracking must also be enabled to perform user tracking.
To disable session and user tracking for all defined session types, clear the Enable session tracking check box.
- Click Apply to save your changes and return to the Application tab.
- Click OK to save your changes and exit the Application Management Configuration Editor.
- Click Cancel to cancel your changes and exit the Application Management Configuration Editor.
- Click Help to open the online help for Application Management Configuration Editor.
Procedure: Adding session types
- Verify that the Enable session tracking check box is selected.
- Click Add. The Session Identification dialog box opens in a separate window.
- Click
 in the Type field and select one of the
following session types to monitor:
in the Type field and select one of the
following session types to monitor:- HTTP Cookie
- HTTP Header
- HTTP Query String
- XML Post
- In the Key name field, type the value for the selected session type to be tracked.
- Do one of the following actions:
- Click OK to add the session type to the table.
- Click Cancel to cancel the add operation and return to the Session tab.
- Click Help to open the online help for Application Management Configuration Editor.
You are returned to the Session tab in the Application Management Configuration Editor. The selected session type and specified key name is added to the table.
- Click Apply to save your changes and return to the Application tab.
- Click OK to save your changes and exit the Application Management Configuration Editor.
- Click Cancel to cancel your changes and exit the Application Management Configuration Editor.
- Click Help to open the online help for Application Management Configuration Editor.
Procedure: Removing session types
- Verify that the Enable session tracking check box is selected.
- In the table, highlight the entry to be removed.
- Click Remove. The highlighted entry is immediately removed from the table.
- Click Apply to save your changes and return to the Application tab.
- Click OK to save your changes and exit the Application Management Configuration Editor.
- Click Cancel to cancel your changes and exit the Application Management Configuration Editor.
- Click Help to open the online help for Application Management Configuration Editor.
Procedure: Editing session types
- Verify that the Enable session tracking check box is selected.
- In the table, highlight the entry to be edited.
- Click Edit. The Session Identification dialog box opens in a separate window.
- Change the type of session by clicking
 in the Type field and select one of the following
session types to monitor:
in the Type field and select one of the following
session types to monitor:- HTTP Cookie
- HTTP Header
- HTTP Query String
- XML Post
- In the Key name field, type the value for the selected session type to be tracked.
- Do one of the following actions:
- Click OK to complete the edit.
- Click Cancel to cancel the edit and return to the Session tab.
- Click Help to open the online help for Application Management Configuration Editor.
- Click Apply to save your changes and return to the Application tab.
- Click OK to save your changes and exit the Application Management Configuration Editor.
- Click Cancel to cancel your changes and exit the Application Management Configuration Editor.
- Click Help to open the online help for Application Management Configuration Editor.
Procedure: Specifying a session timeout
- Verify that the Enable session tracking check box is selected.
- In the Session timeout (minutes) field below the table, enter a number between 0 and 2147483647.
- Click Apply to save your changes and return to the Application tab.
- Click OK to save your changes and exit the Application Management Configuration Editor.
- Click Cancel to cancel your changes and exit the Application Management Configuration Editor.
- Click Help to open the online help for Application Management Configuration Editor.
Configuring for user tracking
From the default Applications view in the Application Management Configuration Editor, click the name of an application in the panel on the left, and then click the Users tab to display the User Identification and Unique User Information configuration dialog boxes.
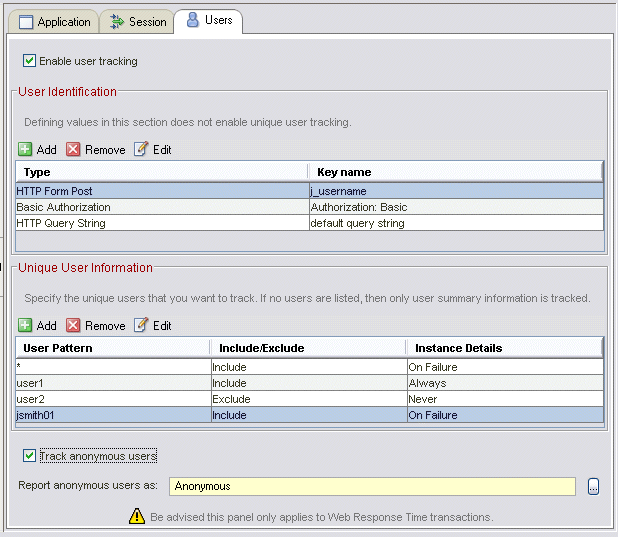
Before you can perform any tasks in the Users tab, you must first enable session tracking in the Session tab. See Procedure: Enabling and disabling session tracking for more information.
- Enable or disable user tracking.
- Add one or more types of user tracking to the table.
- Add one or more user filters to the table.
- Specify an anonymous user name to track sessions that do not already have an associated user name.
- Remove one or more types of user tracking from the table.
- Remove one or more user filters from the table.
- Edit entries in the table to change the type of user tracking or the key name of a selected user tracking type.
- Edit entries in the table to change the user filtering.
Procedure: Enabling and disabling user tracking
To enable user tracking for the users that you have defined in the table, select the Enable user tracking check box. If this check box is not selected, you cannot add, remove, or edit entries in the tables. Note that Session tracking must also be enabled on the Sessions tab before you can configure user tracking.
To disable user tracking for all defined user types, clear the Enable user tracking check box.
- Click Apply to save your changes and return to the Application tab.
- Click OK to save your changes and exit the Application Management Configuration Editor.
- Click Cancel to cancel your changes and exit the Application Management Configuration Editor.
- Click Help to open the online help for Application Management Configuration Editor.
Procedure: Adding user types
- In the Sessions tab, verify that the Enable session tracking check box is selected.
- Verify that the Enable user tracking check box is selected.
- In the User Identification section of the Users tab, click Add. The User Identification dialog box opens in a separate window.
- Click
 in the Type field and select one of the
following user types to monitor:
in the Type field and select one of the
following user types to monitor:- HTTP Form Post
- HTTP Header
- HTTP Query String
- XML Post
- Basic Authorization
- In the Key name field, type the value for the selected user type to be tracked.
- Do one of the following actions:
- Click OK to add the user type to the table.
You are returned to the User tab in the Application Management Configuration Editor. The selected user type and specified key name is added to the table.
- Click Cancel to cancel the add operation and return to the User tab.
- Click Help to open the online help for Application Management Configuration Editor.
- Click OK to add the user type to the table.
- Click Apply to save your changes and return to the Application tab.
- Click OK to save your changes and exit the Application Management Configuration Editor.
- Click Cancel to cancel your changes and exit the Application Management Configuration Editor.
- Click Help to open the online help for Application Management Configuration Editor.
Procedure: Adding user filters
- In the Sessions tab, verify that the Enable session tracking check box is selected.
- In the Users tab, verify that the Enable user tracking check box is selected.
- In the Unique User Information section of the Users tab, click Add. The User Filter dialog box opens in a separate window.
- In the User Pattern field, type the user name or string pattern
to filtered. Matching is supported at the following levels:
- Exact (value)
- StartsWith (value*)
- EndsWith (*value)
- Contains (*value*)
- Click
 in the Include/Exclude field and select
one of the following options:
in the Include/Exclude field and select
one of the following options:- Include: The user information must match the user pattern for the transaction instance data to be stored.
- Exclude: The user information must not match the user pattern for the transaction instance data to be stored.
- Click
 in the Instance Details field and select
one of the following options:
in the Instance Details field and select
one of the following options:- Always: Always collect instance data for this user.
- Never: Never collect instance data for this user.
- On Failure: Collect instance data for this session only if one or more instances is an availability failure.
- On Slow: Collect instance data for this session only if one or more instances have a response time greater than the minimum response time threshold. This filter also accounts for failed sessions.
- Do one of the following actions:
- Click OK to add the user filter information to the table.
You are returned to the User tab in the Application Management Configuration Editor. The selected user type and specified key name is added to the table.
- Click Cancel to cancel the add operation and return to the User tab.
- Click Help to open the online help for Application Management Configuration Editor.
- Click OK to add the user filter information to the table.
- Click Apply to save your changes and return to the Application tab.
- Click OK to save your changes and exit the Application Management Configuration Editor.
- Click Cancel to cancel your changes and exit the Application Management Configuration Editor.
- Click Help to open the online help for Application Management Configuration Editor.
Procedure: Configuring anonymous user tracking
You might want to track sessions for which a user name or ID is not yet associated. In this situation you can use the Users tab to specify a user name to use to signify anonymous user tracking.
- In the Sessions tab, verify that the Enable session tracking check box is selected.
- In the Users tab, verify that the Enable user tracking check box is selected.
- At the bottom of the Users tab, select the Track anonymous users check box.
- In the Report anonymous users as field, you can type a
string to represent the anonymous user name, such as Anonymous.
Optionally, you can click the ellipsis button
 to the right of the field to display an additional menu of
selections, similar to the following example, and choose from that
selection to customize the name reported for these transactions.
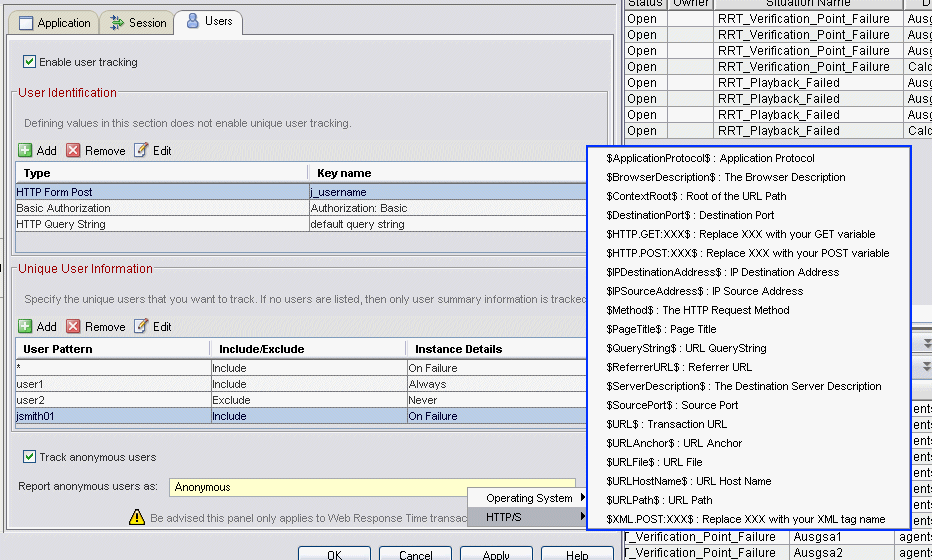
You can disable tracking sessions with this anonymous user name by clearing the Track anonymous users check box.
- Click Apply to save your changes and return to the Application tab.
- Click OK to save your changes and exit the Application Management Configuration Editor.
- Click Cancel to cancel your changes and exit the Application Management Configuration Editor.
- Click Help to open the online help for Application Management Configuration Editor.
Procedure: Removing user types
- In the Sessions tab, verify that the Enable session tracking check box is selected.
- Verify that the Enable user tracking check box is selected.
- In the User Identification table, highlight the entry to be removed.
- Click Remove. The highlighted entry is immediately removed from the table.
- Click Apply to save your changes and return to the Application tab.
- Click OK to save your changes and exit the Application Management Configuration Editor.
- Click Cancel to cancel your changes and exit the Application Management Configuration Editor.
- Click Help to open the online help for Application Management Configuration Editor.
Procedure: Removing user filters
- In the Sessions tab, verify that the Enable session tracking check box is selected.
- In the Users tab, verify that the Enable user tracking check box is selected.
- In the Unique User Information table, highlight the entry to be removed.
- Click Remove. The highlighted entry is immediately removed from the table.
- Click Apply to save your changes and return to the Application tab.
- Click OK to save your changes and exit the Application Management Configuration Editor.
- Click Cancel to cancel your changes and exit the Application Management Configuration Editor.
- Click Help to open the online help for Application Management Configuration Editor.
Procedure: Editing user types
- In the Sessions tab, verify that the Enable session tracking check box is selected.
- Verify that the Enable session tracking check box is selected.
- In the User Identification table, highlight the entry to be edited.
- Click Edit. The User Identification dialog box opens in a separate window.
- Change the type of user by clicking the down-arrow
 in the Type field and select one of the following
session types to monitor:
in the Type field and select one of the following
session types to monitor:- HTTP Form Post
- HTTP Header
- HTTP Query String
- XML Post
- Basic Authorization
- In the Key name field, type the value for the selected user type to be tracked.
- Do one of the following actions:
- Click OK to complete the edit.
- Click Cancel to cancel the edit and return to the User tab.
- Click Help to open the online help for Application Management Configuration Editor.
- Click Apply to save your changes and return to the Application tab.
- Click OK to save your changes and exit the Application Management Configuration Editor.
- Click Cancel to cancel your changes and exit the Application Management Configuration Editor.
- Click Help to open the online help for Application Management Configuration Editor.
Procedure: Editing user filters
- In the Sessions tab, verify that the Enable session tracking check box is selected.
- Verify that the Enable session tracking check box is selected.
- In the Unique User Information table, highlight the entry to be edited.
- Click Edit. The User Filter dialog box opens in a separate window.
- In the User Pattern field, verify or change the user name or string
pattern to filtered. Matching is supported at the following levels:
- Exact (value)
- StartsWith (value*)
- EndsWith (*value)
- Contains (*value*)
- Click
 in the Include/Exclude field and verify
the value or select one of the following options:
in the Include/Exclude field and verify
the value or select one of the following options:- Include: The user information must match the user pattern for the transaction instance data to be stored.
- Exclude: the user information must not match the user pattern for the transaction instance data to be stored.
- Click
 in the Instance Details field and verify
the value or select one of the following options:
in the Instance Details field and verify
the value or select one of the following options:- Always: Always collect instance data for this user.
- Never: Never collect instance data for this user.
- On Failure: Collect instance data for this session only if one or more instances is an availability failure.
- On Slow: Collect instance data for this session only if one or more instances have a response time greater than the minimum response time threshold. This filter also accounts for failed sessions.
- Do one of the following actions:
- Click OK to change the user filter information to the table.
You are returned to the User tab in the Application Management Configuration Editor. The modified user filter information is added to the table.
- Click Cancel to cancel the edit operation and return to the User tab.
- Click Help to open the online help for Application Management Configuration Editor.
- Click OK to change the user filter information to the table.
- Click Apply to save your changes and return to the Application tab.
- Click OK to save your changes and exit the Application Management Configuration Editor.
- Click Cancel to cancel your changes and exit the Application Management Configuration Editor.
- Click Help to open the online help for Application Management Configuration Editor.
Configuring a WebSEAL server for user and session tracking
When tracking HTTP or HTTPS transactions on a server that serves as a junction destination for a WebSEAL server, you must enable certain WebSEAL configuration options to track the WebSEAL user sessions. These options can be enabled through the TAM Web Portal Manager.
In the TAM Web Portal Manager, select the junction that serves the backend web server that you are monitoring. You should see options similar to those shown in the following example:
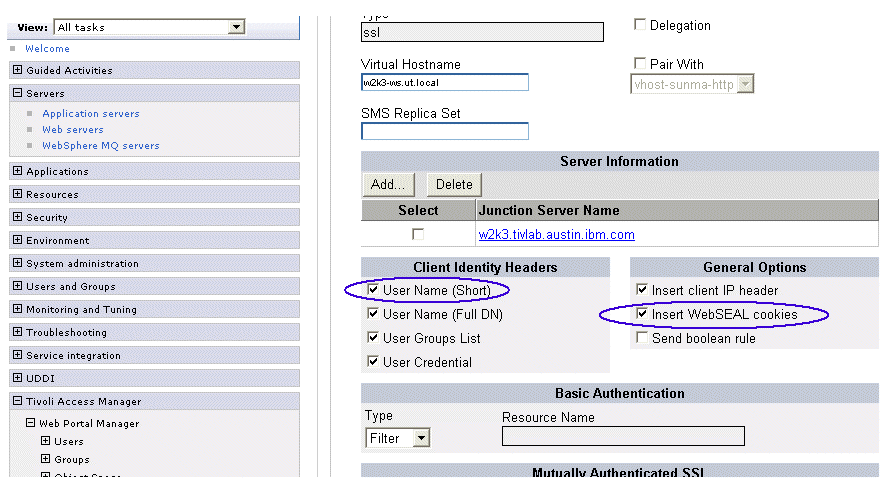
Enabling session tracking: To enable session tracking, select the Insert WebSEAL cookies check box. When this option is enabled, the PD-S-SESSION-ID cookie is forwarded to the backend server.
Enabling user tracking: To enable user tracking, select the User Name (Short) check box. When this option is enabled, the iv-user HTTP header is set to the user name of the TAM user that is logged in.