Procedure: Defining a new profile
Define profiles that specify which transactions you want to monitor, when you want to monitor them, and the location on which you want to monitor them.
Use this procedure to define a new profile:
- Access the Applications view, if you have not already done so (see Procedure: Accessing the Applications view).
- Click
 and select Profiles. The list of profiles
is displayed in a node tree, sorted by agent type.
and select Profiles. The list of profiles
is displayed in a node tree, sorted by agent type. - To create a new profile, do any of the following from the Profiles
navigation view:
- If the top Profiles node is highlighted, do either of the
following:
- Right-click the top Profile node and select Create New Profile.
- Click the
 icon to the left of the view
selection field above the top Profile node.
icon to the left of the view
selection field above the top Profile node.
- If one of the profile names in the node tree is highlighted, do
either of the following:
- Right-click the highlighted profile name and select Create Another Profile.
- Click the
 icon to the left of the
view selection field and select Create Another Profile.
icon to the left of the
view selection field and select Create Another Profile.
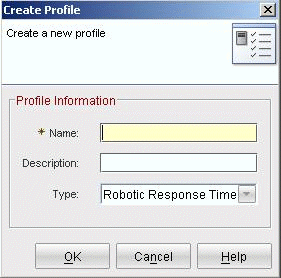
The Create Profile window is displayed, similar to the following example.
- If the top Profiles node is highlighted, do either of the
following:
- In the Name field, type the name of the profile to be created.
- (Optional) In the Description field, type a description of what this profile does to further identify it.
- In the Type field, click and select
the monitoring agent for this profile. You can select from the following
valid agent types:
- Robotic Response Time
- Transaction Tracking
- Web Response Time
- Click OK. A configuration window is displayed, similar
to the following example:
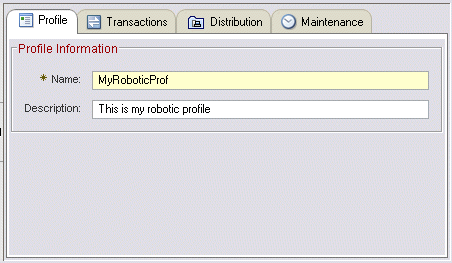
The Profile tab is displayed by default, and contains the name and optional description of the profile. You can optionally type over these fields to change them as needed.
- Create a distribution list for the profile. See Creating and using managed system and distribution lists.
The Session and Users tabs are used to configure user and session tracking to monitor transactions associated with specific users. See Monitoring unique users and sessions for Web Response Time for more information about configuring monitoring for user and session tracking.
- Click Apply. When you save the profile information, the
software distributes and enables the profile on the selected monitoring
agents.Note: Clicking OK saves any changes made, but closes the editor.