Creating components
You can use the Application Management Configuration Editor to create and manage components for TCP transaction traffic that you want to monitor.
You can use the Components feature of Application Management Configuration Editor to define the components and protocols to be monitored, and to provide a descriptive reporting name for all TCP traffic associated with a given components entry.
For example, you might define an entry for all traffic to servers 9.48.152.129 and 9.48.152.128 on port 82 and 445 to belong to the component named Production HTTP(S), and therefore should be monitored. Using the Create Component window in the Application Management Configuration Editor, you define your components similarly to how you define clients.
Procedure: Creating a component
- Access the Component view.
- Access the Tivoli Enterprise Portal.
- Click
 in the toolbar.
Previously defined applications, transactions, clients, profiles, and components are retrieved from the repository and loaded into the Application Management Configuration Editor. The Application Management Configuration Editor is displayed in a separate window.
- By default, the list of applications is displayed when the Application Management Configuration Editor is first
opened. Click
 and select Components to display the list
of predefined components in the navigation view.
and select Components to display the list
of predefined components in the navigation view.
- Create a new component.
- To create a new component, click
 .Note: The ability to create a new component by using an existing component as a template is not supported.
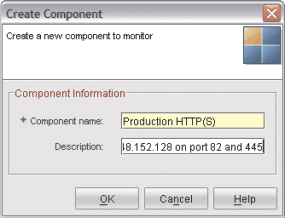
The Create Component window is displayed.
- To create a new component, click
- Define the new component.
- In the Component name field of the Create Component window, type the name of the new component.
- Optional: In the Description field, type the description text for the new component.
- Click OK. The Component tab
is displayed on the right pane of the Application Management Configuration Editor, similar
to the following example:
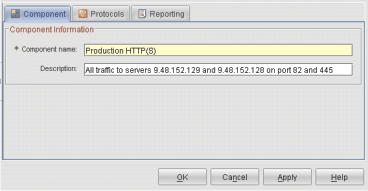
The name and optional description you provided for the new component are displayed in the Component Information section at the top. You can modify these fields by typing over the content if needed.
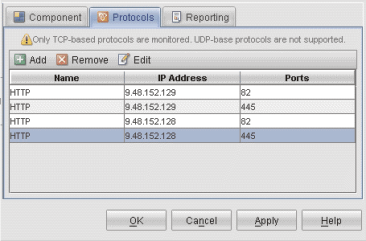
- Click the Protocols tab to display the protocol table for
the component. For a new component, this table is initially empty.
Click Add to add one or more protocol definitions to the component.
For more information about defining protocols, see Defining protocols.
In this example, the resulting protocols defined for this new component
might look similar to the following example:
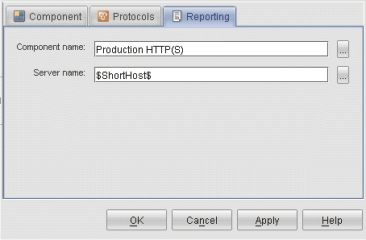
- Click the Reporting tab to display the reporting rules
that the software uses to name the collected data that is displayed
in the workspaces. The current reporting rules for the selected transaction
are displayed in the Reporting tab, similar to the following example:
 Click
Click to the right of each field to display an additional
menu of selections, similar to the following example, and choose from
that selection.
to the right of each field to display an additional
menu of selections, similar to the following example, and choose from
that selection.
This procedure for defining reporting rules for components is similar to the procedure for clients. For more information about defining reporting rules, see Defining reporting rules.
- Click Apply to save your changes and continue using the Application Management Configuration Editor.
- When you are finished, click OK to close the Application Management Configuration Editor.
Procedure: Defining protocols
- If you have not already done so, access the component for which you want to create a protocol. (See Procedure: Modifying an existing transaction)
- If you have not already done so, click the Protocols tab.
- Click
 . The Protocol window is displayed, similar to the following
example:
. The Protocol window is displayed, similar to the following
example: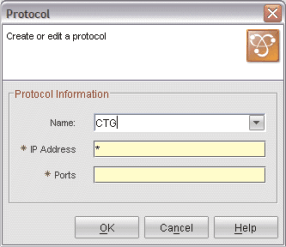
- By default, an existing protocol name is displayed in the Name field.
To select a different protocol, click in the Name field
and choose a protocol from the list of available protocols, or you
can type over the name in this field to create a new protocol name.
- In the IP Address field, type the IP address (for example,
192.168.1.10) or address pattern (for example, 192.168.1.*) to match
on for this protocol. You can include asterisk (*)
characters in the value to act as wildcard characters:
- If you include an * at the beginning of the string, then everything that follows the * must match the transaction.
- If you include an * at the end of the string, then everything that precedes the * must match the transaction.
- If you include an * at the beginning and end of the string, then everything between the two * characters must match the transaction.
- If you include an * anywhere else, then the string being matched must contain an * in that position for the match to succeed.
Format checking is performed on this field, and an error message is displayed if you specify the IP address or pattern in an unacceptable format. You can specify only one IP address or matching pattern in this field.
- In the Ports field, type one or more port numbers to be matched for this protocol. Specify multiple port numbers using comma separated values (for example, 80, 85), or a range of ports (for example, 80-85), or a combination of both (for example, 80-85, 9081, 9085).
- Click OK. The Protocol window is closed, and the protocol
is added to the table in the Protocols tab.
Avoid overlapping protocols: A protocol is defined as the combination of a specific IP address (or pattern) and one or more port numbers. Protocols cannot overlap. If you define a protocol that includes the same IP Address or pattern match and port number as an existing protocol definition, perhaps because asterisk wild card characters are being used in either or both protocols, when you click OK, an error message is displayed that indicates you have set up overlapping protocols. The conflicting component and protocol name is identified. You will need to correct your protocol definition to remove the overlap conflict.
- Click Apply to save your changes and continue using the Application Management Configuration Editor.
- When you are finished, click OK to close the Application Management Configuration Editor.
Procedure: Modifying an existing protocol in the component definition
- If you have not already done so, access the component for which you want to modify a protocol.
- If you have not already done so, click the Protocols tab.
- A table showing the list of defined protocols is displayed in
the Protocols tab:
You can sort the list of filters by clicking on the Name, IP Address, or Ports column headers in the title bar.
- After selecting a protocol to modify, click
 .
The selected protocol is displayed in the Protocol window.
.
The selected protocol is displayed in the Protocol window.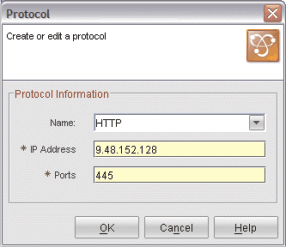
- Edit the protocol definition as needed. You can change the name, IP Address, and port information. Click OK to save your changes.
- Click Apply to save your changes and continue using the Application Management Configuration Editor.
- When you are finished, click OK to close the Application Management Configuration Editor.
Procedure: Removing protocols from the component definition
- If you have not already done so, access the component for which you want to remove a protocol.
- If you have not already done so, click the Protocols tab.
- A table showing the list of defined protocols is displayed in
the Protocols tab:
You can sort the list of filters by clicking on the Name, IP Address, or Ports column headers in the title bar. You can select multiple protocols by holding down the Ctrl key as you click each protocol.
- After selecting one or more protocols to remove, click
 . The selected protocols are removed from the table.
 - Click Apply to save your changes and continue using the Application Management Configuration Editor.
- When you are finished, click OK to close the Application Management Configuration Editor.
Procedure: Deleting a component
To delete a component, perform the following steps:
- Select the navigator item of the component that you want to remove from the view.
- Click
 , or right-click the item in the tree and choose Delete
Component.
, or right-click the item in the tree and choose Delete
Component. - Click Yes to confirm the operation.
- Click Apply to save your changes and continue using the Application Management Configuration Editor.
- When you are finished, click OK to close the Application Management Configuration Editor.