About this task
In each case, the same data is used each time when the stub is started.
However, the testing of complex systems may require persistent storage of data so that a stub can save information across multiple operations. This enables you to virtualize services that create data, for example, a customer, and then use that data in a "GetCustomer" service without having to know a design time the data will be used. It is this capability that distinguishes simple stubs from those that are coordinated to provide a virtualized application.
In cases where you require multiple operations within a stub, or multiple stubs to share data to provide a virtualized application, you should use a data model to hold such data. Data models can be shared across stubs. In addition, data models can hold data about multiple entities and their relationships, such as customers and orders.
Therefore, a data model is a simple view of entities and their relationships that can be used by stubs to persist information. Data models exist as assets within a project. A stub’s properties define which data model it is using (if any). Stubs can read and modify data held in a data model. The Stub Editor (for information about this, refer to Modifying message-based stubs) enables you to indicate whether an operation is trying to create, update, or delete data based on the received message, reducing the time and effort required to create rich stubs.
In IBM Rational Integration Tester, you can create a data model by using the Data Model Editor (for information about this, refer to Using the data model editor). Alternatively, you can create a data model while creating a data model-driven stub from recorded events. This second method analyzes the message in recorded events and creates a data model and entities within that data model based on the messages. Operations that are created will connected to the data model automatically.
To create a data model-driven stub from recorded events:
Procedure
- Click the arrow button
(
 ) next to the Save Stub from selected events button
(
) next to the Save Stub from selected events button
( ) on the Events View toolbar and then click Save
Data Model Stub on the shortcut menu.
) on the Events View toolbar and then click Save
Data Model Stub on the shortcut menu. Alternatively, right-click the messages and click Save Data Model Stub on the shortcut menu.
The Operation Assignment screen of the Recorded Events wizard is displayed.
The Operation Assignment screen, which is the third screen of the wizard, enables you to modify (if you want) the operation and the events associated with the stub.
Note: The first and second screens of the Recorded Events wizard are the Resource Type and Data Storage screens. The screens are displayed only if you click the Save button ( ) or press
CTRL+S. Clicking the Save Stub from selected events button
() bypasses the Resource Type and Data Storage screens.
) or press
CTRL+S. Clicking the Save Stub from selected events button
() bypasses the Resource Type and Data Storage screens.For information about using Operation Assignment screen, refer to Creating basic stubs.
Note: If you are creating a stub for multiple operations, Rational Integration Tester will attempt to verity that all selected recorded events are associated with the correct operations. - Clicking Next on
the Transaction Assignment screen displays the Entity Mapping screen.
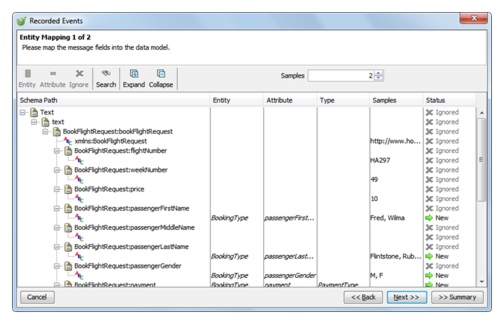
The Entity Mapping screen enables you to map the fields in the selected recorded events to the data source that will be used for data model-driven stubbing.
The following table describes how to use the Entity Mapping screen.
To... Do this... Specify that a field in a recorded event will be an entity in the data model 1. Select the field. 2. Click Entity. The Map to entity dialog box is displayed.
3. Click OK. For the selected field, New is displayed under Status.
Specify that a field in a recorded event will be an attribute of a particular entity in the data model 1. Select the field. 2. Click Attribute. The Map to Attribute dialog box is displayed.
3. Click OK. For the selected field, New is displayed under Status.
Specify that a field in a recorded event is not included in the data model 1. Select the field. 2. Click Ignore.
Search for a specific data item in a recorded event 1. Click Search. 2. In the Find field (displayed on the lower half of the screen), enter your search query.
3. Press ENTER.
Increase or decrease the number of example values displayed for each field In the Samples box, enter or select the number of examples you want to display (default value: 2). Specify that a field is a "key" field so that it can be used to match data between different messages Under the Key column, select the check box of the field. Expand or collapse a node 1. Click the node. 2. Click Expand or Collapse (as applicable).
Close the wizard without making any changes Click Cancel. Move to the (previous) Transaction Assignment screen Click Back. Move to the next screen Click Next. Note: The next screen may be another Entity Mapping screen because the number of Entity Mapping screens displayed by the Recorded Events wizard depends on the number of merged messages (which determined by the using the Transaction Assignment screen).Move to the (final) Summary screen of the wizard Click Summary. The Summary screen, which is the final screen of the Recorded Events wizard, enables you to review the configuration of the stub and to save the stub and the data model.
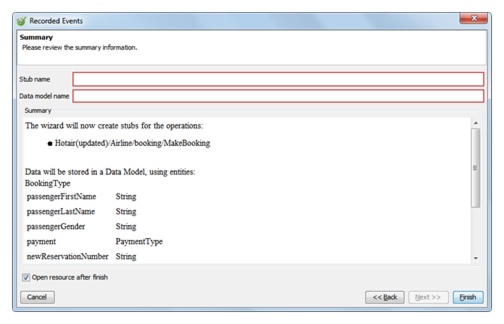
For information about using the Summary screen, refer to Creating basic stubs.
Results
After clicking Finish on the Summary screen:
- Rational Integration Tester Test Factory perspective is displayed, and the newly created stub is displayed under the relevant logical resource on the Test Factory perspective’s component tree. If you created a stub for multiple operations, the stub is displayed under each applicable operation.
- If you selected the Open resource after finish check box on the Summary screen, the stub is also opened in the Stub Editor (for information about this, refer to Modifying message-based stubs).
- If you view the Architecture School perspective’s Data Models window, the newly created data model is listed on the upper left of the window and the data model’s details can be displayed on Data Models window by selecting it. For information about editing a data model, refer to Editing data models.