About this task
It does not execute any other operations, such as performing calculations, looking up any data, or making any decisions.
To create a basic (hard-coded) stub from recorded events:
Procedure
- Click the Save Stub from selected
events button (
 ) on the
Events View toolbar.
) on the
Events View toolbar. Alternatively, right-click the messages and click Save Stub on the shortcut menu.
The Operation Assignment screen of the Recorded Events wizard is displayed.
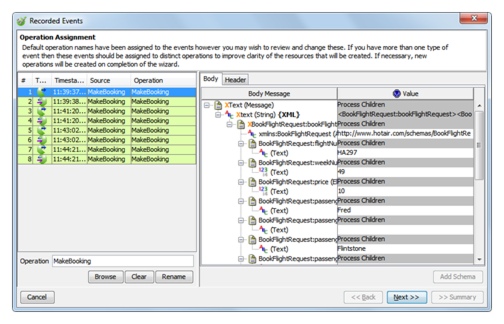
The Operation Assignment screen, which is the third screen of the wizard, enables you to modify the operation and the events associated with the stub.
Note: The first and second screens of the Recorded Events wizard are the Resource Type and Data Storage screens. The screens are displayed only if you click the Save button ( ) or press CTRL+S. Click the Save
Stub from selected events button () to bypass
the Resource Type and Data Storage screens.
) or press CTRL+S. Click the Save
Stub from selected events button () to bypass
the Resource Type and Data Storage screens.The following table describes how to use the Operation Assignment screen.
To... Do this... Define names of operations from recorded message payloads 1. Select a message that contains a field with the value that must be used as the name of the operation.
2. On the Body tab, select the relevant field.
3. Click Define Operation. (This button is available only in Rational Integration Tester 8.0.1 (or later).)
The location of the field within the message is used to define operation names for all selected messages, or all messages if only a single message is selected.
Select a different operation in the current Rational Integration Tester project 1. Click Browse to open the Select a Resource dialog box. 2. Select a different operation.
3. Click OK to close Select a Resource dialog box.
Select a different operation that is not in the current Rational Integration Tester project 1. Click Clear. Alternatively, type over text in the Operation field. 2. In the Operation field, enter the name of a new operation. (The operation will be created after you have completed using the Recorded Events wizard.)
3. Click Rename.
4. If you have not selected all the events displayed on the Operation Assignment screen for assignment to the new operation, you are prompted to confirm whether you want any non-selected events on the screen to be assigned to the new operation.
Apply a different schema to a recorded event 1. On the left side of the screen, select the event that you want to modify. 2. On the right side of the screen, click the Body and/or Header tab (as appropriate).
3. Select a field.
4. Click Add Schema to display the Select Schema dialog box. (For information about selecting message schemas, refer to Rational Integration Tester reference.)
5. Click Finish on the Select Schema dialog box. You are prompted to confirm that you want to apply the selected schema to the selected event.
Close the wizard without making any changes Click Cancel. Move to the (next) Transaction Assignment screen of the wizard Click Next. Note: If you are creating a stub for multiple operations, Rational Integration Tester attempts to verity that all selected recorded events are associated with the correct operations.The Transaction Assignment screen, which is the fourth screen of the Recorded Events, enables you to group events into transactions. A transaction can consist of request-reply or a series of events.
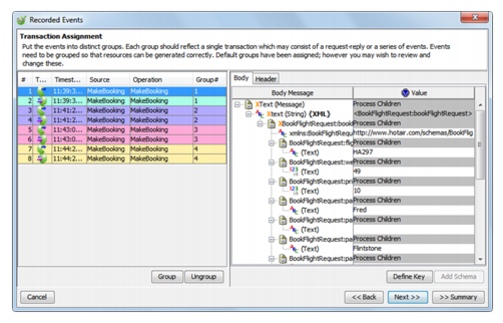
The following table describes how to use the Transaction Assignment screen.
To... Do this... Group two or more recorded events into a single transaction 1. On the left side of the screen, select the events that you want to group into a transaction. 2. Click Group. The Group# field of the selected events changes.
Ungroup a transaction 1. On the left side of the screen, select the events that you want to ungroup. 2. Click Ungroup. The Group# field of the selected events changes.
Add one or more key fields to one or more selected events displayed on the screen. 1. On the left side of the screen, select the event that you want to modify. 2. On the right side of the screen, click the Body and/or Header tab (as appropriate).
3. Select a field.
4. Click Define Key. If the field’s value is also in any other fields of other events displayed on the screen, the Define Key dialog box is displayed. Otherwise, an error message is displayed.
5. On the Define Key dialog box, clear the check boxes of any other events that do not have the same logical value as the field you selected.
6. Optional: In theSave as a Field Type called field, enter a comment for the key field. Any comment you enter will be displayed in the Architecture School perspective’s Rule Cache.
7. Click OK to save your changes and to close the Define Key dialog box.
Any messages on the screen that are not already grouped into transactions and that contain the key field that you have defined are grouped.
Apply a different schema to a recorded event 1. On the left side of the screen, select the event that you want to modify. 2. On the right side of the screen, click the Body and/or Header tab (as appropriate).
3. Select a field.
4. Click Add Schema to display the Select Schema dialog box. (For information about selecting message schemas, refer to IBM Rational Integration Tester.)
5. Clicking Finish on the Select Schema dialog box prompts you to confirm that you want to apply the selected schema to the selected event.
Close the wizard without making any changes Click Cancel. Move to the (previous) Operation Assignment screen Click Back. Move to the (final) Summary screen of the wizard Click Next or Summary.
Results
The Summary screen, which is the final screen of the Recorded Events wizard, enables you to review the configuration of the stub and to save the stub.
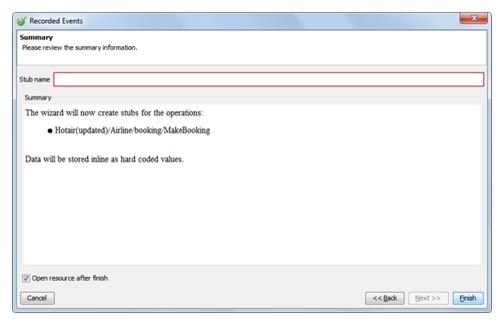
The following table describes how to use the Summary screen.
| To... | Do this... |
|---|---|
| Open the stub in the Stub Editor after you save it and quit the Recorded Events wizard | Select the Open resource after finish check box. |
| Close the wizard without making any changes | Click Cancel. |
| Move to the (previous) Transaction Assignment screen | Click Back. |
| Save your stub | 1. In the Stub name field, enter a name for the stub. 2. Click Finish. |
After clicking Finish on the Summary screen:
- Rational Integration Tester’s Test Factory perspective is displayed and the newly created stub is displayed under the relevant logical resource on the Test Factory perspective’s component tree. If you created a stub for multiple operations, the stub is displayed under each applicable operation.
- If you selected the Open resource after finish check box on the Summary screen, the stub is also opened in the Stub Editor (for information about this, refer to Modifying message-based stubs).