
The Remote Systems LPEX Editor is based on the base LPEX Editor, and contains System i® specific functions.
You can quickly launch the Remote Systems LPEX Editor in edit mode from the Remote Systems view, System i Table view, and Remote Search view by double-clicking a member. You can also launch the editor by using the pop-up menu on a member to open it in edit mode, or in browse mode.
The first thing you will notice when you open the editor is the use of color in the source. This is called tokenization, and is the coloring of language tokens to make them easy to distinguish.
Note that the prefix area contains the sequence numbers of the member. The prefix area in Remote Systems LPEX Editor supports SEU commands (for example, CC, B, A, LL).
Also note that for many source types, an Outline view appears. The Outline view displays the outline of your source and can be used to navigate within your source.

Syntax checking, prompting, and help
The Remote Systems LPEX Editor has automatic syntax checking. are immediately visible. All of the syntax errors are embedded into the editor view and there is no need to move to the bottom of the screen to scroll through errors. The Remote Systems LPEX Editor uses the latest language syntax to check syntax for DDS, RPG and COBOL. An active connection is required for syntax checking SQL and CL. CL does cache syntax information, so syntax checking may be available when disconnected if cached information exists.

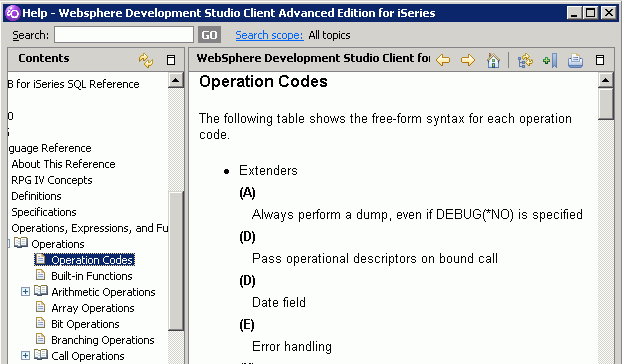
Help (F1 in the Remote Systems LPEX Editor) is not just available for errors, but for source too. Pressing F1 for context-sensitive help opens the reference manual at the topic for the code you are editing. For example, when you press F1 on an ILE RPG operation code, the help for that operation code opens in the help browser. Reference manuals are also accessible through the Source menu in the Remote Systems LPEX Editor. This reduces the requirement for printed manuals.
F4 allows you to prompt when editing in the Remote Systems LPEX Editor. For languages other than CL, the Prompt view opens and allows you to modify your source. For CL, a window opens with your prompt. F1 context-sensitive help is available from all prompts.

For more information, see the topic Editing RPG, COBOL, CL, C, C++, and DDS members in the online help in the client product. See also Editing source in the tutorials.
Verifiers and System i Error List view
Syntax checking ensures that there are no errors on the line that you type, but the Remote Systems LPEX Editor provides an additional check, called the Verifier. A verifier does the same syntax checking and semantic checking that the compiler does, without generating an object. This means that if you try to use an undeclared variable, the verifier will let you know.
The verifier function is available for COBOL, RPG and DDS from the Source menu, or by pressing Ctrl+Shift+V. Use the Source menu to verify with prompt and specify additional options.
Any errors detected by a verify will appear in the System i Error List view, exactly as those from a compile.

The System i Error List view allows you to insert the errors into the editor view by double-clicking. Use the F1 key to get help for errors, and use the View menu to filter errors that you don't want to see (for example, perhaps you want to ignore informational messages). The menu can also be used to dictate whether or not, and how, error messages are inserted into the editor view.
To cleanup any inserted errors, from the editor you can use Ctrl+F5 to refresh the list. The refresh action:
Or you can use the Remove messages menu option from the Source menu.
The System i Error List view can also be used as a To Do list. As you modify lines, they are either marked with an X to indicate that the line has been deleted, or with a check mark, to indicate that an error has been addressed. Only another verify will ensure that the errors have truly been fixed.
Using the verifier has the following advantages:
The System i Error List view (whether being used for compile results or verify) has several advantages as well:
Content assist, templates, and RPG wizards
The Remote Systems LPEX Editor has several functions which help you quickly enter code.
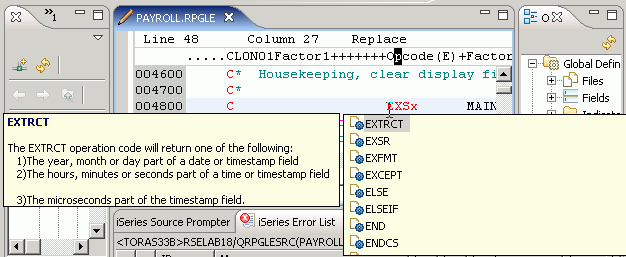
Content assist (Ctrl+Space) will propose, display, and insert code completions at the cursor position. Based on the previously typed characters, or in the case of RPG, column position as well, invoking content assist presents you with possible valid completions to the code you have already entered. For example, this can be useful when you are unsure of the number of parameters required when calling a procedure, or even the parameter types.
For more information, see the topic Content assist in the online help in the client product.
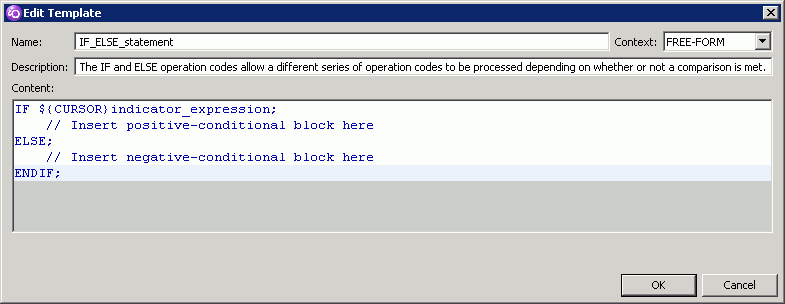
Templates can be used to generate frequently used blocks of code. They can be imported and exported, which means they can be shared. For example, if you have a standard header that must be added to each program, or a standard interface, you can define a template, and insert it by typing its name and then Ctrl+Space.
For more information, see the topic Completing code with content assist and the topic Templates in the online help in the client product. See also Verifying the source in the tutorials.
There are three RPG wizards that can help you create code quickly:

Code will be generated for you.

For more information, see the topic Creating an RPG Definition Specification in the Remote Systems LPEX Editor in the online help in the client product.
Additional Remote Systems LPEX Editor parser action and preferences
Additional preferences and actions are available for the System i languages:

Content assist, templates, and RPG wizards, are designed to speed up and improve your editing experience.
Additional LPEX keys
In the Remote Systems LPEX Editor, most functions are available through menus and keystrokes. Here is a list of additional keys you might find useful in LPEX:
| Key combination | Description |
|---|---|
| Ctrl+Home | Go to the top (like TOP in SEU) |
| Ctrl+End | Go to the end (like BOTTOM is SEU) |
| Ctrl+L | Go to line number (also entering line number in prefix area like SEU works) |
| Alt+S | Split a line |
| Alt+J | Join a line |
| Alt+L | Select a line |
| Alt+R | Select a rectangle |
| Ctrl+W | Show all lines (useful when lines are filtered out) |
| Ctrl+Z | Undo |
| Ctrl+Y | Redo |
| Ctrl+S | Save |
| Ctrl+M | Match (selects matching brackets, and for languages like CL and RPG, control statements like DO/ENDDO, IF/ENDIF) |
| Ctrl+Shift+M | Find match |
Printing
Like most Windows applications, printing can be done through the File > Print menu option or by pressing Ctrl+P. This can be done while editing. Printing also tokenizes the printed source, as long as you select the Tokenized checkbox. Printing in the Remote Systems LPEX Editor prints to your Windows printer, not the System i printer. Print options are available in Window >Preferences > LPEX Editor > Print.

The following substitution variables are available for use in the header and footer:
Find and replace in the Remote Systems LPEX Editor
In the Remote Systems LPEX Editor you can use Ctrl+F to open the Find function in LPEX. The search function is very flexible. You can specify regular expressions that allow you to search for a pattern. For example, if you specify this|that as the search string with the Regular expression check box selected, then the editor searches for lines with this or that on them. You can use Ctrl+N or Shift+F4 to find the next match.

For more information, see the topic Finding and replacing text in the online help in the client product. See also Finding and replacing text in the tutorials.
Compare a file in the Remote Systems LPEX Editor
Comparing members in the Remote Systems LPEX Editor requires you to open a member in the editor. Once open, you can easily compare that member to another by selecting the Compare button in the toolbar or through the Edit > Compare > Compare file menu option.
Once the compare has been triggered, source appears merged with different lines flagged in color. Pink is the color used for the source being compared to, and yellow is the color for the opened source.
Unlike on the System i , where you have to flip between the spooled file and the source opened in SEU, comparing in the Remote Systems LPEX Editor allows you to continue to modify the member that was opened originally. Use Ctrl+Shift+N to navigate to the next mismatch and Ctrl+Shift+P for the previous mismatch. If you do modify source, you can use Ctrl+Shift+R to refresh the compare and finally Edit > Compare >Clear to end.

Compile from the Remote Systems LPEX Editor
When you have source open in the Remote Systems LPEX Editor, it's not convenient to go to the Remote Systems view or System i Table view to issue a compile. Instead you can use one of the following:
For more information, see the topic Compiling in the online help in the client product. See also Compiling source remotely in the tutorials.
Comparing the Remote Systems LPEX Editor to SEU
The following table compares the features of the Remote Systems LPEX Editor described in this topic to equivalent or similar features in SEU.
| In the Remote Systems LPEX Editor | In SEU |
|---|---|
| Launch the editor from the pop-up menus on a member in edit or browse modes | Launch SEU with PDM option 5 |
| Full screen mode for both edit and browse (double-click the editor tab). However, many more lines are visible in Remote Systems LPEX Editor in full screen than in SEU. | Full screen mode when browsing only (F13) |
Split screen for edit and browse:
|
Split screen and browse |
| Language tokens are displayed in colors (tokenization) | Not available |
| Provides a prefix area containing sequence numbers and supports SEU edit commands | Prefix area available for edit commands |
| Date area appears next to the sequence numbers. It is Off by default, but can be enabled through the preference, or the pop-up menu. | Date area is at the right, and is always enabled |
| View or hide excluded lines by expanding (clicking +), or collapsing (clicking -) items | Excluded lines cannot be viewed |
| Automatic syntax checking - all errors are immediately visible | Automatic syntax checking - first error is visible |
| Content assist, code templates, and RPG wizards are available to assist in code creation | Prompter is available to assist in code creation |
| Most editing functions are available through menus and keystrokes | All editing functions are available through keystrokes |
| Printing is available from the File menu, or Ctrl+P | Print with STRSEU, Option 6 |
| Printing can be done while editing | Not available |
| A member opened in the editor for compare can be modified | To edit the source, switch from the spooled file to the source in SEU |