Getting started in the Remote System Explorer perspective
The Remote System Explorer perspective enables you to access,
edit, run, compile, and debug all items on your system.
When you first open Remote System Explorer, you are not connected to any
system except your local workstation. To connect to a remote System i®, you need
to define a profile and a connection.
A profile is used to group connections, share connections, or keep them
private.
A connection is a TCP/IP network connection to your System i, that enables
you to access, edit, run, compile, and debug all items on the system. When
you define a connection, you specify the name or IP address of the remote
system and you also give the connection itself a unique name that acts as
a label in your workspace so that you can easily connect and disconnect. When
you connect to the System i, the workbench prompts you for your user ID and
password on that system.
To start working in Remote System Explorer (RSE):
Start the workbench
When prompted, specify the workspace
Once the workbench opens, ensure that you are in the Remote System Explorer
perspective. If the perspective is not open, you can open it by selecting Window > Open Perspective > Remote System Explorer
Click the X to close the Welcome view.
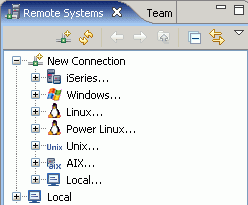
In the Remote Systems view New Connection shows
the various remote system types you can connect to through the Remote Systems
view.
Create a connection:
Expand System i under New Connection in the view, to open the Name personal profile page. Accept
the default profile value to open the connection page.
Leave the Parent profile default value
Enter your host system name in the Host name field. The Connection name field is automatically
filled with the host name.
Leave the Verify host name check box selected.
Click Finish to create your connection.
You can define multiple connections to the same System i, but in
addition, you can include different configurations for the startup of your
connection, such as saving different user IDs and passwords, initial library
lists, for example. After you create a connection to a System i, you can
easily connect and disconnect.
For more information see the topic Configuring a connection to a remote system in the online help in the
client product. See also Configuring a connection
to a System i and connecting to a System i in the tutorials.
Tips:
When creating a connection, use the default profile name. The default
profile can be used to share connections with others, and to use filter pools.
(For more information about filter pools, see the topic Remote System Explorer filters, filter pools, and filter pool references in
the online help in the client product.)
When specifying Host name, you can either
specify the IP address, or the fully qualified name (if necessary).
The Verify host name check box ensures
that you can actually connect to the System i you have specified. To ensure that
you have all necessary PTFs installed on your System i, right-click the connection (after
it has been created) and select Verify connection. This ensures that all necessary ports are open, callbacks can be performed,
and that the required host PTFs are applied.
To define the startup properties for a connection, right-click on a connection
and select Properties.
Subsystems
After you configure a connection to a System i, you can
easily connect and expand your new connection to show the subsystems. Subsystems
are represented by containers which show the libraries, command sets, and
jobs on your remote system. Subsystem in this context is not related to the
subsystem on the System i.
System i connections have five different subsystems:
System i Objects: This can be used to access libraries, objects and members.
System i Commands : By default, this subsystem is populated with a set
of predefined commands that you can use to run against remote objects. You
can also define command sets, and commands of your own. The results are logged
in the Commands Log view. (For more information about the Commands Log view
see the topic Running programs and commands in
the online help in the client product.)
System i Jobs: Use this subsystem to list jobs. You can subset by job
attributes, and perform job operations, such as hold, resume, end.
IFS Files: Explore files and folder structures in the Integrated File
System, and perform actions on them.
Qshells: Access the list of active running Qshells for the connection,
and use this subsystem to start a Qshell. (For more information see the topic Running and viewing commands and shells using the Remote
Shell view in the online help in the client product.)
The view that a connection is in is called the Remote Systems view. It
works much like Windows File Explorer. You drill down by clicking the “plus"
(+) to gain access to desired items. For example,
expand the *LIBL filter to see all the libraries
in the library list, then expand a file to see all its members (much like
option 12 in PDM).
Filters
Expanding a subsystem results in a list of filters for that subsystem.
Filters are names of lists of items that you can specify, reuse, and share.
Filters filter out items that you are not currently
interested in. When creating filters, you can use generic values, and have
as many filters as you want or need. Filters can be created for each subsystem,
so you can have filters for IFS files, local files, System i objects,
for example.
Tips:
You can always drill down within a filter if the item is a container (a
library and a file are examples of containers)
You can specify multiple levels of generic values, for example you could
specify library BOB, file QRPG* member A*,
when you create your filter.
Pay close attention to the page where you specify the filter name. On
this page you choose whether or not you want the filter to be only for the
specified connection, or to appear in all connections. You can also specify
a profile, if you want to share your filters with others.
Since filters are names which are stored with your connection in RSE, all
filters persist between sessions.
Filter strings
When first created, a filter contains only one filter string. By modifying
the properties of a filter, you can add additional filter strings. Filter
strings provide the ability to generate more complex lists. By using multiple
filter strings in a filter, you can list members in different files, and even
in different libraries in a single named filter.
Tips:
Filters must contain the same types of items. For example, it is not possible
to list objects and members in the same filter.
Group items into a filter by project or application. For example, add
filter strings so that you can see the DDS members in the same list as your
RPG and COBOL files.
For more information about filters, see the topic Filtering members in the online help in the client product. See also Introducing filters in the tutorials.
Searching
There are two ways to search in RSE:
From the Search menu option (then selecting System i)
From the Find String action in the Remote Systems view and System i Table view
RSE allows you to search filters, not just libraries, files, and members.
This means that you can search with very flexible search patterns. For example,
you could search all the members in the file QRPGLESRC in library MYLIB and the members A* in the files PRJA* in
library PROJECT by invoking the Find string action on the filter
that contained those filter strings.
Search results appear in the Remote Search view, and the view has a history
of searches. You see the list of all the search results in one place, allowing
you to open whichever member you want first, and using whichever match in
the member you decide. The Remote Search view allows you to manage the resulting
list, by letting you remove members and matches from the list through the
pop-up menu.
Tips:
Double-click the member name in the Remote Search view to open a member
in the Remote Systems LPEX Editor for editing and to be positioned to the match
selected.
The pop-up in the Remote Search view has a list of options similar to
the System i Table view.
Double-click on the Remote Search tab to maximize the view to the full
workbench window. This will allow you to see more matches at one time.
Expand or collapse matched members to quickly zero in on the matches that
are important to you.
See the topic Searching for text strings on the System i in the online help in the client product. See also Searching multiple files in the tutorials.
Comparing RSE to PDM
The following table compares the RSE features described in this topic to
equivalent or similar features in PDM.
Table 21.
In RSE
In PDM
Create a connection
Start an emulator session
Create filters with generic values
Create filters with generic values
Expand a container to view additional items
Option 12
Specify multiple levels of generic items
Not available
Filters persist between sessions
Previous parameters for the WRKxxxPDM command
are remembered
Create complex lists by defining multiple filter strings
in a filter to list members in different files
List members in one source physical file in a single
library
Flexible search patterns permit searching of filters
Single search pattern with option 25 or with FNDSTRPDM
All search results are available in the Remote Search
view
Search results and members are available one at a time
in the order that the matches are found