In this lesson, use Process Designer to create a diagram
of a simplified car loan application process.
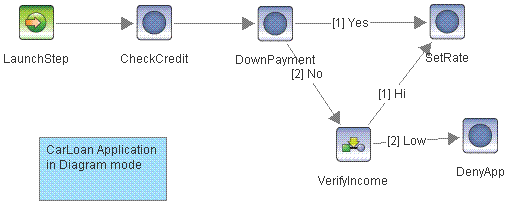
The workflow consists of the following activities:
- Extracting data from a loan application document
- Checking the credit of the applicant
- Evaluating any down payment
- Evaluating the income level
- Deciding whether to deny or approve the loan and at what interest
rate
Although the diagram is not a functional workflow, it
helps the business user communicate workflow activities
to others, such as to the business analyst who implements the
process. Later lessons complete the implementation and
run the process by using fictional data.
To create the car loan application diagram:
- Start Process Designer.
- Click .
Process Designer has two modes
of operation:
- Diagram, intended for a business user to create and document diagrams
of business processes.
- Design, intended for an IT analyst to implement a business process.
- Click in an open area of the map to select the workflow
definition itself rather than the LaunchStep.
In the Properties pane, enter a name
for the workflow (CarLoanApplication) and
enter a description of the purpose of this workflow. The name is the
default name of the workflow definition file.
The description provides information for the
IT analyst.
- Drag an Activity step from the docked Palette onto the
map. This first step in the workflow checks the
credit of the applicant.
Enter a name (CheckCredit) and description
of this activity.
- Create a route from the LaunchStep to the CheckCredit step.
Point to the edge of the LaunchStep until the
cursor indicates route creation. Drag to the CheckCredit
step and release the mouse button.
- Continue adding the following Activity steps:
- DownPayment
- VerifyIncome
- SetRate
- DenyApp
Connect the Activity
steps with routes as shown in the diagram.
Identify each step with a name and description. The description
communicates the intent of the step or route.
- In the example, the VerifyIncome step represents a multi-step
process that does not show on the main map. Do
the following steps to create a submap, CheckIncome,
for this task.
- Right-click the VerifyIncome step, select Change step type, and select
Submap step. You can also drag
a Submap step onto the map and name it
VerifyIncome.
- On the maps section of the toolbar, click Create
Map to create a new submap.
Select Create new map,
enter the name, CheckIncome, and click
OK.
- On the CheckIncome map, add an Activity step,
ContactEmployer. Add a route
from StartStep to ContactEmployer.
In the
Description for ContactEmployer, add
information about the types of information that is to be requested,
such as length of employment.
This subprocess
is simple, but it demonstrates how
to create one.
- On the maps section of the toolbar, select Workflow (Main Map) to return to the
main map.
- With the VerifyIncome step selected, in the Properties
pane under Select a map for the Submap,
select CheckIncome.
- To add more information to the map, right-click in an open
area of the map and click to add an annotation
to the map.
Enter
text in the Message box in the Properties pane.
You can associate the annotation with a step or route, if appropriate,
by pointing to the edge of the annotation
and dragging a line to the step or route.
- Click and browse to a location in your local
file system where the diagram is to be saved.
Accept the default name, CarLoanApplication.pep.