Importing the migration snapshot
Import the migration snapshot from the source
environment into the target environment.
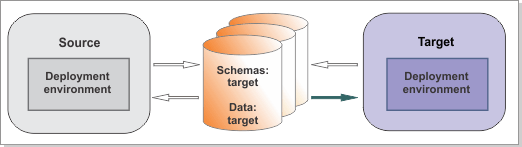
Figure 1. Sample environment after the target is
started. The source environment is not running. The target can read
from the databases.
Before you begin
Make sure that the messaging engines in the target environment are started successfully before you run the BPMMigrate utility, or the command will fail with the exception: Cannot find message engine.
 If you are migrating applications
that use non-embedded Resource Adapters such as the CICS Resource
Adapter, install these adapters on the new configuration before you
import the snapshot.
If you are migrating applications
that use non-embedded Resource Adapters such as the CICS Resource
Adapter, install these adapters on the new configuration before you
import the snapshot.
About this task
Run the BPMMigrate utility to import the snapshot, which includes information about LTPA keys, performance options, applications, and service integration bus (SIB) messages, from your previous version to your new version.
Important: If you decide to make configuration
changes to the source environment based on your new configuration,
you must run the utility again to take a new snapshot.
The BPMMigrate utility
performs the following tasks:
- Stops automatic generation of LTPA keys and applies the LTPA keys from the source environment to the target environment.
- Installs your applications in the target environment.
- Syncs the managed nodes.
- Runs the command to move the SIB messages from the source environment to the target environment.
- Runs the command to re-create the scheduler tasks.
- Updates the WebSphere Adapters.
Procedure
For each deployment environment that you are migrating, complete the following steps:
- Optional: If your applications
use WebSphere Adapters and you are migrating to a different computer,
you must edit the XML file that contains the application deployment
configuration. You extracted the application deployment configuration when you copied the migration utilities to the source computer. Now, edit the ApplicationMigrationInformation.xml file to mark the WebSphere adapter instances that are to be updated to the new version during migration.
- Locate the ApplicationMigrationInformation.xml file
in the following directory:
snapshot directory/Adapters - Edit the ApplicationMigrationInformation.xml file.Change the value in <update> from false to true to update a specific WebSphere adapter instance to the new version. Additionally, copy the new version RAR file of the WebSphere adapter being marked for update into the following directory: target_install_root/installableApps.Note: Set the <update> value to true for any application that embeds WebSphere Adapter for SAP or WebSphere Adapter for SAP instances that are configured at node or cluster scope.Attention: If the WebSphere adapter deployed at node level is used to configure the WebSphere adapter at cluster scope, the update of the WebSphere adapter must be applied in a consistent manner. If the WebSphere adapter at cluster scope must be updated to the new version, the corresponding instance of WebSphere adapter that is defined at each individual node scope for nodes that are participating in the cluster must be updated as well. Failure to perform the WebSphere adapter update in a consistent manner for participating nodes and cluster level can lead to failures of applications using a WebSphere adapter instance. See
 Configuring Resource Adapters in the WebSphere
Application Server information center.
Configuring Resource Adapters in the WebSphere
Application Server information center.
- Locate the ApplicationMigrationInformation.xml file
in the following directory: