Importing the migration snapshot

Import the migration snapshot from the source environment into the target environment.
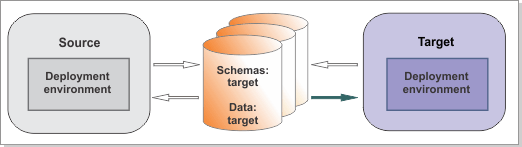
Figure 1. Sample environment after the target is started. The source environment is not running. The target can read from the databases.
The details of the diagram are provided in the figure caption.

Before you begin

Make sure that the messaging engines in the target environment are started successfully before you run the BPMMigrate utility, or the command will fail with the exception: Cannot find message engine.

About this task

Run the BPMMigrate utility to import the snapshot from your previous version to your new version.

Important: If you decide to make configuration changes to the source environment based on your new configuration, you must run the utility again to take a new snapshot.

The BPMMigrate utility applies the customizations from the 100Custom.xml in the source environment to the configuration objects in the target environment. For information about configuration objects, refer to Configuration objects.

Procedure

  1. If you have not done so already, update the migration.properties file to specify the configuration information for the target environment.

    The file is found in BPM_home/util/migration/resources/migration.properties.

  2. Import the snapshot from the source environment by running the BPMMigrate command.
    BPM_home/bin/BPMMigrate.sh -backupFolder snapshot_folder -propertiesFile migration_properties_file
    where:
    • snapshot_folder is the directory where the extracted information is stored.
    • migration_properties_file is the full path to the migration properties file in which you specified the configuration information for the target environment.
    Notes:
    • If you receive an SSL Signer Exchange Prompt message while running this command, click Y to add the signer to the truststore.
    • If you receive a connection timeout when migrating schedulers, the problem is caused by the call from the wsadmin environment to the deployment manager. Increase the default timeout value (180 seconds) by modifying the com.ibm.SOAP.requestTimeout property in the deployment_manager_profile/properties/soap.client.props file.