This topic walks you through the DB2 Setup wizard
to install the IBM® DB2® pureScale® Feature. The DB2 Setup wizard is a GUI installer,
invoked by running the db2setup command.
Before you begin
- Ensure that your system meets installation, memory, and disk requirements. See the related links at the end of
this topic.
- Complete the DB2 pureScale Feature preinstallation
checklist. See the related links at the end of
this topic.
- The DB2 Setup wizard is a graphical
installer. To install a DB2 product
using the DB2 Setup wizard,
you require an X Window System (X11) to display the graphical user
interface (GUI). To display the GUI on your local workstation, the
X Window System software must be installed and running, and you must
set the DISPLAY variable to the IP address of the workstation you
use to install the DB2 product
(export DISPLAY=<ip-address>:0.0). For example,
export DISPLAY=192.168.1.2:0.0. For details, see this developerWorks® article: http://www.ibm.com/developerworks/community/blogs/paixperiences/entry/remotex11aix?lang=en.
- If you are not using AIX® security
software to authenticate users in your environment, you must manually
create the required DB2 users
before you start the DB2 Setup wizard. The DB2
Setup wizard does not create the users.
- Ensure that you are logged in as root.
About this task
The
DB2
Setup wizard provides default values for most of the fields
and options. You only need to input a few fields and options. For
a complete list, see the installation checklist.
Procedure
- Log in as root.
- Ensure the DB2 installation
image available. After downloading the DB2 database
product image, extract and untar the product file:
- Extract the product file using the gzip -d product.tar.gz command,
where product represents the name of the downloaded
product.
- Untar the product file using the gnutar -xvf product.tar command,
where product represents the name of the downloaded
product.
- Change directory using the cd ./product command,
where product represents the name of the downloaded
product.
- Ensure you export your display. For example:
export DISPLAY=IP_Address:0.0
Where IP_Address represents
the IP address of the workstation you are using to launch the installation.
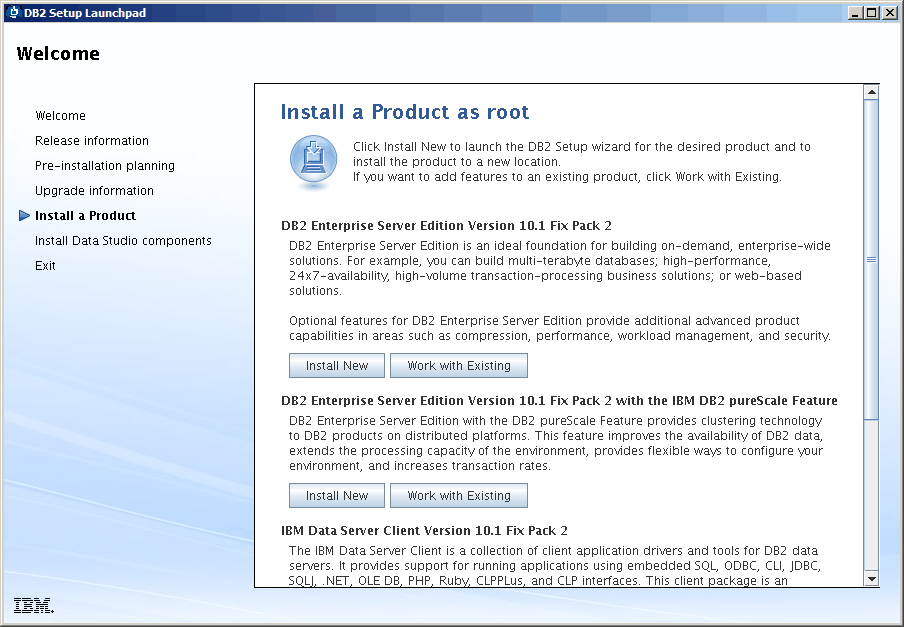
- Start the DB2 Setup wizard by running
the db2setup command from the directory where the DB2 installation image resides:
./db2setup -l /tmp/db2setup.log -t /tmp/db2setup.trc
The -l and -t recommended
parameters that enable DB2 logging
and tracing. The IBM DB2 Setup Launchpad opens.
Figure 1. DB2 Setup
Launchpad
From this window, you can view the DB2 pureScale Feature release
information, upgrade options, architectural overview, and pre-installation
planning, or you can proceed directly to the installation.
- Click Install a Product and the Install
a Product window displays the products available for installation.
Figure 2. Install a Product window
Click Install New under DB2 Enterprise Server Edition Version 10.1 with
the IBM DB2 pureScale Feature.
Installation help can guide you through each of the installation panels.
To invoke the installation help, click Help or
press F1. You can click Cancel at
any time to end the installation. If you are performing an upgrade,
select the Install New option.
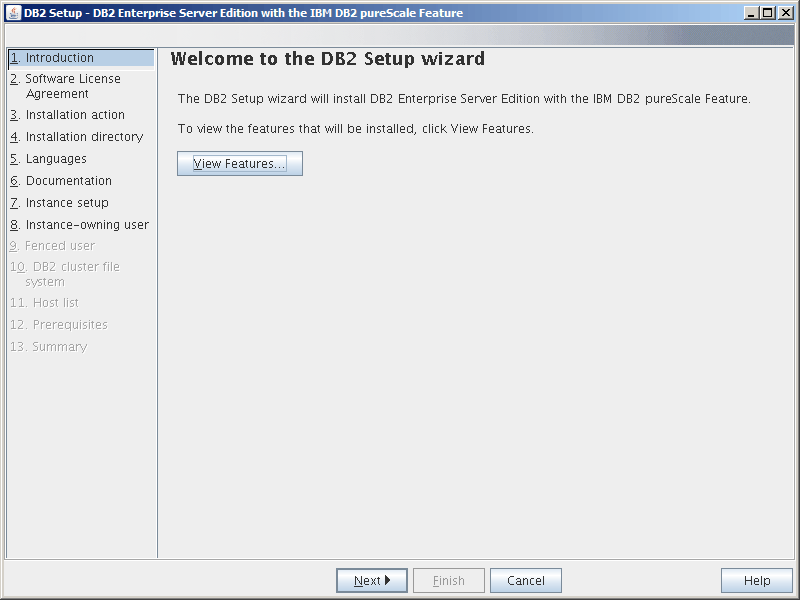
- Welcome Panel.
Figure 3. DB2 Setup
wizard Welcome Panel
Click View Features to view the features
to be installed. The View Features dialog box
opens and displays the features to be installed. Click Close to
close the View Features dialog box.
Click Next to
continue.
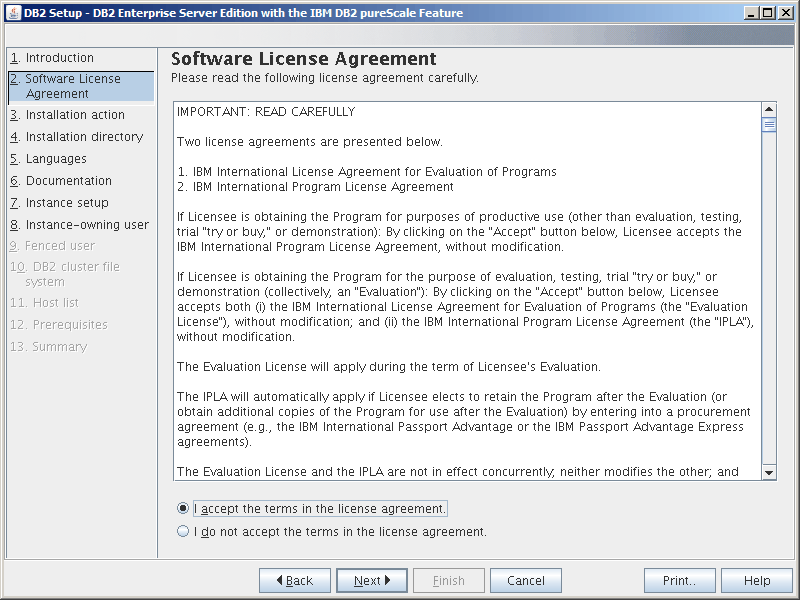
- Software License Agreement Panel.
Figure 4. Software License Agreement Panel
After reviewing the software licensing agreement,
select Accept to accept the terms. Click Next.
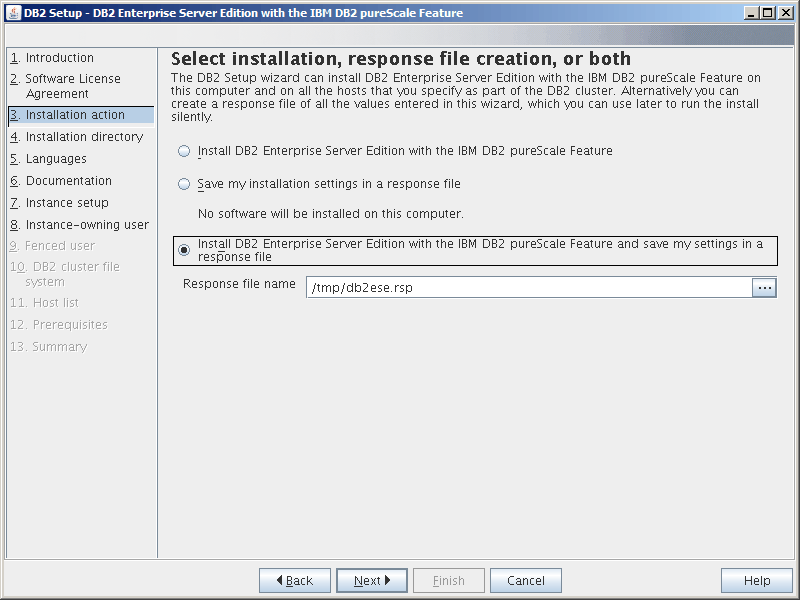
- Select installation, response file creation,
or both Panel
Figure 5. Select
installation, response file creation, or both Panel
You can use the DB2 Setup wizard
to: - Install the product. When you are finished stepping through
the DB2 Setup wizard, your DB2 database product is installed on your system.
No response file is saved.
- Create and save the installation settings in a response file,
but not install the product. You can use this response file to install
this product later. The DB2 database
product is not installed.
The DB2 Setup wizard generates the response file
that is only based on your selections.
- Install the product and create and save a response file that
you can use as a record of your choices.
If you choose to create a response file, you can specify the
name and location of the response file in the Response
file name field. This same response file can be updated
to use on another set of hosts as well. Click Next.
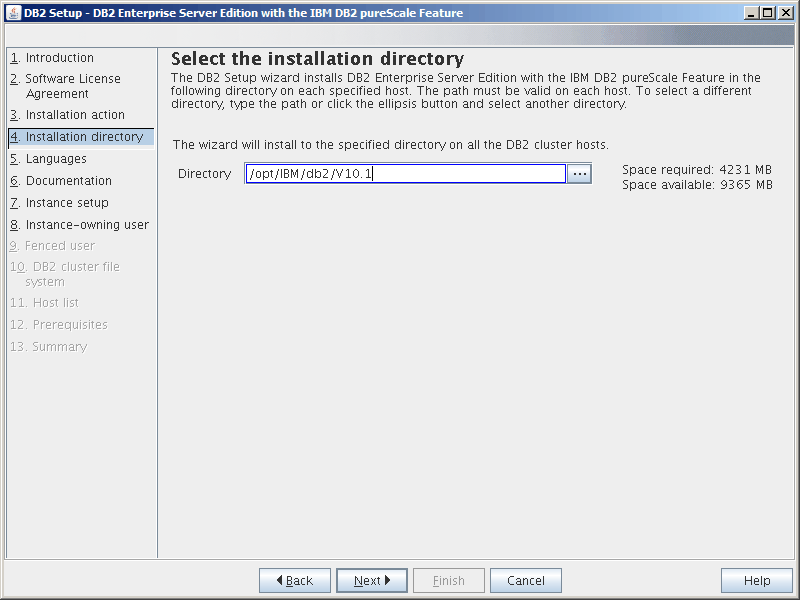
- Select installation directory Panel
Figure 6. Select installation directory
Panel
Specify the directory path where you want to install
your DB2 database product. If
you are installing the DB2 pureScale Feature,
the DB2 installer installs the DB2 copy to the same location on each host and
this specified location must be valid on all hosts.
The DB2 database resides on the shared disk and
the DB2 code is installed on
all DB2members.
Click Next.
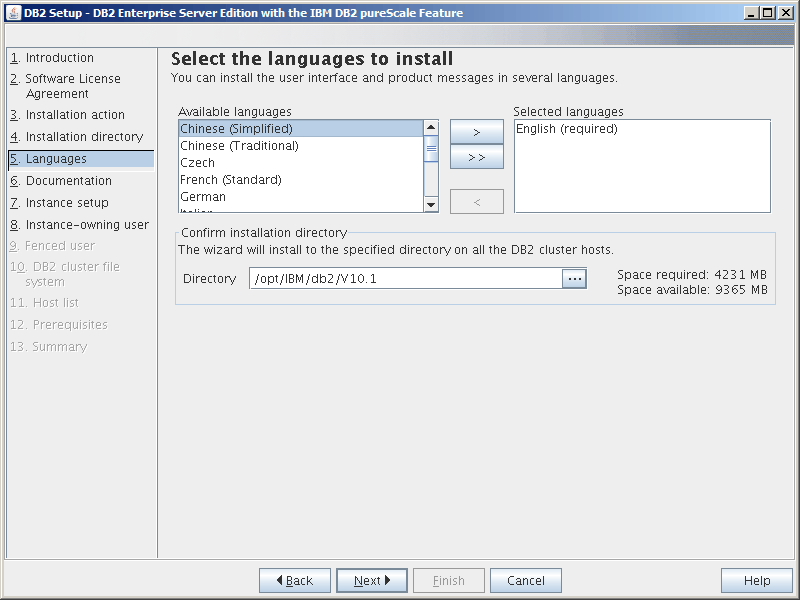
- Select the language to install Panel
Figure 7. Select language to install Panel
Specify the directory path where you want to install
your DB2 languages. If you are
installing the DB2 pureScale Feature,
the DB2 installer installs the DB2 copy to the same location on
each host and this specified location must be valid on all hosts.
Click Next.
- Specify the location of the DB2 Information Center
Panel
Figure 8. Specify
the location of the DB2 Information
Center Panel
Specify the directory path of your DB2 Information Center. You can select the IBM website or
specify the intranet server with the host name and port number.
Click Next.
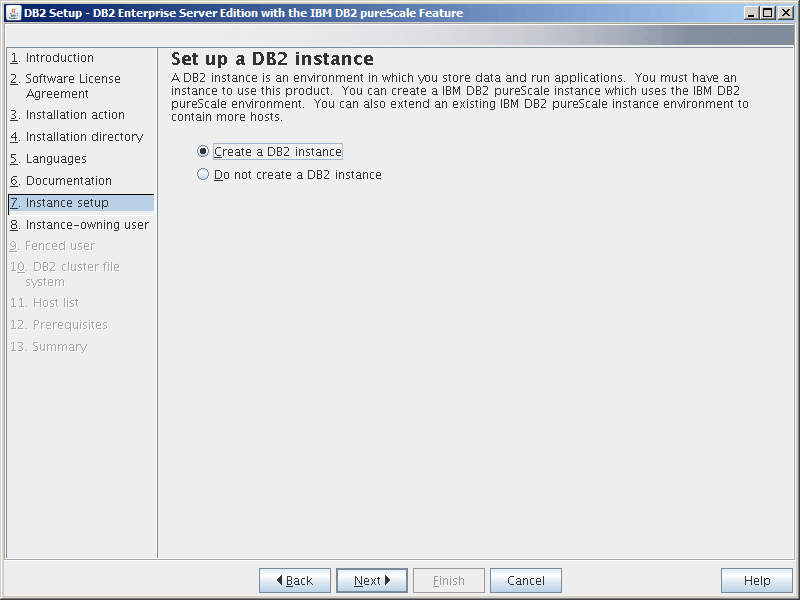
- Set up a DB2 instance Panel.
Figure 9. Set up a DB2 instance
Panel
Use this panel to create a DB2 pureScale instance. If you
would like to add the current host to an existing DB2 pureScale instance, you should
start the instance extension (db2isetup or db2iupdt
-add) from a host that already belongs to the instance.- To create a DB2 instance,
select Create a DB2 instance.
- If you do not want the DB2 Setup wizard
to create a DB2 instance, select Do
not create a DB2 instance. The DB2 installer still performs the installation,
but, you can create an instance at a later point by running the db2icrt or db2isetup command.
In addition, you would have to manually create the required
users in the host for the instance owner, for ssh, and fenced user.
If
you are upgrading from a previous DB2
version, select "Do not create a DB2
instance".
Click Next.
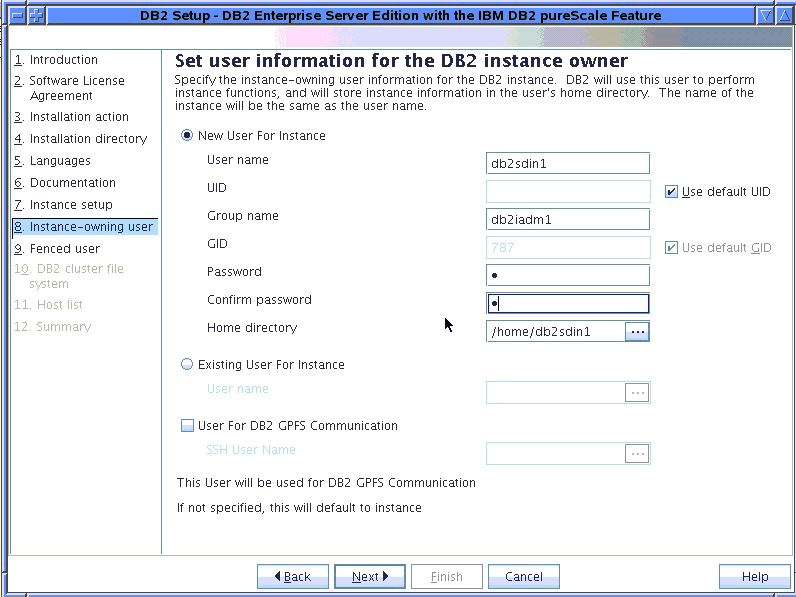
- Set user information for the DB2 instance owner
Panel
Figure 10. Set user
information for the DB2 instance
owner Panel
Specify the user information that the DB2 installer uses to perform instance functions
and store instance information in the user's home directory. The new
user and group is created on all hosts. The name of the instance is
the same as the user name. You can also specify an existing user.
If you select "Existing user", the user name must comply with the
conditions outlined in the "Required users for a DB2 pureScale Feature installation" topic. The
SSH user name is required to use a Secure Shell (SSH) network protocol
between hosts. If this name is not specified, the instance owner user
ID is used. Click Next.
- Set user information for the fenced user.
Figure 11. Set user information for the fenced user
Panel
Create a new user or use an existing user:
- To create a new fenced user, select New user and
provide information about the fenced user in the fields. In a DB2 pureScale environment the
user account is created on all the hosts.
- To use an existing fenced user, select Existing user.
You can type a valid user name or click [...] to select an existing
user name. If you select "Existing user", the user name you enter
must exist on all hosts with the same UID and GID.
- Setting up a DB2 Cluster File System Panel
Figure 12. Setting up a DB2 Cluster File System
Use this panel to specify both of the shared disk
partitions required for the DB2 pureScale Feature installation:
- One partition where the database data resides (Shared disk partition device).
- One partition for cluster recovery purposes (DB2 Cluster Services tiebreaker).
The partitions specified cannot be the same. They should be
raw disks and not be used by anything else.
Click Next.
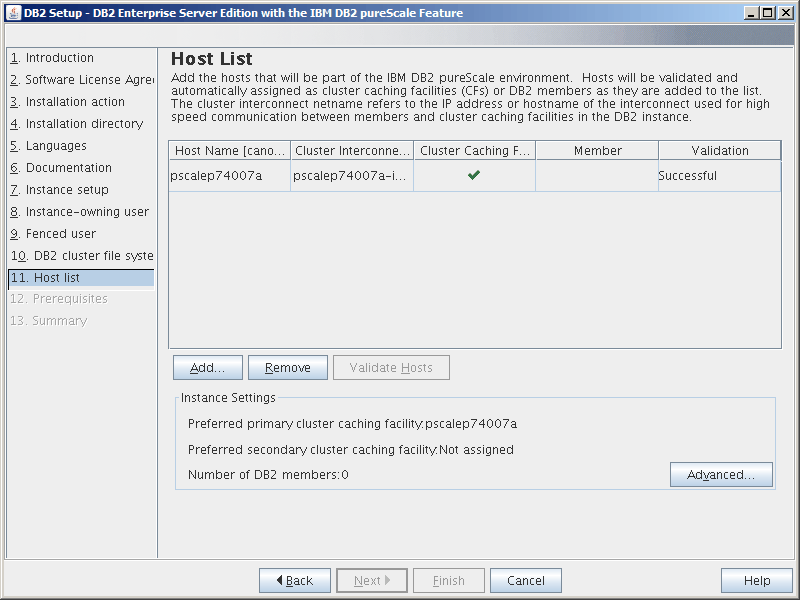
- Host List Panel
Figure 13. Host List Panel
Add the hosts that are part of the DB2 pureScale environment. Hosts
are validated as they are added to the list. The available disk space
for the installation files is checked on every host as part of the
validation process. The installation-initiating host (IIH) is automatically
loaded into the host list.
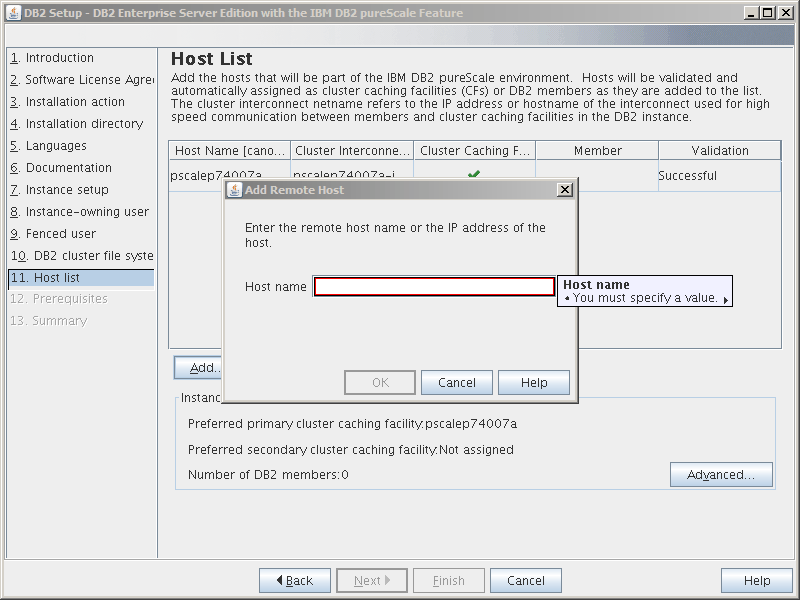
To add a remote host, click Add.
Figure 14. Add Remote Host window
Enter the remote host name and click OK. If you receive an error during host remote validation, you
can fix the problem on the Host List panel or return to any of the
previous panels of DB2 Setup wizard to make changes
to the installation settings. You can also click Advanced on
the Host List page to change the DB2 pureScale instance settings.
In addition, regardless of the status of the hosts, a Secure Shell
check is done at this point to confirm the passwordless SSH availability
between the hosts. Ensure that root SSH access is installed, setup,
and configured on the host you want to add.
Error information is
available by clicking the button displayed in the "Errors" column.
If you cannot resolve a host error, you can remove the host from the
list entirely with the Remove button. You can
then later fix the issue and add the host to the instance after the
initial deployment.
You can also specify custom settings for the DB2 pureScale instance. See the
next step for more details.
- Advanced Instance Settings dialog. After adding all the hosts you want to participate in the DB2 pureScale environment, you
can make changes to the default instance settings by clicking on Advanced.
Optionally, you can make changes to the default instance settings
using the options in the Instance Setting box.
The
following tabs can be displayed:
- Cluster caching facility
Figure 15. Advanced Instance Settings - Cluster
caching facility tab
You can manually select the hosts to be used as CFs,
or allow the installer to automatically assign them. The automatic CF assignment
option is selected by default. At least one CF is
required to run a DB2 pureScale instance.If
you choose to manually assign the CF,
you must specify which CF acts
as the preferred primary CF.
You can also optionally designate which CF acts
as the preferred secondary CF.
These designations indicate which cluster caching facility the
cluster manager attempts to start in the primary CF role.
You
can also select the option of specifying that a host can act as both
a CF and
a member.
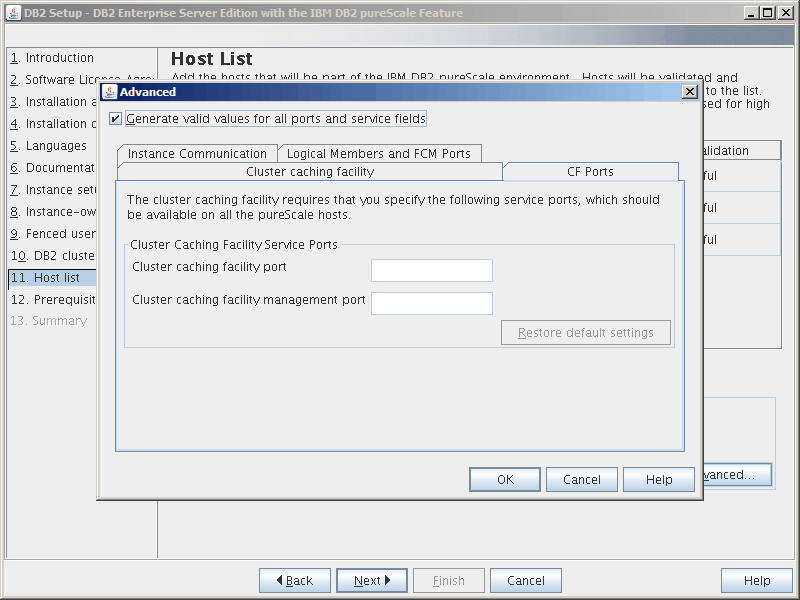
- CF Ports
Figure 16. Advanced Instance Settings - CF Ports
tab
The CF requires
that you specify service ports. The same ports must be available on
all hosts that are running cluster
caching facilities.
The port numbers can be in the range of 1024 to 65535. - Instance Communication
Figure 17. Advanced Instance Settings - Instance
Communication tab
The TCP/IP port number is used by a DB2 instance to listen for incoming DB2 connections. The port number value must be
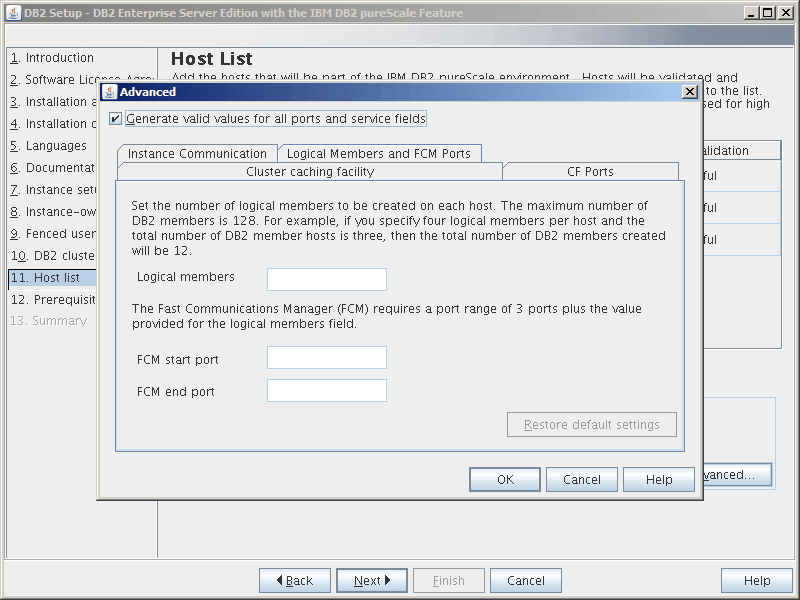
in the range 1024 to 65535 and must be available on all hosts.- Logical Members and FCM Ports
Figure 18. Advanced Instance Settings - Logical
members and FCM Ports tab
You can set the number of logical members to be created on each
host. The maximum number of members is 128. The same logical number
is applied to all hosts. Ensure that the port numbers used by the DB2 pureScale instances are free
on all hosts. The Fast Communications Manager (FCM) requires a port
range of the three mandatory ports plus the value provided for the
logical members field. This port range can designate up to 130 hosts
(128 member + 2 CFs).
The default FCM start port is 60000 and must be in the range of 1024
to 65535.
Click OK to close the Advanced dialog.
The DB2 installer revalidates
the added hosts if you have updated any of the default instance settings.
Click Next on the Host List Panel.
- DB2 Prerequisite Panel Use this panel to determine if your system satisfies the DB2 pureScale Feature prerequisites (such as
operating system level, Linux distribution,
AIXTechnology Level, and other DB2 pureScale specific requirements.)
The status field indicates whether the prerequisites are met. Click Next.
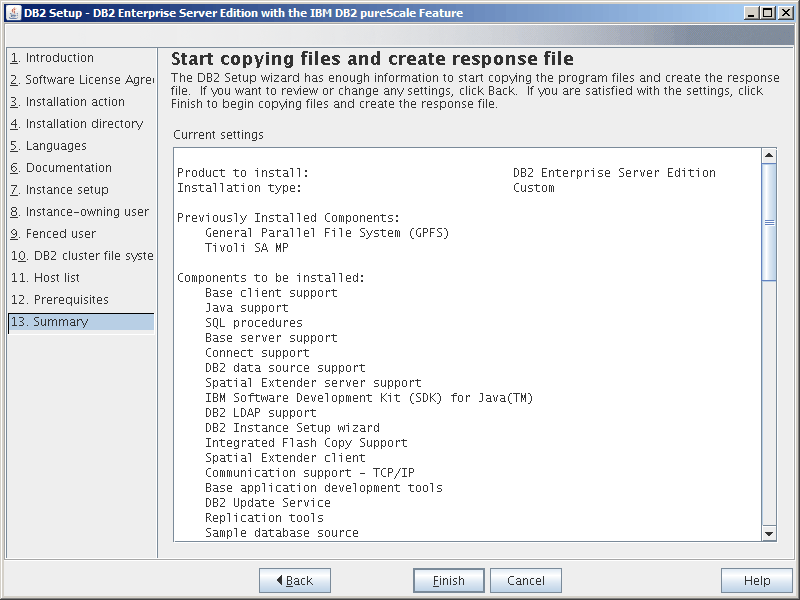
- Summary Panel
You have made all the choices necessary to complete
the DB2 installation or to create
a response file. Review all the features listed in this window before
clicking Finish. To change any of these settings,
click Back to go back to the previous pages
in the DB2 Setup wizard and change your choices.
Clicking Finish launches the installation process
across all specified hosts.
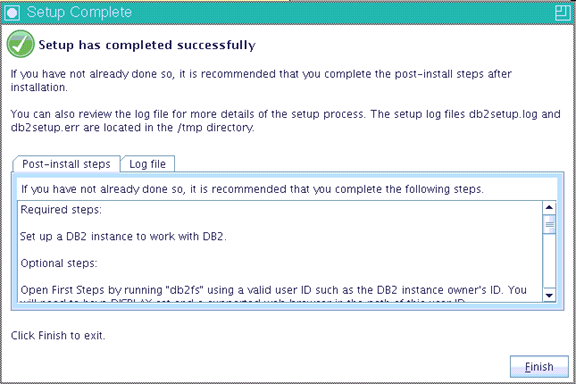
- Setup Complete
Figure 20. Setup Complete Panel
To
use your DB2 database product,
you must have a valid license. For information about obtaining and
applying DB2 license files,
see DB2 database
product licensing and support.
Once the installation is
complete, you can review the post-installation steps, the log file
for more details on what was setup, and the status of each remote
host. Click Finish to exit.
Results
The DB2 pureScale Feature installation
image is copied to the DB2DIR/sd directory on
each host in the DB2 pureScale instance. If you
need to scale the DB2 pureScale instance, you can
use any host within the DB2 pureScale instance from which
to launch the operation.
The
default names and location for the installation log files are:
- The DB2 setup log file.
This file captures all DB2 installation
information including errors. The DB2 setup
log file name is db2setup.log.
- The DB2 error log file.
This file captures any error output that is returned by Java™ (for example, exceptions and trap information).
The DB2 error log file name
is db2setup.err.
By default, these log files are located in the
/tmp directory.
You may have overridden this default when you issue the
db2setup command.
TheDB2 installer saves a copy
of the DB2 setup log file in
the
DB2DIR/install/logs/ directory,
and renames it
db2install.history. If the name
already exists, then the DB2 installer
renames it
db2install.history.xxxx,
where
xxxx is
0000-
9999,
depending on the number of installations you have on that machine.
The DB2 installer also produces logs
detailing the actions on each host, including the IIH, under the /tmp/db2log.xxxx directory
on the local machine (where xxxxxx represents the
process id) and /tmp/db2log directory on each
remote host.
When you want to add another DB2 member or CF,
you can run either the db2isetup or db2iupdt
-add command from any of the existing DB2 member or CF.
These commands performs the DB2 installation
and instance configuration on the target hosts.
What to do next
If
you are in the process of upgrading from a previous DB2 version, return to topic "Upgrading a DB2 pureScale server". Otherwise,
for new DB2 pureScale Feature installation,
refer to your installation plan for performing post-installation tasks.