Monitoring data using Socket
The socket data source offers a convenient means for data to be provided to the agent from an external application, running on the same system as the agent. The external application can send data to the agent anytime it wants to. For example, you could develop a command line interface that allows a user to post data to an attribute group when it is run. Another option is to modify a monitored application to send updates to the agent. Note that the agent does not start or stop the application that is sending data to the socket; this is controlled by the user.
Use the following procedure to create an attribute group to collect data using a Transmission Control Protocol socket (TCP) socket.
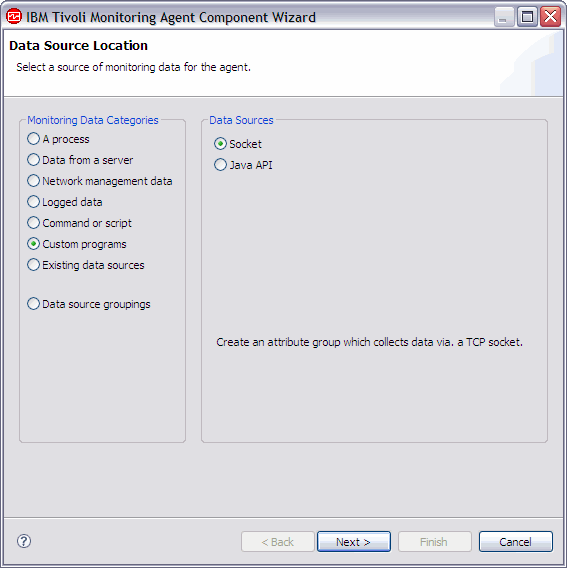
- On the Agent Initial Data Source page (Figure 192) or the Data Source Location page, click Custom programs in the Monitoring Data Categories area.
- In the Data Sources area, click Socket.
- Click Next.
- On the Socket Information page, enter an Attribute group name.
- Enter a help text for the attribute group.
- Select whether the attribute group Produces a single data row, Can produce more than one data row, or Produces events. For more information, see Sending data.
- In the Socket Information section, select a Code page. For more information, see Character sets.
- (Optional) Click Advanced to modify the advanced properties for the attribute group. The Advanced button is active when you have selected that the attribute group Can produce more than one data row, or Produces events.
- Click Next.
- On the Attribute Information page, specify the first attribute for the attribute group. For more information about creating attributes, see Creating attributes.
- Click Next.
- (Optional) On the Global Socket Data Source
Information page, Error Codes section Figure 194, you can define the error codes
that the socket client can send if it cannot collect data. For more
information, see Sending errors instead of data. To define an error code,
do the following:
- In the Error Codes section, click Add. An error code has a limit of 256 characters. Only ASCII letters, digits, and underscores are allowed. No spaces are permitted.
- In the Socket Error Code Definition window Figure 195, enter a display value that is shown in the Peformance Object Status attribute group.
- Enter an internal value. The internal value must be an integer from 1,000 to 2,147,483,647.
- You must define a message text for each error.
You can use message text that was entered previously by selecting
it from the drop-down list. Click OK to return
to the Global Socket Data Source Information page. The message will
be logged in the agent log file.
If no suitable message text is available, click Browse to set up the message text. The Messages (list) window is displayed (Figure 196). The message window lists messages that are defined in the agent. Until you have defined messages, the list remains blank. You can use Edit to alter a defined message and Remove to delete one or more messages that you have defined.
- In the Messages (list) window, click Add to
see a Message Definition window (Figure 197), where
you can type the text that describes the meaning of the new message
and select the message type.
Note:The message identifier is automatically generated for you.
- Click OK.
- The Messages (list) window is displayed with the new message. To verify the message and return to the Global Socket Data Source Information page, click OK.
- (Optional) In
the Supplemental Files section of the Global
Socket Data Source Information page, you can add files that are packaged
with the agent and copied to the agent system when the agent is installed.
The File Type column describes how each file
is expected to be used. Three possible uses are described in the following
table:
For information about where the Supplemental Files are installed with your agent, see New files on your system.Table 24. File types for supplemental files File Type Description Executable Select this option if you want to include an executable with the agent. The agent will not use these files. Library Select this option if you to include a library with the agent. The agent will not use these files. Java resource Select this option to include Java resources with the agent. The agent will not use these files. Click Edit to make changes to the imported file. For more information, see Editing a command file definition.
- Do one of the following steps:
- If you are using the New Agent Wizard, click Next.
--OR--
- Click Finish to save the data source and open the Agent Editor.
Select the operating systems on which the agent listens to data from socket clients in the Operating Systems section of the Socket Provider Settings page. To open this page, click Socket Provider Settings in the outline view or click Global Settings in the Agent Editor on any socket attribute group page.
Note:Error codes and supplemental files can be updated in the Error Codes and Supplemental Files sections of the Socket Provider Settings page. - If you are using the New Agent Wizard, click Next.


