To connect to the SoftLayer® cloud
system, map the SoftLayer account
information to a functional ID. Then, assign that functional ID to
a team.
Before you begin
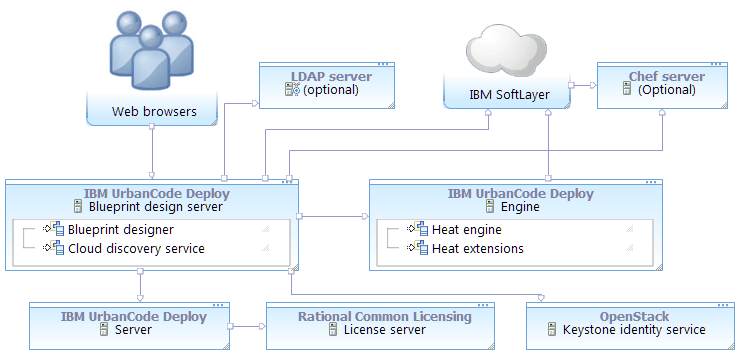
- Configure the images for use with the blueprint designer. See Configuring SoftLayer images.
- Obtain an OpenStack Keystone server. The blueprint design server requires a Keystone server to connect to any cloud. You can reuse a Keystone server that is connected to a different cloud, or you can install a Keystone server for use with SoftLayer. See the OpenStack documentation.
- Obtain an engine. The engine version must match the version of the OpenStack cloud.
You can use any of the following options for the engine:
- Install an engine. See Installing engines in silent mode or Installing engines in interactive mode.
- If you already have an engine, connect it to the Keystone server as described in Connecting engines to Keystone servers.
- Extend an existing Heat orchestration engine and connect it to the Keystone server. See Extending Heat orchestration engines.
- Create a functional user account on the Keystone server. This user account must be a member of the administrative tenant on the Keystone server. Later, you associate the SoftLayer account information with this functional ID. With this account, users authenticate to SoftLayer.
- Install the blueprint design server. See Installing the blueprint design server.
- Connect the blueprint design server to the server. See Connecting the blueprint design server to the server.
- Set up a SoftLayer account. This account must have permission to provision and access
virtual environments and to access other necessary resources such as SSH keys. In general,
give this account the following permissions:
- Support
-
- View Tickets
- Search Tickets
- View Tickets by Hardware Access
- View Tickets by Virtual Server Access
- Add Tickets
- Edit Tickets
- View All Tickets
- Devices
- View Hardware Details
- View Virtual Server Details
- Manage Device Monitoring
- Reboot server and view IPMI system information
- Upgrade Server
- Edit Hostname/Domain
- Issue OS Reloads and Initiate Rescue Kernel
- Manage Port Control
- Network
- View Bandwidth Statistics
- Add IP Addresses
- Services
- Manage SSH Keys
- Manage Provisioning Scripts
- Manage Public Images
- Account
- View Account Summary
- Add/Upgrade Cloud Instances
- Cancel Server
- Cancel Services
- Reset Password
- Add Storage
- Add/Upgrade Services
- Add Server
Also, in the SoftLayer account settings, specify that this account has access to new images. In the setting When new devices are added, specify Always add them to this account automatically.
- Install the blueprint design server. See Installing the blueprint design server.
- Ensure that the blueprint design server can connect to SoftLayer. For example, make sure
that no firewall, proxy, or security settings prevent communication between the blueprint
design server and the cloud. You can verify the connection path with the
curl command, as in the following
example:
Use your SoftLayer user name for user_name and your API key for API_key.curl --user user_name:API_key https://api.softlayer.com/rest/v3/SoftLayer_Account/SshKeys
About this task