To connect to Amazon Web Services (AWS), map the AWS account information to a functional
ID. Then, assign that functional ID to a team.
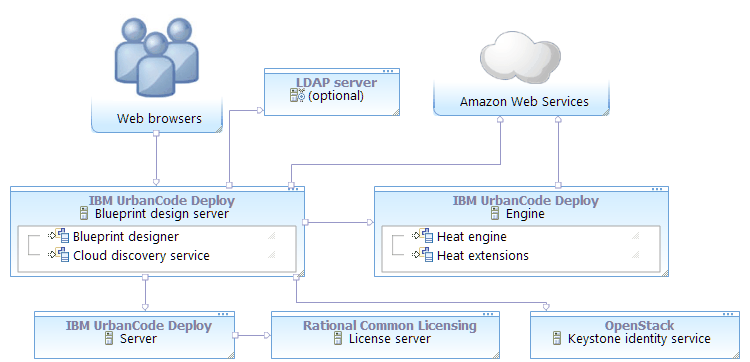
Before you begin
- Obtain an OpenStack Keystone server. The blueprint design server requires a Keystone server to
connect to any cloud. You can reuse a Keystone server that is connected to a different
cloud, or you can install a Keystone server for use with AWS. See the OpenStack
documentation.
- Obtain an engine. The engine version must match the version of the OpenStack cloud.
You can use any of the following options for the engine:
- Create a functional user account on the
Keystone server. This user account must be a member of the administrative
tenant on the Keystone server.
Later, you associate the AWS account information with this functional ID. With this
account, users can authenticate to AWS.
- Install the blueprint design server. See Installing the blueprint design server.
- Connect the blueprint design server to the server. See Connecting the blueprint design server to the server.
- Ensure that the blueprint design server can connect to AWS. You can verify the
connection path with the curl or telnet commands.
For example, make sure that no firewall, proxy, or security settings prevent communication
between the blueprint design server and the cloud. The blueprint design server must be
able to access the AWS endpoints for the regions that you plan to use, such as
ec2.ap-northeast-1.amazonaws.com and
ec2.us-west-2.amazonaws.com.
About this task
The following diagram shows a typical topology for this scenario. The
blueprint design server and engine connect to Amazon Web Services. For authentication
information, the blueprint design server connects to the Keystone identity service and
optionally to an LDAP server.
Procedure
- Log in to the blueprint designer as a user with the following permissions:
- Configure Security
- Manage Users & Groups
- Create a connection to the cloud:
- Click .
- Click Add New Cloud.
- Specify a name for the cloud connection.
- In the Type list, select Amazon
EC2.
- In the Endpoint Type list, select the type of URL that you use to
connect to this cloud.
- If you connect through a private URL, select Internal.
- If you connect through a public URL, select Public.
- In the Identity URL field, specify the location of the identity
service, such as https://example.com:5000/v2.0 or
https://example.com:5000/v3. Do not include a trailing slash.
- In the Timeout in Mins field, specify the amount of time in minutes to
wait for a provision request to be completed.
- Specify the Heat orchestration engine to use:
- Optional: Select the cost center to use to estimate the cost of environments on this cloud.
- Click Save.
- Create one or more cloud projects that tie the functional ID on the Keystone server
with the AWS account information. See Creating cloud projects for the blueprint designer.
- Add the cloud project to a team.
- Add users to the team and to one or more
roles on the team. These users can come from any authentication
realm, including LDAP servers, Keystone identity services, or from
the internal authentication realm.
- Make sure that the roles include the appropriate
permissions for those users, such as creating and editing blueprints.
- Register the Amazon Elastic Compute Cloud (EC2) images with the cloud discovery
service. See Registering Amazon EC2 images with the cloud discovery service.
Results
Users can log in to the blueprint designer and use the cloud connection. At the top of the
page, users can select the AWS cloud connection, cloud project, and region. When they edit
blueprints, the palette shows resources that are available to the AWS account, and they can
provision blueprints to the selected region.