You can set up multiple servers for a clustered
or high-availability configuration. In this configuration, multiple
servers run at the same time.
Before you begin
Install a load balancer. This load balancer will distribute
requests to the servers in the cluster.
About this task
To set up servers in a clustered configuration, you install
the server on separate systems and connect the servers to the same
database. Then, you configure a load balancer to distribute the traffic
between the servers. Instead of accessing the servers directly, users
access the load balancer URL. To the users, that URL appears to host
a single instance of the server with high capacity; the users are
not aware of the multiple servers.
Procedure
- Install and configure the database as usual. If
you already have a database, you can use it for the clustered servers.
See Installing the database.
- If you already have one or more servers, convert them to
cluster servers with the following steps:
- Stop the server.
- On the server, open the file install_folder/ucrelease/conf/server.properties in
a text editor. Use the server installation directory for install_folder.
- In this file, update the public.url parameter
to the URL and port of the load balancer. Escape colons
and other special characters with a backslash (\),
as in the following example:
public.url=http\://balancer.example.com\:8080
- Save the file.
- To install new cluster servers, install the servers as
usual, but with the following changes:
- Connect each server to the same database.
- For the host name that the users access,
specify the host name of the load balancer, not the computer that
hosts the server.
- If you are installing the server on the same computer as another
server, use a different port for HTTPS requests for each server.
See Installing the server. Be sure to note
the ports for each server because you will need this information later.
The default port for HTTP requests is 8080 and the default port for
HTTPS requests is 8443.
- Start each server.
- Log in to one server and select the Keep me
logged in check box.
- Open the server.properties file for
that server.
- In the server.properties file, find
the property cookie.key and copy it. This
property specifies a key that is included in a cookie when a user
logs in. Later, you will copy this key to the other servers so users
do not need to sign in separately on each server.
- In the server.properties file for
each server, add the following properties:
ha.activation.enabled=yes
ha.node.name=nodeName
cookie.key=cookieKey
For nodeName,
specify a unique node name for each server. After you have set up
the servers, this node name appears on each server. Knowing which
server you are using can help you debug problems. To see the name
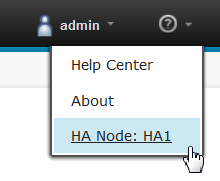
of the node that you are using, click Help at
the top of any page. The node name is shown in the menu, as shown
in the following figure:For cookieKey, specify the cookie
key that you copied from the first server. This key must be the same
on each server. For example, the code that you add
to the
server.properties file might look like
the following example:
ha.activation.enabled=yes
ha.node.name=HA node 1
cookie.key=D3ZizBbRSWFjdOQ8N2a/yQ\=\=
- Optional: To store attachments on a shared
directory, add the property attachments.folder.path and
specify the shared directory, as in the following example:
attachments.folder.path=/
- Restart each server.
- Configure a load balancer to share the
load between the servers. For more information, see the
documentation for your load balancer.
Results
After you configure the load balancer to distribute
connections to the servers, users can connect to a single URL and
use the capacity of all of the servers. The servers also ensure that
only one license per user is used, even if a user accesses multiple
servers.
 For example, the code that you add to the server.properties file might look like the following example: