IBM Data Server Manager
Version 1.1
Quick Start Guide
This guide describes a quick and easy way to set up and get started with the product.
Product overview
Data Server Manager is an integrated database management tools platform for DB2® for Linux, UNIX, and Windows. It is simple to set up, easy to use, and ready to manage hundreds of databases.
Step 1: Evaluate the hardware and system requirements

Data Server Manager is
supported on Linux, AIX, and Windows. For detailed system requirements,
see:
http://www.ibm.com/support/docview.wss?uid=swg27045176
http://www.ibm.com/support/docview.wss?uid=swg27045176
Step 2: Review the product architecture
The following diagram illustrates the architecture
of the product and provides a basis for planning
how you will set up Data Server Manager.
The Base Edition software package includes the Data Server Manager software
component. The Enterprise Edition also includes IBM
InfoSphere®
Optim™ Data Tools Runtime Client software
that provides extended features, and it requires the use of a
repository database. 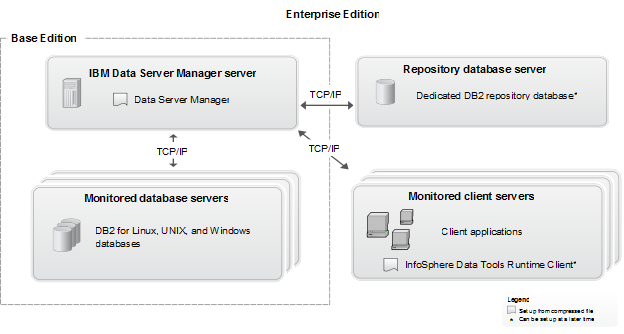
Tip: The InfoSphere
Optim Data Tools Runtime Client software
and repository database can be set up after you complete
the initial product setup.
Step 3: Access and extract the software files

Before you set up Data Server Manager in
your environment, extract the software files to a new directory
on your server:
- To download the product from IBM Passport Advantage, follow the
instructions in the download document
at:
http://www.ibm.com/support/docview.wss?uid=swg24039424 - From the downloaded compressed file, extract the Data Server Manager archive.For example, extract the archive into a new directory (setup_directory) such as:
- Windows: C:\DSM
- Linux and UNIX:
/usr/ibm/dsmImportant: Make sure that the user ID that extracts the files has write access to the new directory. The user ID that will run the setup program and the user ID that will run Data Server Manager also need write access to this directory.
Step 4: Set up Data Server Manager

To set up Data Server Manager interactively with the default product settings:
- From the new directory where you extracted the files, open the setup_directory/ibm-datasrvrmgr directory, and then run the setup.sh or setup.bat file to set up the Data Server Manager software for your selected platform.
- Accept the license agreement.
- Specify a user ID and a password for the default product administrator user. The user ID is specific to the product and is independent of operating system user IDs. Make a note of the user ID and password that you choose so that you can use them to log on to the web console after the setup is complete.
- If needed, update the default HTTP, HTTPS, and status ports that are used with the product. Tip: You can update the HTTP and HTTPS ports later from the page of the web console.
- Complete the product setup and wait for the product to start.
At the end of the setup process, the URLs for the web console are displayed.
Tip for the Enterprise Edition: If
you have a license for the Enterprise Edition of Data Server Manager,
you can create the required repository database before you set up
the product, and then run the Data Server Manager setup
program with a customized configuration file so that the setup program
also configures the database as the repository. Alternatively, you
can create the repository database later,
and configure it from the page of the web
console. For information about how to set up the Enterprise
Edition, or how to upgrade to the Enterprise Edition
from a Base Edition, see the Setup roadmaps topic in
the product documentation.
Step 5: Access the web console and explore the product features

- Open the Data Server Manager web
console by navigating in a browser to the web console URL that was
provided when the setup completed, for
example: http://localhost:11080/
Specify the default administrator user ID log in credentials that you specified during the setup.
- Click one of the tasks on the Welcome page.
- When prompted, create a connection to a supported database.
- Explore the features in the product, including viewing performance data, exploring the objects in the database, or generating SQL or administration commands.
More information

For more information, see the following resources:
- In-product help at in the web console.
- Product documentation at: http://www.ibm.com/support/knowledgecenter/SS5Q8A/product_welcome.html
- Enterprise edition: How to create a repository database: http://www.ibm.com/support/knowledgecenter/SS5Q8A_1.1.0/com.ibm.datatools.dsweb.ots.installconfig.doc/topics/creatingrepo.html
- IBM Data Server Manager community at: https://ibm.biz/BdXcBE
- Product support at: http://www.ibm.com/support/entry/portal/overview/software/information_management/ibm_data_server_manager