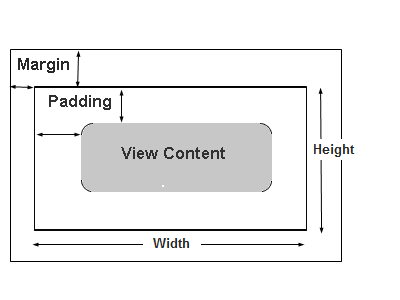
Positioning options for coach view instances
You can control the spacing of the coach views in your coaches by setting the positioning properties for each coach view instance. The values that you set can be absolute, for example in millimeters, or relative, for example as a percentage of the available display space.
The values that you set determine the amount of space that surrounds the view content. Padding refers to the space inside the border of the coach view. Margin refers to the space outside the coach view border. If your view does not have a visible border defined, you can see the border by selecting the coach view so that the border is highlighted.
You can also specify the height of a coach view, measured from the bottom to the top border, and the width from the left to right border. The minimum height and width settings allow you to limit the reduction in height or width, for example, if the screen space on the run time device is reduced. An example of how these settings interact is described below.

The margin and padding properties take up to four values, corresponding to values for the top, right, bottom, and left of the view. If a single value is specified for margin or padding, it is applied to all four sides. For example, if you specify the view margin with a single value of 15pt, then the margin on all four sides of the view will be set to 15 pt. To set the values individually for the different sides of the view, you can type them out individually using the format top right bottom left or you can click the button next to the field to use the dialog to enter values for each side.
The values that you specify can be relative or absolute values, depending on the unit of measurement that you specify. The supported units of measure are described in the following tables.
| Abbreviation | Description |
|---|---|
| % | Percentage of viewport |
| px | CSS pixels |
| em | Width of letter 'm' in current font |
| rem | Width of letter 'm' in font of top-level page element |
| Abbreviation | Description |
|---|---|
| in | Inch |
| mm | Millimeter |
| cm | Centimeter |
| pt | Point (1/72 inch) |
| pc | Pica (12 points) |
Coach view positioning property settings follow the same inheritance patterns as other responsive properties. For example, if you set positioning properties for your view using the Large screen size setting, these values are inherited by other screen size, unless you overwrite these values. When looking at the view instance under another screen size setting, for example, the small screen setting, you can see the inherited values by default. You can overwrite these values by entering new values for that screen size setting.
Overflow settings
At run time, the contents of a coach view instance might be larger than the display area defined by the Height and Width settings for the view. By default, all view content is shown in the display area. However, in some cases, view content might overlap, particularly in complex coach views that include other views.
You can optionally configure your coach view to behave differently by setting Overflow Content to any of the values in the following table.
| Value | Behavior |
|---|---|
| Show all content (visible) | All coach view content is always displayed. This is the default setting. |
| Hide overflow content (hidden) | Any overflow content is not visible. |
| Permanent scroll bars (scroll) | Scroll bars always appear with the coach view. |
| Optional scroll bars (auto) | Scroll bars are automatically included when content is larger than display area. |