< Previous | Next >

Task 1: Designing the rule project

To help business users write rules easily, you must create a meaningful vocabulary for them.

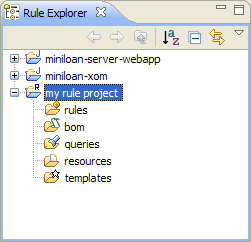
In this task, you use Rule Designer to create a vocabulary directly from the object model of the existing Miniloan application.

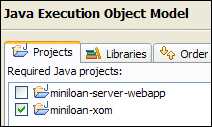
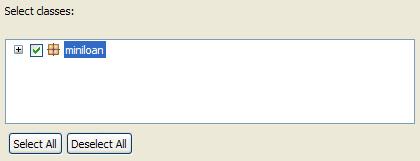
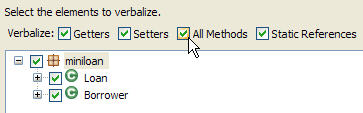
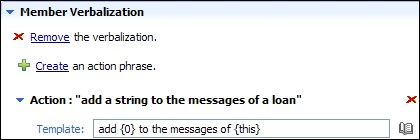
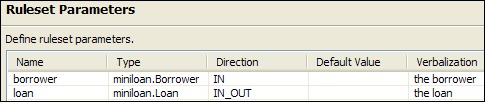
Business users need to write and edit rules using familiar terms. As the rule project developer, you must create a business rule vocabulary for them. The process for creating this vocabulary is called “verbalization”. You create a Business Object Model (BOM) based on an object model defined in a Java™ project. The classes and members of the BOM map to the terms and phrases familiar to the business user, as follows:

BOM design

Time This task should take you about 20 to 30 minutes to complete.

Step 1: Start Rule Designer

Rule Designer is the development environment for business rule applications. Developers can take advantage of its integration with Eclipse to develop Java projects along with rule projects.

In this tutorial, the rule project containing the rules to import is provided in American English (en_US) only. Therefore, you must start Rule Designer in American English (en_US) to edit and create business rules. To start Rule Designer in American English (en_US) and to import the projects for this tutorial, you open the samples console.

To open the samples console:

  1. From the Start menu, click All Programs > IBM > package_group > Sample Server > Samples Console (en_US) . package_group refers to the package group specified in IBM® Installation Manager during installation. The default package group is Operational Decision Manager V8.5.

    The Workspace Launcher dialog shows your default workspace. If the workspace is not empty, switch to a new and empty workspace.

  2. To create a new workspace, change the name of the workspace to a new name, and click OK.
    Tip: If you do not see the Workspace Launcher dialog when starting Rule Designer, change the workspace by clicking File > Switch Workspace.

    The Samples Console perspective opens on the Samples and Tutorials view which contains the samples and tutorials to discover the components of Operational Decision Manager. You can view the instructions and import the projects for each sample or tutorial.

  3. Under Getting Started, expand Decision Server, and under start, click Import projects.

    Rule Designer imports the projects for the Getting Started tutorial, and switches to the Rule perspective icon Rule perspective.

The Rule perspective contains various views that you will discover in this tutorial:

The Rule Explorer currently contains two projects:

  • miniloan-server-webapp: the project for the Miniloan web application from which we retrieve the hard-coded rules.

    You can inspect these rules in the validateWithJava method of the miniloan-server-webapp/src/miniloanweb/MiniloanBean.java class.

  • miniloan-xom: the Java project for the Miniloan application, which is composed of the miniloan package that includes the Borrower and the Loan Java classes.

The Rule Project Map guides you through the different steps for setting up a rule project. It is currently empty because you have not created a rule project yet.

Empty Rule Project Map view

If the Rule Project Map is not displayed, click Window > Show View > Rule Project Map to open it.

Step 2: Create a rule project

The Miniloan business object model is composed of two classes, one for the borrower and one for the loan. Before creating the rule project itself, make sure that the miniloan-xom Java project is displayed in the Rule Explorer.

In Rule Designer, you store the business logic of your application in a rule project. The rule project contains rule artifacts, business object model (BOM), vocabulary, and reference to the execution object model (XOM). This project enables you to manage, build, and debug the items that comprise the business logic of your application.

To create the rule project:

  1. Make sure that you are in the Rule perspective icon Rule perspective.
    Tip: To switch to the Rule perspective, click the Window menu, click Open Perspective > Other, then select Rule, and then click OK.
  2. Click File > New > Rule Project.
  3. Select Standard Rule Project and click Next.
  4. In the Project name field, type my rule project.
  5. Click Finish.

    my rule project opens in the Rule Explorer, and the Rule Project Map is now active.

    New project in the Rule Explorer

    For now, the rule project only contains empty folders. During the tutorial you will use the rules and bom folders to store your rules and your BOM.

Step 3: Attach the Java project

Now that you have an empty rule project, you can use the Rule Project Map to guide you through the steps of building the project.

The first thing that your rule project needs is the object model of the Miniloan Java project, which you imported into your workspace. This is referred to as the execution object model (XOM).

Note: Alternatively, you can use an XML Schema for the execution object model.

To import the XOM into your rule project:

  1. In the Rule Explorer, click my rule project to select it.

    The Rule Project Map displays the steps to follow to design your rule project.

  2. In the Design part of the Rule Project Map, click Import XOM.
    Rule Project Map, Import XOM highlighted
  3. In the Import XOM dialog, select Java Execution Object Model and click OK.
  4. Under Required Java projects, select miniloan-xom.
    Selecting miniloan-xom
  5. Click OK.

    The Rule Project Map shows that you now have one XOM in your rule project.

    Rule Project Map

Step 4: Create the BOM

Before you create and edit rules, you need to define a business object model (BOM). You can create a BOM from scratch or create it automatically by parsing your execution object model (XOM).

Here you use Rule Designer to parse your Java classes (XOM) automatically and create the BOM from their methods and properties. Then, you can write rules from the vocabulary terms that are contained in the BOM.

To create a BOM from the XOM:

  1. In the Design part of the Rule Project Map, click Create BOM.
    Tip: You can also right-click the bom folder in the Rule Explorer and click New > BOM Entry.
  2. In the New BOM Entry wizard, in the Name field, type miniloan.
  3. Make sure that Create a BOM entry from a XOM is selected, and then click Next.
  4. In the Choose a XOM entry field, click Browse XOM, select platform:/miniloan-xom, and then click OK.
  5. Under Select classes, select the miniloan package. Selecting the package selects all the classes in the package.
    Selecting the miniloan package
  6. Click Next.
  7. In the BOM Verbalization page, you must select the All Methods check box. This ensures that all methods are verbalized in addition to the elements already selected.
    Selecting the All Methods check box
  8. Click Finish.
  9. In the Rule Explorer, double-click bom > miniloan to open the BOM Editor.

    Take a few moments to look at your BOM. In the BOM Editor, expand the miniloan entry:

    Expanded miniloan BOM entry

    You now have in your BOM two classes equivalent to those in the XOM: one for the borrower and one for the loan.

  10. Double-click the Loan class to open it in the BOM editor.

    All Java members and methods have been converted and assigned a default verbalization, which you can change.

  11. In the Members section, double-click the addToMessages(String) method.

    The BOM editor switches to the Member tab. In the Member Verbalization section, you can see that the verbalization of this method is add a string to the messages of a loan:

    Method verbalization in the Member Verbalization section

    This verbalization will also be used in the Rule Editor.

  12. Close the miniloan tab to close the BOM Editor:
    Closing the BOM Editor

Step 5: Declare ruleset parameters

A ruleset is an executable package that includes rule artifacts and non-rule artifacts. It contains a set of rules that can be executed by the rule engine. Ruleset parameters are part of the design of the project because they define the data that is sent to the rule engine and the type of information that can be retrieved. Rules can then use these parameters to manipulate objects passed to the rule engine, as you will see later.

Ruleset parameters are equivalent to Java method parameters. They are references that you can use when you write your rules.

To enable a decision to be made on the status of a loan, you need to create ruleset parameters for a borrower and a loan:
  • The borrower must be an IN parameter. The value of the IN parameter is provided as input to the ruleset on execution.

  • The loan must be an IN_OUT parameter. The value of the IN_OUT parameter is provided as input to the ruleset on execution, and can be modified by the ruleset and provided as output at execution completion.

To declare ruleset parameters:

  1. In the Design part of the Rule Project Map, click Define parameters.
    Tip: You can also right-click the my rule project project in the Rule Explorer and click Properties.
  2. In the Properties dialog, make sure that Ruleset Parameters is selected.
  3. To define the borrower parameter, click Add.

    A new row is displayed with default values. Change the values as follows:

    1. In the Name column, type borrower.
    2. Click the cell in the Type column, click the ... button to display the Types dialog, and then double-click the Borrower type in the Matching types box.

      The miniloan.Borrower type is displayed in the Type column.

    3. In the Direction column, select the IN direction.
    4. In the Verbalization column, type the borrower.
  4. To define the loan parameter, click Add.
    1. In the Name column type loan.
    2. Click the cell in the Type column, click the ... button to display the Types dialog, and then double-click the Loan type in the Matching types box.

      The miniloan.Loan type is displayed in the Type column.

    3. In the Direction column, keep the default IN_OUT direction.
    4. In the Verbalization column, type the loan.

      Your ruleset parameters are displayed as follows:

      Defining ruleset parameters
  5. Click OK to save.

You now have a rule project with a vocabulary, and ruleset parameters. You have completed the design part of your rule project.

Before writing the actual rules in Rule Designer, you will orchestrate how your rules will be executed. You do this with a ruleflow in the next task.

< Previous | Next >