DFDL schema editor
Use the DFDL schema editor to create, edit, and test DFDL schema files.
The DFDL schema editor is launched when you open an existing DFDL schema file, or when you create a DFDL schema file by using the wizard.
You use the DFDL schema editor to:
- Edit DFDL schema files. Schema files that are created by the wizard are automatically populated with content, which you edit as required.
- Populate empty DFDL schema files with DFDL schema objects by creating the DFDL schema objects and DFDL properties required to represent your message format.
- Test parse your DFDL schema files against sample input data, and view a visual representation of how the DFDL parser uses the DFDL schema annotations to parse your input data.
- Test serialize a logical instance document against your DFDL schema file, and view a visual representation of how the DFDL serializer uses the DFDL schema annotations to serialize your output stream.

- 1. Navigator view
- The Navigator view shows a hierarchical view of all the resources that are currently in your workspace. By expanding the folder for a project, you can see the resources, including any DFDL schema files, that this message set project contains. Selecting a DFDL schema file in this view opens it for editing in the Editor.
- 2. Outline view
- This view displays an outline of the DFDL schema file that is currently open in the editor area, and lists its structural elements.
- 3. Editor
- You use the Editor to define the logical structure of your data
formats by creating DFDL schema objects such as Elements, Complex
types, Simple types, and Groups. You also use the Editor to define
DFDL annotation objects such as Formats, Escape schemes, and Variables.
The Editor shows the DFDL objects for the DFDL schema file that you
have opened.
A main toolbar spans the Editor and the DFDL Properties area. Use the buttons on this toolbar to control what is displayed (hide all properties, show quick outline, show only the selected item), to test parse and test serialize the model, and to create a logical instance.
Use the toolbar that is located below the main toolbar, to the left of the Editor view, to add, remove, and reorder elements.
Use the tabs across the top of the Editor to switch between open DFDL schema files.
- 4. DFDL Properties
- You use the DFDL Properties area to edit the DFDL representation
properties, variables, and test conditions for your DFDL objects.
The DFDL Properties area shows the DFDL properties for the object
that you have currently selected in the Editor. The DFDL properties
area has three tabs:
- Representation Properties. Tip:
- You can select multiple objects in the Editor, but you see properties for only the first item that you selected.
- Use Filter to find the property that you want to change.
- Click Show Only Basic Properties to filter properties. If only basic properties are displayed, click Show All Properties to display all properties
- To unset a property value, use the Clear local property value and Clear all local properties buttons to the right of the filter bar and filter actions. Using the Delete key can result in the property being set to an empty string, rather than being unset.
- The value that is entered in the Sample Value column in the main editor view, or the Sample value text field in the properties, is the lexical representation of the corresponding XML Schema type. This value is what will appear in the logical instance that is generated. Information on the lexical representation of the different XML Schema types can be obtained from XML Schema Part 2: Datatypes Second Edition.
- Variables. DFDL variables are not fully supported in the current IBM® implementation of DFDL.
- Asserts and Discriminators. Define DFDL asserts and discriminator tests to ensure, during parsing, well-formed data, and to resolve points of uncertainty.
- Representation Properties.
- 5. Problems view
- Each time you save a change within a DFDL schema file, the content is validated to ensure that the DFDL schema file follows the DFDL specification. All informational, warning, and error messages that relate to the validation appear in this view. Double-click a problem to display the object in error in the editor.
- 6. Help
- This view displays help on the item that has focus. If the Help view is not displayed, press F1.
DFDL test perspective
The DFDL Test perspective gives you tools to test whether your DFDL schema file correctly models your data. Click Test Parse Model or Test Serialize Model in the Editor area to switch to the perspective.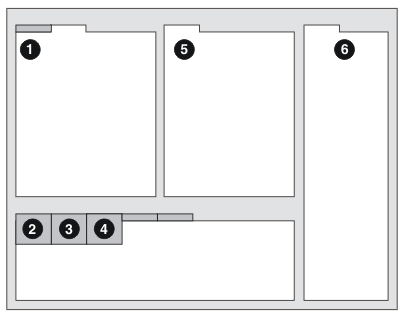
- 1. Editor
- The editor, as previously described.
- 2. DFDL Test - Parse
- You use the DFDL Test - Parse view to view how the DFDL parser used your DFDL schema file to parse your input data. Selecting a DFDL schema element in the Editor area highlights the associated data in the DFDL Test Parse view.
- 3. DFDL Test - Serialize
- You use the DFDL Test - Serialize view to view how the DFDL serializer used your DFDL schema file to serialize your sample logical instance data.
- 4. DFDL Test - Trace
- You use the DFDL Test - Trace view to identify any DFDL parsing errors that occurred during test parsing of sample data, or any DFDL serializing errors that occurred during test serialization of sample data.
- 5. DFDL Test - Logical instance
- The DFDL Test - Logical Instance view shows the results of the
DFDL parser parsing your input data using your DFDL schema. The results
are in a logical tree format, sometimes called an infoset.
Data in the view can also be generated by the Create Logical
Instance button. The logical data can also be used as
input data to the DFDL serializer.
The view has two tabs, a Tree view and an XML view. Both tabs display the same data, in different formats.
- 6. Help
- Help, as previously described.