Configuring for Web Response Time Content Checking
Some well designed websites have the ability to catch internal errors and surround them with HTML code to display more user friendly error messages. The following example shows a web page display of an internal error that provides more useful information to the user:
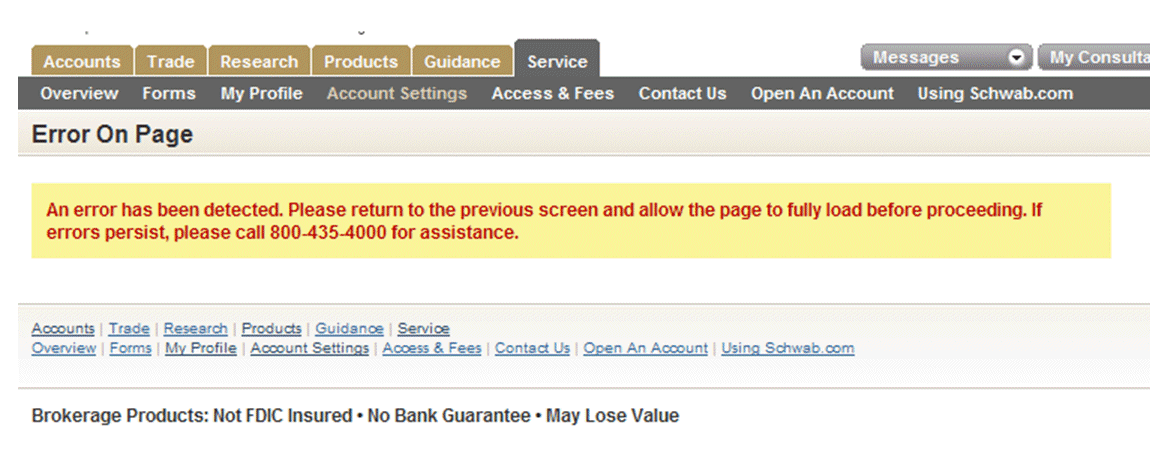
In this example, you might want to track this type of an error by searching on the string: An error has been detected. For the Web Response Time agent, you can configure this type of content checking of web pages, searching web page titles or the body of the HTML code. If the web page being monitored has this phrase, it is flagged as a content violation, or availability error.
Use with Appliance mode only: Content checking is not available when using the HTTPS plugin.
General configuration procedure
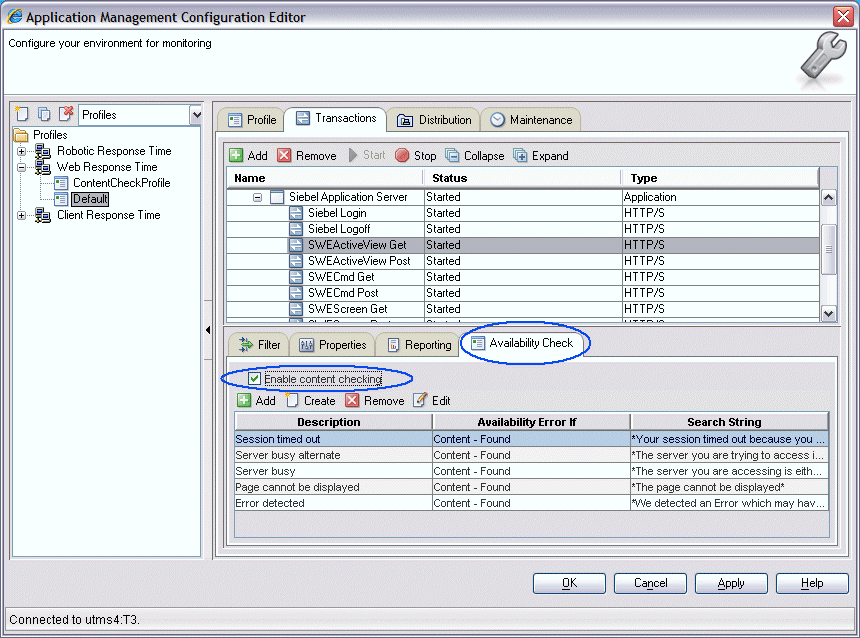
- Access the Profiles view.
- Click
 to expand the Web Response Time node and select
the desired profile.
to expand the Web Response Time node and select
the desired profile. - In the configuration window, click the Transactions tab.
- Include applications and transactions in the profile as needed.
- Select one or more transactions in the upper portion of the Transactions tab for which you want to configure content checking.
- Click the Availability Check tab to display a table of
the content checking filters for the selected transactions. Initially,
if no filters have been added to the selected transactions, this table
is empty.
 If you select more than one transaction, the following conditions apply:
- If all selected transactions are enabled for content checking, Enable content checking is automatically selected, otherwise it is cleared.
- Only availability check filters that are common to all selected transactions are displayed in the table.
- Availability check filters that are selected to be added to the table are added to each selected transaction.
- Availability check filters that are edited or removed are handled the same way for each selected transaction.
- Above the filter table is the Enable content checking check
box. Before you can create new filters, add, remove, or edit filters
in the table, select the Enable content checking check box.
Processing overhead considerations: If you experience processing overhead problems, you can clear this check box for a specific transaction to disable content checking. The availability check filter definitions remain in place, however, so you can enable content checking again at a later date if needed.
- With content checking enabled, you can perform any of the following
tasks:
- Click Create to define a new availability check filter and add it to the table. See Creating a new availability check filter for details.
- If there are availability check filters that have been defined but are not already included in the table, you can click Add and select one or more defined filters to add to the table. See Adding an availability check filter to the table for details.
- Select one or more filters in the table and click Remove to remove them. See Removing an availability check filter from the table for details.
- Select a filter in the table and click Edit to modify the definition as needed. See Editing an existing availability check filter for details.
- Click Apply to save your settings and continue using the Application Management Configuration Editor.
- When you are finished, click OK to close the Application Management Configuration Editor.
Creating a new availability check filter
When you enable content checking and click Create to create a new availability check filter, a dialog box similar to the following example is displayed:

- Description
- Enter a text string that briefly describes the availability check filter being created.
- Availability error if:
- Select one of the following options from the available selection
list:
- Content - Found
- Content - Not Found
- Page Title - Found
- Page Title - Not Found
This field specifies whether the search will result in an availability error if the filter string is found or not found in the selected portion of the web page (content or page title).
- Search string
- Enter the case sensitive text string to be searched
for in the web page. Optionally, you can include the asterisk (*)
wild card character before or after the string. For example, if you
want to search for the text string Your session timed out,
enter it as *Your session timed out*.
You can also enter raw HTML code as part of the search text, but that full HTML is rendered and displayed in the content filter table. For example, if you entered the text string Your <b>session</b> timed out, this is displayed in the content checking filter table as written, Your <b>session</b> timed out. However, if you included <html> tagging as well, such as <html>Your <b>session</b> timed out</html>, the bolded text is rendered and the text string is displayed in the table as Your session timed out.
Click OK to save the definition and add the filter to the table. Once defined, this filter is available to be added to any other Web Response Time profile.
Adding an availability check filter to the table
With content checking enabled, if there are availability check filters defined that are not already included in the availability check table for the selected transaction, the Add icon is enabled and you can click it to add one or more additional filters to the table.
Even if a transaction in the profile has no availability check filters previously defined, you can still select from a set of predefined filters using the Add function:
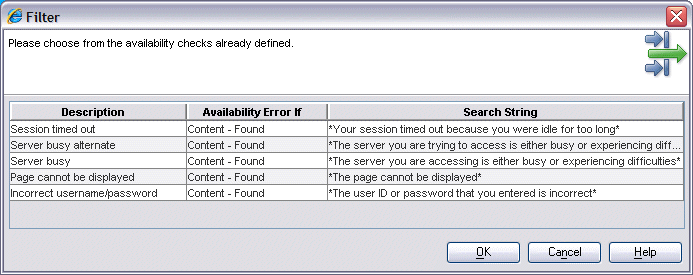
Additional availability check filters that you have defined for this or other Web Response Time transactions are also displayed in this table. You can sort the table by column if desired. Select one or more availability check filters from the table and click OK to add it to the filter table for the selected transaction.
Click OK to add the selected filters to the transaction table.
Editing an existing availability check filter
With content checking enabled, when you highlight an existing availability check filter in the table and select the Edit function, the same dialog box used for creating a new availability check filter is displayed, except the fields are already populated with the information for the highlighted filter. Modify the filter definition as needed and click OK to save it in the table.
Click OK to save the definition and add the filter to the table. Once defined, this filter is available to be added to any other transaction in a Web Response Time agent profile.
Removing an availability check filter from the table
With content checking enabled, you can highlight an availability check filter in the table and click Remove to remove the filter from the table. You can still add the removed filter back to this transaction or to another Web Response Time transaction. If the availability check filter is removed from all transactions in the profile, it is deleted when the Application Management Configuration Editor is closed.
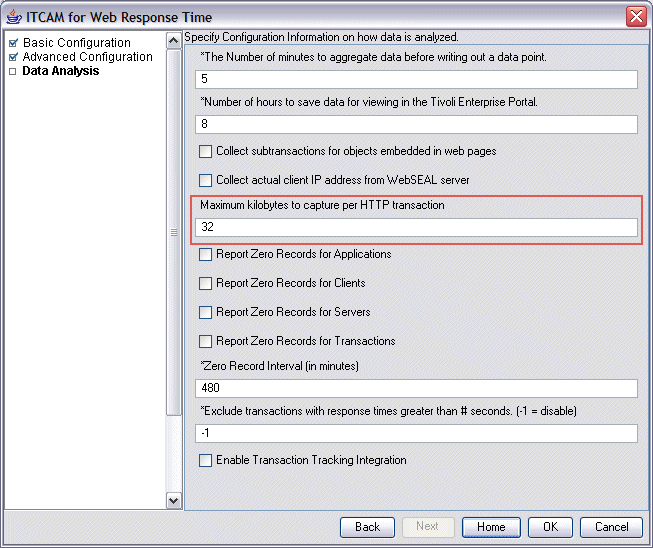
Configuring enough captured bytes to ensure a match
Content checking considers only the bytes that are captured by the Web Response Time agent. If the Maximum kilobytes to capture per HTTP transaction configuration setting for the agent is not large enough to capture the offending string, some errors might not be observed using the content capture filter. Be sure to check your Web Response Time agent configuration for the value set for Maximum kilobytes to capture per HTTP transaction and ensure that it is large enough. Be aware that raising this value increases the amount of memory used by the Web Response Time processes at runtime.
More information
See the Workspaces chapter of the IBM Tivoli Composite Application Manager for Transactions User's Guide for more information about the Errors workspace, where content error information is displayed.