Scheduling maintenance windows
You can use the Application Management Configuration Editor to create and manage maintenance windows for an application or a system.
You can use the maintenance window feature of Application Management Configuration Editor to define the times when an application or a system is unavailable because of maintenance.
When assigned to a profile, these maintenance windows disable the collection of data (including any Robotic playback). Maintenance windows can be configured for specific periods of time as well as the ability to repeat. For instance, you can create a maintenance window for every Saturday from 02:00-04:00. When assigned to a profile, this window will cause data to not be collected for that profile every Saturday during the hours that you specify. The maintenance window times can be either in the agent's local time zone or in a specific chosen time zone.
Procedure: Creating a maintenance window
- Access the Maintenance Windows view.
- Access the Tivoli Enterprise Portal.
- Click
 in the toolbar.
Previously defined applications, transactions, clients, and profiles are retrieved from the repository and loaded into the Application Management Configuration Editor. The Application Management Configuration Editor is displayed in a separate window.
- By default, the list of applications is displayed when the Application Management Configuration Editor is first
opened. Click
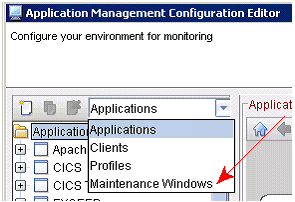
 and select Maintenance Windows to display the list of predefined
maintenance windows in the navigation view.
- Create a new maintenance window or create
a maintenance window using an existing window as a template.
- To create a new maintenance window, click
 .
. - To create another maintenance window from an existing one, select
the navigator item of the existing maintenance window that you want
to use as a template, and click
 .
.
The Create Maintenance Window window is displayed.
- To create a new maintenance window, click
- Define the new maintenance window.
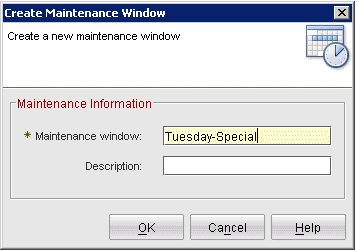
- In the Maintenance Window field of the Create Maintenance Window window, type the name of the new maintenance window.
- Optional: In the Description field, type the description text for the new maintenance window.
- Click OK. The maintenance tab is displayed
on the right pane of the Application Management Configuration Editor, similar
to the following example:
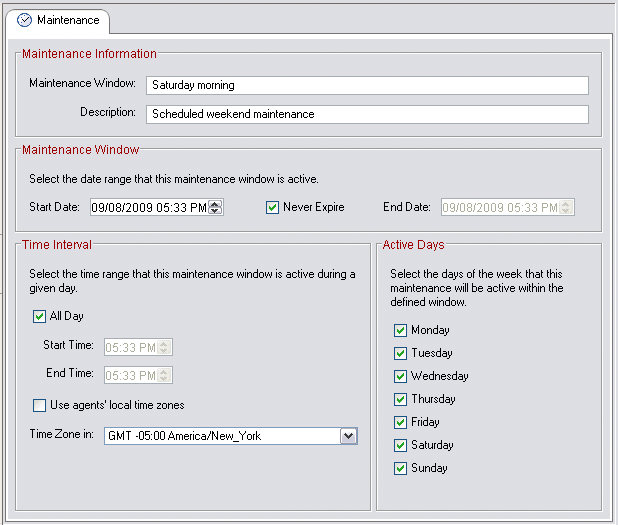
The name and optional description you provided for the new maintenance window is displayed in the Maintenance Information section at the top.
- In the maintenance panel, provide the detailed information of
the new maintenance window.
Table 1. Maintenance window definition Name Description Maintenance Window Start Date Specifies the date when the maintenance starts. This date is when the maintenance is created by default. Never Expire Indicates the maintenance never expires when this check box is selected. This check box is selected by default. End Date Specifies the date when the maintenance stops Time Interval All Day Indicates the time interval of the maintenance window is 24 hours when this check box is selected. This check box is selected by default. Start Time Specifies the specific time when the maintenance starts. End Time Specifies the specific time when the maintenance stops. If the end time is set to a time ahead of the start time, the maintenance window crosses a day boundary. Use agent's local time zones Indicates the maintenance applies to the agent local time zone when this check box is selected. This check box is not selected by default. Note: For non-ARM Transaction Tracking transaction types, the time zone of the Transaction Collector is used, and not the time zone of the data collector generating the Transaction Tracking events.Time Zone in Specifies which time zone to which the maintenance window is applied. Active Days Monday-Sunday Specifies the day of the week when the maintenance is active. - Click Apply to save your changes and continue using the Application Management Configuration Editor.
- When you are finished, click OK to close the Application Management Configuration Editor.
Procedure: Applying the maintenance window to a profile
To apply the maintenance window to a profile, perform the following steps:
- Access the Profiles view.
- To see all the available existing profiles, click
 to
expand grouping.
 - Click the profile to which you want to apply the maintenance.
- On the right side of the Application Management Configuration Editor window, click the Maintenance tab. All available maintenance windows are listed.
- Select the check box in front of the Name column for the
maintenance that you want to apply to the profile. You can select
multiple options. No maintenance is selected by default.Tip: To select all of the maintenance schedules, select the check box beside Active.
- Click Apply to save your changes and continue using the Application Management Configuration Editor.
- When you are finished, click OK to close the Application Management Configuration Editor.
Procedure: Deleting a maintenance window
To delete a maintenance window, perform the following steps:
- Select the navigator item of the maintenance window that you want to remove from the view.
- Click
 , or right-click the item in the tree
and choose Delete Maintenance Window.
 - Click Yes to confirm the operation.
- Click Apply to save your changes and continue using the Application Management Configuration Editor.
- When you are finished, click OK to close the Application Management Configuration Editor.
Procedure: Configuring a maintenance window to span days of the week
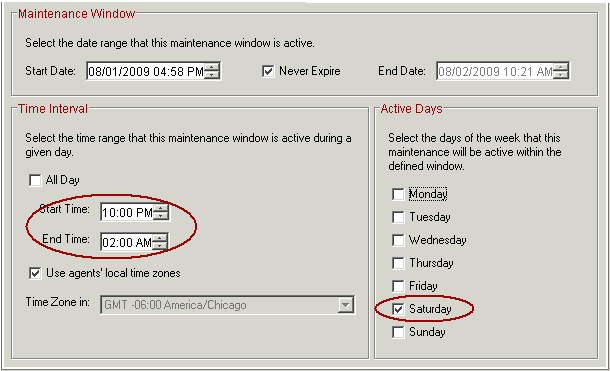
You can configure maintenance windows to start on one day and end on the following day. For example, you might configure a maintenance window to start on Saturday at 10:00 p.m. and end on Sunday at 2:00 a.m.
In the maintenance window configuration panel, in the Active Days section, select the day of the week when the maintenance window is to start. In this example, select the check box for Saturday. Specify the start time (in this example, 10:00pm). For the end time, specify the time when the maintenance window is to end, in this example, 2:00 a.m. Note that you do not have to select the Sunday check box.
Procedure: Configuring a non-repeating maintenance window that starts on a future date
A maintenance window prevents data collection or a script from playing back between the start and end of the maintenance window. Data collection or script playback resumes after the maintenance window ends. This section uses a Robotic Response Time example to illustrate how you can configure a non-repeating maintenance window that starts on a future date.
Suppose you need a maintenance window to run once on a date in the future, Tuesday, July 6, 2010, starting at 2:30 a.m. and ending at 5:00 a.m.
- Open the Application Management Configuration Editor and select Maintenance
Windows from the pull-down window.
- Click New in the Maintenance Window toolbar.

- Enter a functional name, such as Tuesday-Special, and click OK.
- Configure the maintenance window:
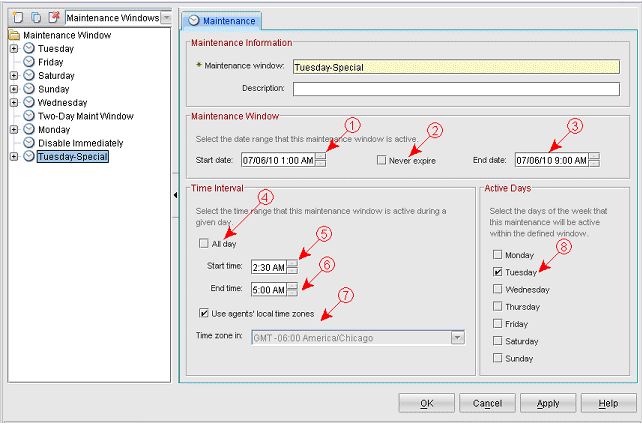
- (1) The Start date is typically the date and time you created this maintenance window. The date and time must precede the Start time (5) and End time (6).
- (2) Clear the Never expire check box, because you are configuring a non-repeating maintenance window.
- (3) Enter a date and time that occurs after the maintenance window End time (6).
- (4) Clear the All day check box if you want the maintenance window to run during specific hours of the day, instead of all day. If you want the maintenance window to run all day, then select this check box.
- (5) Enter the Start time that the maintenance window begins. In this example, the maintenance window starts at 2:30 a.m. The script stops running before the maintenance window begins.
- (6) Enter the End time that the maintenance window ends. In this example, the maintenance window ends at 5:00 a.m. The script will resume running after the maintenance window ends.
- (7) Select the time zone. In this example, the maintenance window is run according to the agent's setting for its local time zone.
- (8) Select the days when the maintenance window is in effect. In this example, the check box for Tuesday is selected to run the maintenance window on Tuesday, July 6.
- Click Apply.
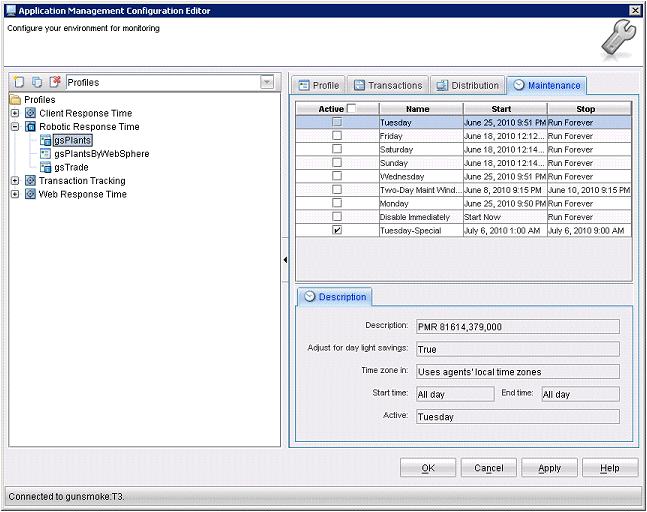
- Choose the profile that is to run this maintenance window. Click
the Maintenance tab. Select the maintenance windows to be applied
to this profile. Click Apply. For example:
- Click the Distribution tab. Verify that the profile is distributed to agents where you want the maintenance window to be applied. If you make changes here, click Apply. Then, click OK to close the Application Management Configuration Editor.
- In the TEP console, navigate to the Robotic Response Time -> Configuration
workspaces for one of the agents where the profile has been distributed.
The Agent Messages workspace should show that the profile has been
updated. One way to expedite the profile update process is to restart
the agent. For example:

- The Agent Messages workspace also posts a message when the maintenance
window starts and ends. For example:

- After the maintenance window expires, select the Robotic Response Time -> Transactions node in the TEP Navigator tree for one of the agents where the maintenance window was active. The Transaction Current Status Details workspace should show that the script ran before and after the maintenance window, but did not run during the maintenance window.
Procedure: Creating a multi-day maintenance window
A maintenance window prevents data collection or a script from playing back between the start and end of the maintenance window. Data collection or script playback resumes after the maintenance window ends. This section uses a Robotic Response Time example to show how you can create a maintenance window that spans multiple days.
Suppose that in your environment, system maintenance is performed from Friday night through Sunday night. To prevent your robotic scripts from reporting spurious results, you can configure a set of consecutive maintenance windows that spans multiple days.
- Friday from 9:15 p.m. to midnight
- Saturday all day
- Sunday from midnight to 9:15pm
- Open the Application Management Configuration Editor and select Maintenance
Windows from the pull-down window.

- Click New in the Maintenance Window toolbar.

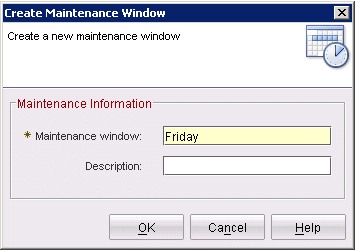
- Enter a functional name, such as Friday, and click OK.
- Configure the maintenance window:
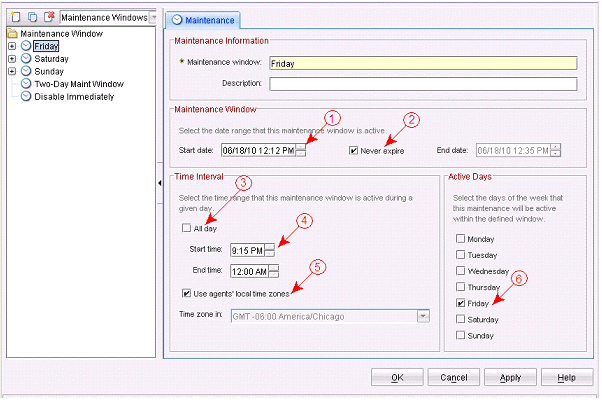
- (1) In this example, the start date and end date are not changed to demonstrate how to configure a repeating maintenance window. If you want the maintenance window to start and stop on specific dates and times, enter the start date/time and stop date/time here.
- (2) Click the Never expire check box to display a checkmark if you are configuring a repeating maintenance window.
- (3) Clear the All day check box if you want the maintenance window to run during specific hours of the day, instead of all day. If you want the maintenance window to run all day, select this check box to display a checkmark.
- (4) Enter the start time and end time that the maintenance window runs. In this example, the maintenance window starts at 9:15 p.m. and ends at midnight (12:00 a.m.).
- (5) In this example, the maintenance window is configured to run according to the local time zone for the monitoring agent.
- (6) Select the days when the maintenance window is in effect. In this example, select the check box for Friday to run this portion of the maintenance window on Fridays.
- Click Apply to save your changes.
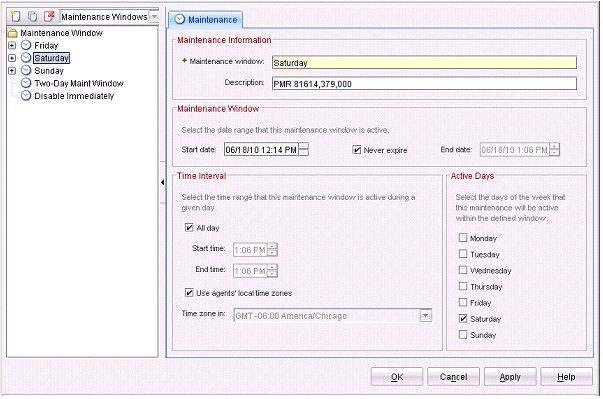
- Create a second maintenance window to run all day on Saturdays.
Notice that the All day check box is selected.
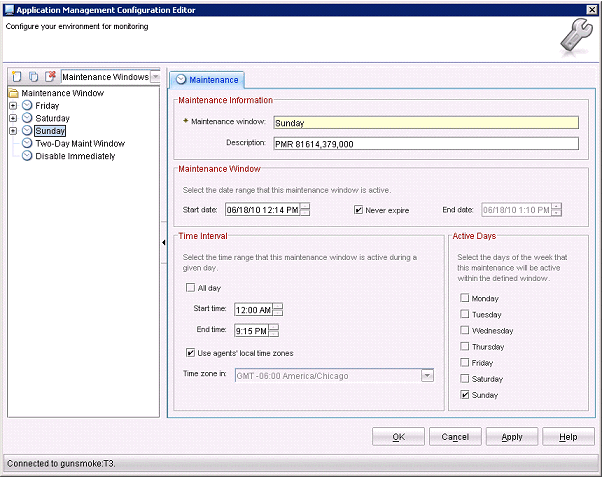
- Create a third maintenance window to run from midnight to 9:15
p.m. on Sundays.
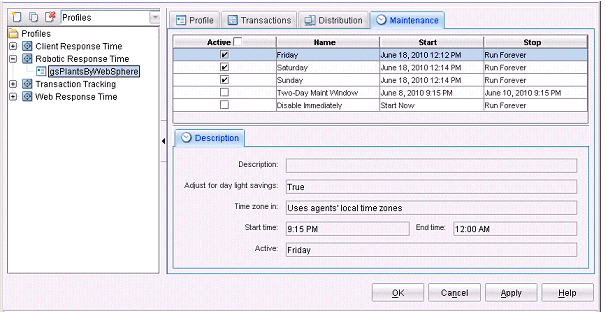
- In the script profile, click the Maintenance tab. Select
the maintenance windows to be applied to the profile, then click Apply and
then OK.
- In the TEP console, navigate to the Robotic Response Time ->
Configuration workspaces for one of the agents where the profile has
been distributed. The Agent Messages workspace should show that the
profile has been updated. One way to expedite the profile update process
is to restart the agent. For example:

- The Agent Messages workspace also posts a message when the maintenance
window starts and ends. For example:

- After the maintenance window expires, select the Robotic Response
Time -> Transactions node in the TEP Navigator tree for one of
the agents where the maintenance window was active. The Transaction
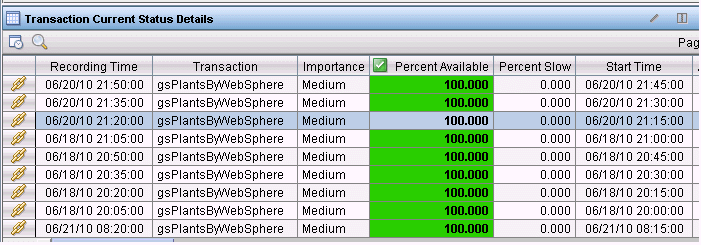
Current Status Details workspace should show that the script did not
run during the maintenance window.
In this example, the script ran before and after the maintenance window, but it did not run during the maintenance window.
 Note: Defining multiple maintenance windows to operate as a single, multiple-day maintenance period is supported in ITCAM for Transactions V7.2 upgraded to Interim Fix 1 or with Fix Pack 1. Defining maintenance windows to operate this way is not supported in ITCAM for Transactions V7.1 Fix Pack 3 (maintenance windows defined to start at midnight run only once).