Learn
about the features of this media device.
Features
This section describes the features of
the 16X/48X SCSI DVD-ROM Drive. The 16X/48X IDE DVD-ROM Drive is a half-high,
5.25-inch, tray-loading drive with a Low-Voltage-Differential (LVD) SCSI interface.
Its features include the following:
- CD media high-speed data transfer rate of 3300 KB per second (22X) at
the inner diameter, and 7200 KB per second (48X) at the outer diameter.
- DVD media high-speed transfer rate is 8.91 MB per second (6.6x) at the
inner diameter and 21.6 MB (16X) at the outer diameter.
- Average random access time of 90 ms for CD media and 105 ms for DVD media.
- Can be installed in either a vertical or horizontal orientation.
- Loading tray accommodates both 8 cm discs (in the horizontal orientation
only) and 12 cm discs.
- Reads multisession discs.
- Reads CD-recordable discs.
- Reads CD-RW discs.
- Supports all major CD-ROM formats: Mode 1, Mode 2, XA, CDDA, and audio.
- Reads DVD-RAM discs as defined by the DVD Specification for Rewritable
Discs, Version 2.1.
Front View
| 1 |
Compact Disc Tray |
| 2 |
Emergency Eject Hole |
| 3 |
Load/Unload Button |
| 4 |
Status Light |
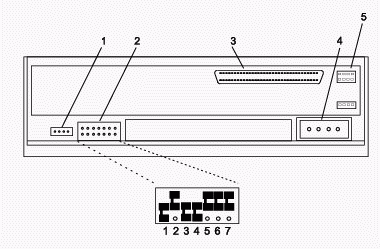
Rear View and Jumper Pin Positions
The following
figure shows the jumper pins as they are set at the factory.
| 1 |
Audio line-out connector |
| 2 |
Jumper block and jumper pins |
| 3 |
68-pin SCSI interface connector |
| 4 |
Power connector |
| 5 |
SCSI mode/term power (Not Used) |
| SCSI ID |
Jumper 1 |
Jumper 2 |
Jumper 3 |
Jumper 4 |
|---|
| 0 |
0 |
0 |
0 |
0 |
| 1 |
1 |
0 |
0 |
0 |
| 2 |
0 |
1 |
0 |
0 |
| 3 |
1 |
1 |
0 |
0 |
| 4 |
0 |
0 |
1 |
0 |
| 5 |
1 |
0 |
1 |
0 |
| 6 |
0 |
1 |
1 |
0 |
| 7 |
1 |
1 |
1 |
0 |
| 8 |
0 |
0 |
0 |
1 |
| 9 |
1 |
0 |
0 |
1 |
| 10 |
0 |
1 |
0 |
1 |
| 11 |
1 |
1 |
0 |
1 |
| 12 |
0 |
0 |
1 |
1 |
| 13 |
1 |
0 |
1 |
1 |
| 14 |
0 |
1 |
1 |
1 |
| 15 |
1 |
1 |
1 |
1 |
DVD-RAM Type II Disc
The DVD-RAM Type II disc can
be removed from its cartridge and played in a DVD-ROM drive that is compatible
with DVD-RAM.
Attention: Be careful when handling removed discs.
Debris, dust particles, fingerprints, smears, or scratches can affect recording
and playback of discs. To clean dust or other debris, use the IBM® DVD-RAM/CD-ROM cleaning kit. Do not use solvents
to clean disc surfaces. When labeling a disc, write only on the printed label
side, using a soft felt-tip marker. Do not use a hard-tip pen to write on
disc surface. Keep out of direct sunlight, high temperatures, and humidity.
Do not attach labels to either side of the disc.
Removing
a Disc from the Cartridge
To remove a disc from the cartridge,
do the following:
- Use the tip of a ballpoint pen to push the locking pin up and out of the
disc cartridge.
- Use the tip of a ballpoint pen to push down on the lock button while pulling
the cartridge lid open.
- With the cartridge lid open, slide the disc out of the cartridge.
Attention: Handle the disc only by its edges.
| 1 |
Locking Pin |
| 2 |
Lock Button |
| 3 |
Cartridge Lid |
Returning a Disc to the Cartridge
To
return a disc to the cartridge, do the following:
Note: Both the disc label
and the cartridge label should be facing up.
- Slide the disc into the cartridge.
- Close the cartridge lid. Make sure the lock button snaps into position.
- Install the locking pin.
Note: Handle the disc only by its edges.
Opening the Tray Manually
The tray automatically
opens when you press the Load/Unload button. If it does not automatically
open, follow these steps to manually open the tray:
- Follow your operating system instructions for shutting down your system,
then turn off the power to your system unit. Unplug the power cord from the
wall outlet.
- Insert the straightened end of a paper clip into the emergency eject hole
until you feel some resistance.
- Continue to push in the paper clip while you pull out the tray with your
fingernail.
- Pull the tray completely open and remove the disc. It is normal for the
tray to make a clicking sound while you are pulling it open.


