Learn how to cable the expansion units, connect the external cables,
power cords, and HMC cables,
attach devices, and route the cables after you install all of your hardware
features or replace parts.
To cable your
server:
| Before you begin |
|---|
| __ |
If you have hardware features that are not installed,
install them now. For instructions, see Installing features and replacing
parts. |
| Cabling the expansion units |
|---|
| __ |
Do you have an expansion unit?
|
| Connecting the external cables |
|---|
| __ |
If you are using any optional adapters
(such as token ring or 8-port EIA-232), connect the cables to the appropriate
adapter connectors in the PCI slots of your machine. See
Adapters, Devices, and Cable Information for Multiple Bus Systems for a description
of cables and adapters that might be installed on your server.
Note: If
the cable did not come with your server, you will have to supply it.
|
| Attaching devices by using
a system port |
|---|
| __ |
If you have an IBM® System p5® or eServer™ p5 server, each system port on the back of
the server is disabled when your server is connected to theHMC. |
| Note: The attachment of high availability
cluster multiprocessing (HACMP™) cables to a system port on
the back of the server is not supported.
|
| Connecting the power cords |
|---|
| __ |
You should route power cords through the
retention rings or under the retention brackets that are provided to prevent
the power cords from becoming unplugged unexpectedly. |
| |
__ |
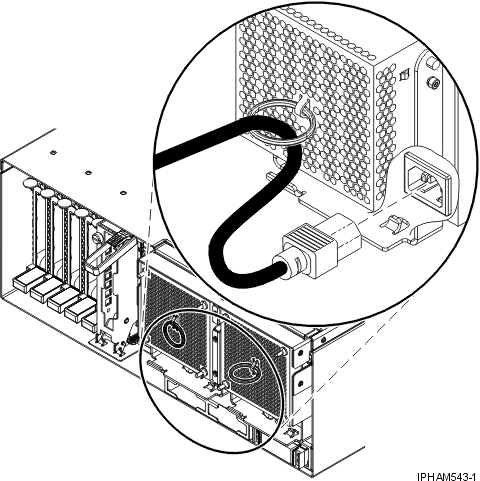
If your server is equipped with a retention ring, route
the power cord through the ring before you plug it into the back of the server,
as shown here: |
| |
__ |
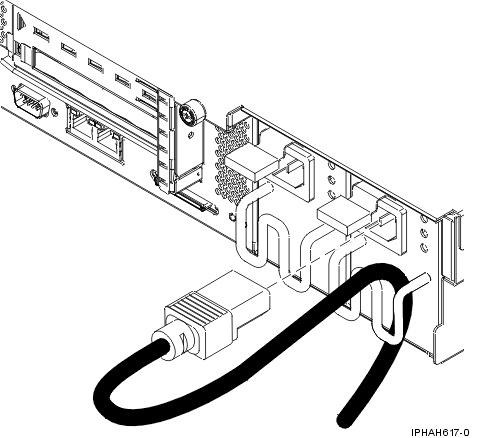
If your server is equipped with a retention bracket,
route the power cord under the bracket before you plug it into the back of
the server, as shown here: |
| __ |
Plug the power cords into the system,
display, and attached devices. Do not connect the power cords to
a power source until instructed to do so. Note: If you connect
your server to a power source before the HMC is
configured as the DHCP server, the server will initialize by using the default
IP address values (HMC1
as 192.168.2.147 and HMC2
as 192.168.3.147) instead of waiting for an address value from the HMC. If you inadvertently connect
your server to a power source, the IP address value will be corrected in the HMC configuration portion of the
installation.
|
| Connecting the HMC cables |
|---|
| __ |
Cable the HMC. |
| Routing the cables through
the cable-management arm |
|---|
| __ |
Is your server installed in a rack? - No. Proceed to the next section, After you finish.
- Yes. Do the following:
|
| |
__ |
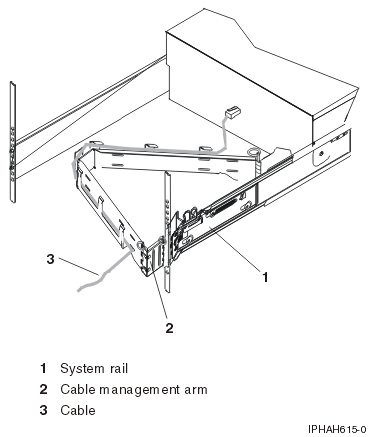
Place the rack-mounted system in the service position.
For instructions, see Place the rack-mounted system or expansion unit in the
service position. |
| |
__ |
Route the cables through the hooks that are located
along the cable-management arm and secure them with the straps that are provided,
as shown here: |
| |
__ |
After attaching the cables to the cable-management arm,
go to the front of the rack and move the system drawer in and out. Observe
the cables and cable-management-arm movement to verify that the cables are
not binding. |
| After you finish |
|---|
| __ |
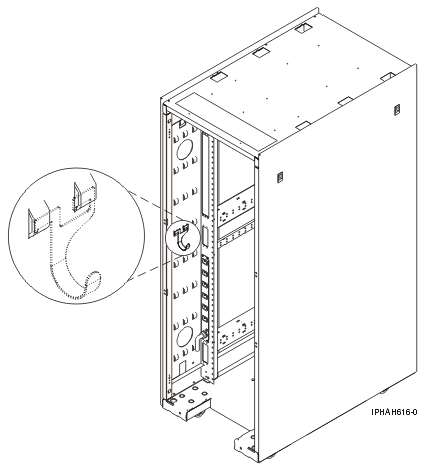
Did you receive a cable hook with your rack shipment?- No. Proceed to the next item.
- Yes. The cable hook manages the server cables in
the back of the rack. To install the cable hook, slide it into the slots that
are located on the back of the rack as shown here:
|
| __ |
Return to your initial server setup checklist and complete
the next step. |