White Papers
Abstract
This document describes how to deploy IBM Sterling Connect:Direct for Microsoft Windows in a Microsoft Windows Failover Cluster to provide Reliability, Availability and Scalability.
Content
1. Introduction
IBM Sterling Connect:Direct for Microsoft Windows (referred to as Connect:Direct in this document) will be deployed as a new cluster role in a Microsoft Windows failover cluster. Additional resources and dependencies will be added to this role, allowing the cluster manager to bring all resource online in the correct order and monitor them. In case of a failure, the cluster manager initiates a failover of the Connect:Direct role to another cluster node to ensures high availability.
The Connect:Direct software will be installed on each cluster node to a shared storage location. The same configuration will be used, resulting in (essentially) identical installations. The new cluster role will be created as a Generic Service Role based on the Connect:Direct service. Additional resources and dependencies will be added to the cluster role, such as the database service, (one or more) client access points and the shared storage where the software is installed. Registry replication will be enabled to ensure that updates to the Connect:Direct node configuration get replicated across the cluster.
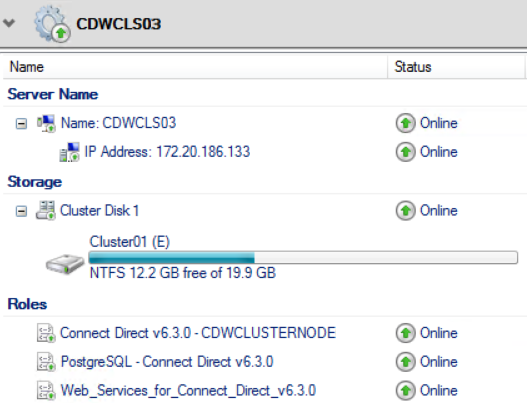
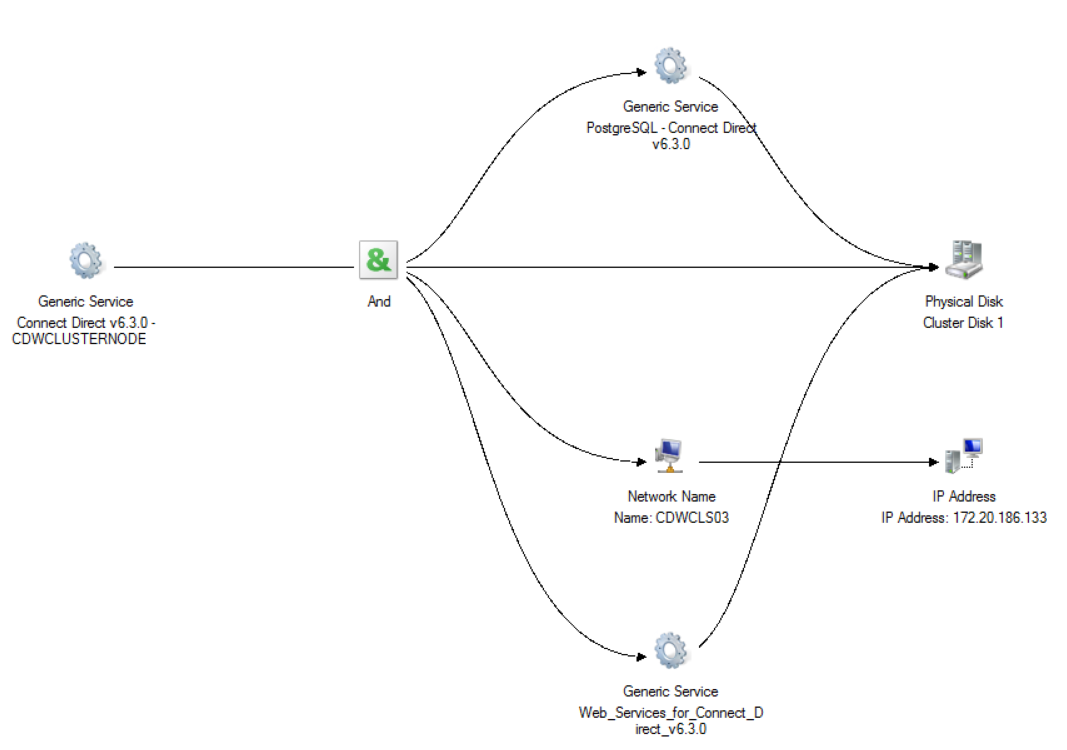
The following example shows a cluster role CDWCLS03 defined for an IBM Connect:Direct for Microsoft Windows 6.3.0 node CDWCLUSTERNODE. The node can be reached by its host name CDWCLS03 or its associated virtual IP address. Dependencies are outlined in the Dependency Report.
The approach outlined in this document uses Windows PowerShell to deploy Connect:Direct in the cluster. The attached PowerShell scripts provide an easy and automated way for you to perform the necessary tasks, such as installing or updating Connect:Direct as well as creating the cluster role. The scripts will detect the version of Connect:Direct automatically, making the deployment easier and more robust. Some PowerShell knowledge may be helpful, but is not mandatory to follow the instructions. See Windows PowerShell Scripting to learn more about Windows PowerShell.
The approach has been successfully verified with the following software
- IBM Connect:Direct for Microsoft Windows 4.8.0 using the default PostgreSQL database.
Note: Deprecated. This version is out of support since 2023-04-30. Please install a later version. - IBM Sterling Connect:Direct for Microsoft Windows 6.0.0 using the default PostgreSQL database
- IBM Sterling Connect:Direct for Microsoft Windows 6.1.0 using the default PostgreSQL database
- IBM Sterling Connect:Direct for Microsoft Windows 6.2.0 using the default PostgreSQL database
Note: Integrated File Agent is currently not support in the cluster and will not be installed. - IBM Sterling Connect:Direct for Microsoft Windows 6.3.0 using the default PostgreSQL database
Note: Integrated File Agent is currently not support in the cluster and will not be installed.
Note: When using a 3rd-party database such as Microsoft SQL Server, modify the property files accordingly to configure Connect:Direct for your database. IBM does not provide support for 3rd party databases and you will need to consult your database vendor for additional support or information on clustering.
2. Preparing the Deployment of Connect:Direct
Before you begin to deploy Connect:Direct in the cluster, ensure your Windows Failover Cluster is configured properly. Review the product documentation, downloaded the required software and gather all configuration details upfront.
Windows Failover Cluster
- Ensure your Windows Failover Cluster is configured properly and successfully passes the failover validation tests (PowerShell: Test-Cluster).
- Install the following Microsoft Windows Failover Cluster features
- Failover Clustering
- Failover Cluster Management Tools
- Failover Cluster Module for Windows PowerShell
- Windows PowerShell 3.0 or later must be installed.
By default, PowerShell only runs scripts signed by a trusted authority. Before you run scripts in Windows PowerShell for the first time, you may need to update its security settings. To enable PowerShell to run local scripts, use the following command
Set-ExecutionPolicy RemoteSigned
See about_Execution_Policies for further details.
Product Documentation
Review the Release Notes and Getting Started Guide for IBM Sterling Connect:Direct for Microsoft Windows 6.0.0, 6.1.0 or 6.2.0 or 6.3.0.
Downloads
Download the following software and store/unzip it in a location accessible from within your cluster.
- IBM Sterling Connect:Direct for Microsoft Windows 6.0.0, 6.1.0, 6.2.0 or 6.3.0.
Either download the base version from Passport Advantage or the latest fix pack or iFix available from the IBM Fix Central website. Both type of installers can be used here. It is recommended to use the latest fix pack or iFix. - The attached CDWindowsCluster zip file containing
- PowerShell scripts
- Install-CDWindows.ps1
- Update-CDWindows.ps1
- Add-ClusterCDRole.ps1
- Templates for Connect:Direct property files
- cd_cluster.ini
- cd_srvr.ini
- Download:
- PowerShell scripts
3. Deploying Connect:Direct in a Cluster
There are three main steps to deploy Connect:Direct in a Windows failover cluster.
- Prepare the Connect:Direct cluster and server property files with the configuration details for your Connect:Direct cluster role and node. These files will serve as input for subsequent steps.
- Install the Connect:Direct software on each cluster node using the provided Install-CDWindows.ps1 PowerShell script.
- Create the Connect:Direct cluster role using the Add-ClusterCDRole.ps1 script.
Follow the outlined steps closely.
Step 1: Prepare the Property Files
Sample property files are provided in the attached download. Start with these templates and modify them as needed to match your environment, i.e. change the passwords. Specify your cluster resources and your initial Connect:Direct node configuration. Complete this step once and save the property files for later use.
Connect:Direct Cluster Property File (cd_cluster.ini)
This property file specifies parameters for the Connect:Direct setup and for the cluster role. All parameters are mandatory.
| Section | Parameter | Description |
|---|---|---|
| Setup | SetupExe | Fully qualified file name of the Connect:Direct installer executable. This can be a base, fix pack or iFix installer. |
| CD_SRVR_INI | Fully qualified file name of the Connect:Direct server property file (cd_srvr.ini). | |
| InstallDir | Fully qualified path to where the Connect:Direct software will be installed. The path must be on the specified ClusterDisk, not on a local drive. The parent path must already exist, except for the folder created by the installer. | |
| Cluster | ClusterRole | Name of the Connect:Direct cluster role. This name will also serve as the server name to access the role via DNS. |
| ClusterStaticIP | IP address assigned to the Connect:Direct cluster role (client access point). | |
| ClusterDisk | Name of the cluster disk where the Connect:Direct software will be installed. Typically, a disk from the 'Available Storage' group. |
Example
An iFix installer, the PowerShell scripts and property files have all been downloaded into a folder E:\Install\CDWindows residing on Cluster Disk 1. The software will be installed into folder E:\Programs\Connect Direct v6.3.0 on the same disk. The cluster role will be created as CDWCLS03.
  [Setup]

  ; Fully qualified file name of the Connect:Direct installer (base, fix pack or iFix)
  SetupExe=E:\Install\CDWindows\6.3.0.0-IBMConnectDirectforMicrosoftWindows-x64-fp0000-if0018.exe

  ; Fully qualified file name of the C:D Windows server property file (cd_srvr.ini)
  CD_SRVR_INI=E:\Install\CDWindows\cd_srvr.ini

  ; Fully qualified folder where the Connect:Direct software will be installed
  InstallDir=E:\Programs\Connect Direct v6.3.0

  [Cluster]

  ; Name of the Connect:Direct cluster role
  ClusterRole=CDWCLS03

  ; IP address for the Connect:Direct cluster role (client access point)
  ClusterStaticIP=172.20.186.133

  ; Name of the cluster disk where the Connect:Direct software will be installed
  ClusterDisk=Cluster Disk 1
Connect:Direct Server Property File (cd_srvr.ini)
This property file specifies the initial Connect:Direct server configuration set during the installation. Review the sample Advanced\cd_srvr.ini file in your Connect:Direct base setup folder or the online documentation for a complete list of supported parameters and their descriptions.
Example
The Connect:Direct node will be installed with a node name of CDWCLUSTERNODE. Please change the password for the Connect:Direct Secure+ keystore (CD_KEYSTORE_PWD). When deploying a Connect:Direct version prior to 6.3 with PostgreSQL, also specify a password for the database (CD_POSTGRESQL_PWD). You can add more parameters at the bottom, if desired.
  [Server]

  ; Perform a custom installation. (Do not change)
  CD_SETUP_TYPE=Custom

  ; Connect:Direct Node Name
  CD_NODENAME=CDWCLUSTERNODE

  ; Listen on all IPv4 addresses available on the machine.
  ; Set IP to ::0 for listening on IPv6 only.
  CD_HOST_IP=0.0.0.0
  CD_HOST_PORT=1364
  CD_API_IP=0.0.0.0
  CD_API_PORT=1363

  ; Secure+ KeyStore password - Please update
  CD_KEYSTORE_PWD=changeit

  ; Database password
  ; Set for Connect:Direct version 4.8.0 to 6.2.0 (Optional for 6.3.0) - Please update
  ; CD_POSTGRESQL_PWD=changeit

  ; Disable SPE, Install Agent and Integrated File Agent.
  ; Do not change any of these!
  CD_SPE_DISABLE_FLAG=1
  CD_AGENT_ENABLE=N
  CD_FILEAGENT_ENABLE=N

  ; Add more parameters below
Notice: When using a 3rd-party database such as Microsoft SQL Server, modify the property file accordingly to configure Connect:Direct for your database.
- For Microsoft SQL Server, set CD_DATABASE_TYPE=MSSQL and add the appropriate CD_SQL_* parameters.
- CD_POSTGRESQL_PWD can be removed or commented out.
Step 2: Install the Connect:Direct Software (Install-CDWindows.ps1)
Repeat the installation of the Connect:Direct software on all cluster nodes using the Install-CDWindows.ps1 script. This is a requirement. Using the same cluster property file ensures that all installations will be identical and point to the same shared location on the cluster disk.
Begin with your first cluster node
- Log on to the cluster node.
- Ensure the cluster disk is online and owned by the current cluster node. Also ensure you have access to the Connect:Direct setup folder, PowerShell scripts and property files.
- Open a PowerShell in Administrative Mode, for example by right-clicking on Microsoft PowerShell and selecting Run as administrator. Change directory (cd) to the location of your PowerShell scripts.
- Execute the Install-CDWindows.ps1 script to begin the Connect:Direct installation.
.\Install-CDWindows.ps1 [-IniFile cd_cluster.ini] [-Interactive] [-RemoveSecurePlus]
Arguments:
-IniFile specifies an optional Connect:Direct Cluster property file (default: cd_cluster.ini)
-Interactive performs the installation in interactive mode (default: silent mode).
-RemoveSecurePlus does not install the Secure+ feature for Connect:Direct version 6.1.0 and earlier, which is not recommended (default: install Secure+).
Once the installation has completed successfully on the first cluster node, move on to the next cluster node, i.e. move the cluster disk, and repeat the actions on all other cluster nodes.
Step 3: Add Connect:Direct as a Generic Service Role to the Cluster (Add-ClusterCDRole.ps1)
The final step will create and configure the Connect:Direct cluster role. You only have to perform this step once.
- Log on to a cluster node. Ensure you have access to the required resources (PowerShell scripts, property files).
- Open a PowerShell in Administrative Mode, for example by right-clicking on Microsoft PowerShell and selecting Run as administrator. Change directory (cd) to the location of your PowerShell scripts.
- Execute the Add-ClusterCDRole.ps1 script
.\Add-ClusterCDRole.ps1 [-IniFile cd_cluster.ini]
Argument:
-IniFile specifies an optional Connect:Direct Cluster property file (default: cd_cluster.ini)
Once the script completes successfully, you can start using your new Connect:Direct cluster role using the command
Start-ClusterGroup -Name ClusterRole
4. Managing Your Connect:Direct Cluster Role using PowerShell
You can manage your Connect:Direct cluster role using the Cluster Failover Management console or using PowerShell commands.
| Task | PowerShell Command |
|---|---|
|
Install the Connect:Direct software on the current cluster node. See chapter 3 for details. |
.\Install-CDWindows.ps1 [-IniFile cd_cluster.ini] [-Interactive] [-RemoveSecurePlus] |
|
Update the Connect:Direct software on the current cluster node by applying a fix pack or iFix. See chapter 5 for details. |
.\Update-CDWindows.ps1 -FixPackExe path_to_fixpack_exe |
|
Add Connect:Direct as a new Generic Service Role to the cluster. See chapter 3 for details. |
.\Add-ClusterCDRole.ps1 [-IniFile cd_cluster.ini] |
| Remove the Connect:Direct cluster role from the cluster. Notice that this does not uninstall the Connect:Direct software. | Remove-ClusterGroup -Name ClusterRole -RemoveResources |
| Start the Connect:Direct cluster role. | Start-ClusterGroup -Name ClusterRole |
| Stop the Connect:Direct cluster role. | Stop-ClusterGroup -Name ClusterRole |
| Show the status of the Connect:Direct cluster role. |
Get-ClusterGroup -Name ClusterRole |
| Move the Connect:Direct cluster role to another cluster node. | Move-ClusterGroup -Name ClusterRole -Node ClusterNode |
| Run validation tests for failover cluster hardware and settings and generate a Validation Report. | Test-Cluster |
See the PowerShell help (get-Help) for more information on individual commands and arguments.
5. Updating Connect:Direct with a Fix Pack or iFix (Update-CDWindows.ps1)
From time to time you may need to apply maintenance to Connect:Direct. Use the Update-CDWindows.ps1 script to properly run the fix pack or iFix installer in the cluster. Same as for the installation, you will have to repeat this on all cluster nodes.
Stop the Connect:Direct cluster role. Then begin with your first cluster node
- Log on to the cluster node. Ensure you have access to the required resources (cluster disk, fix pack installer, PowerShell scripts).
- Open a PowerShell in Administrative Mode, for example by right-clicking on Microsoft PowerShell and selecting Run as administrator. Change directory (cd) to the location of your PowerShell scripts.
- Execute the Update-CDWindows.ps1 script and specify the path to the fix pack or iFix installer. The script runs the fix pack or iFix installer in silent mode and creates an installation log file CDWinFixPack_computername.log in the current folder. For example, to apply iFix 6.3.0.1_iFix001 to a Connect:Direct 6.3.0 node
.\Update-CDWindows.ps1 -FixPackExe .\6.3.0.1-IBMConnectDirectforMicrosoftWindows-x64-fp0001-if001.exe
When the update script has completed successfully, continue with your next cluster node repeating the above steps. Once all cluster nodes have been updated successfully, you can start the Connect:Direct cluster role again.
6. Additional Notes
- Disable the Install Agent in the cluster by setting the initialization parameter agent.enable=N. In addition, the PowerShell scripts will disable the Install Agent service during an installation or update.
- Set the initialization parameter outgoing.address to the virtual IP address of the cluster role (client access point) to help with netmap-checking on remote nodes. Also specify the virtual IP address in the local node's netmap entry for loopback connections (PNODE-SNODE).
- IMPORTANT: Disable Strong Password Encryption (SPE) in the cluster to avoid authentication failures in cases where the registry checkpoint and shared file system may get out of sync. There is a known issue, where the stored password information may become invalid when SPE is enabled. As a result, the Connect:Direct service will fail to start (database login failure) and any remote user proxy will no longer work (login failure). To fix the issue, restore the database password using CD Database Wizard and restore all local passwords configured in the remote user proxies.
Notice: When SPE is disabled, passwords stored at rest are obfuscated, but not encrypted. - The CD Requester feature will not be installed in the cluster by Install-CDWindows.ps1. To manage the Connect:Direct cluster node, use IBM Connect:Direct Web Services, a remote CD Requester or other client, or install the CD Requester Stand-Alone locally on cluster nodes.
- Upgrading Connect:Direct from an earlier version is not supported in the cluster. Instead, do the following steps:
- Perform a side-by-side installation of the new version and import/migrate the configuration from the earlier version.
- Remove the cluster role of the earlier version and add new cluster role for the new version.
- Once the new cluster role has been sucessfully tested, you can uninstall the earlier version of Connect:Direct from all cluster nodes.
- Installing multiple Connect:Direct nodes in the same failover cluster has the following limitations:
- Each Connect:Direct node must be at a different release. For example, you can install a 6.0 and a 6.1 node at the same time, but not two 6.1 nodes.
- Each Connect:Direct node must have its own cluster role, so that it can failover independently of other Connect:Direct nodes. Each cluster role requires its own set of resources and dependencies, including disks, IP/port, hostname and services. Resources and dependencies must not be share between cluster roles.
- Before uninstalling the Connect:Direct software from the cluster, first remove the Connect:Direct role from your cluster. Then uninstall the software from each cluster node where it had been installed.
- The Integrated File Agent feature in version 6.2.0 and 6.3.0 is currently not supported in the cluster and will not be installed by Install-CDWindows.ps1. It may be supported in a future update. If you need File Agent functionality in the cluster, please install the Stand-alone File Agent 1.4.0 for now.
7. History
| Date | Changes |
|---|---|
| 22 January 2014 |
Initial version for IBM Sterling Connect:Direct for Microsoft Windows 4.6.0. |
| 17 December 2018 |
Major update and enhanced PowerShell scripts. |
| 08 March 2019 | Fixed the History section and Dependency Report image |
| 23 September 2020 |
Added support for IBM Connect:Direct for Microsoft Windows 6.1.0.
Enhanced PowerShell scripts:
|
| 05 May 2021 |
Fixed layout of property file samples in Step 1
Updated PowerShell script Add-ClusterCDRole.ps1 to display its correct script name
|
| 24 September 2021 | Added a additional note on installing multiple Connect:Direct nodes in the same failover cluster. |
| 14 April 2022 |
Added support for IBM Connect:Direct for Microsoft Windows 6.2.0. The PowerShell scripts have been updated.
Remove IBM Connect:Direct for Microsoft Windows 4.7.0 as this version is no longer supported. |
| 06 October 2023 |
Added support for IBM Connect:Direct for Microsoft Windows 6.3.0. The PowerShell scripts have been updated.
IBM Connect:Direct for Microsoft Windows 4.8.0 is out of support and deprecated.
|
Was this topic helpful?
Document Information
Modified date:
24 October 2023
UID
swg27040600