Troubleshooting
Problem
The ADMIN2 server job is not enabled for TLS by default
Symptom
HTTP 500 (Internal Server Error) error when accessing the https://[server]:2005/IDSWebApp
Environment
IBM i OS
Resolving The Problem
If you don't want to enable TLS for the ADMIN2 server, you can still access it using the URL, http://[server]:2004/IDSWebApp You will need to ensure your network firewall allows your PC to communicate with your IBM i server over port 2004.
Using the IBM Web Administration for i Console, we have an easy-to-use wizard to walk you through the configuration of the ADMIN2 (Port 2005 - IBM Security Directory Suite) TLS communications. Please refer to the following steps to complete the process.
| 1) | Open a web browser and go to the URL, http://[server]:2001/HTTPAdmin, to display the IBM Web Administration for i console web application. If you are not prompted for a userID and password, execute the following CL command to ensure the ADMIN server is started: STRTCPSVR *HTTP HTTPSVR(*ADMIN) If you continue to experience issues accessing the IBM Web Administration for i console, please open a support case with IBM here or call 1-800-IBM-SERV. |
| 2) | When prompted, sign in with a user profile containing *SECADM and *ALLOBJ explicit special authorities. |
| 3) | Click on Manage -> Application Servers on the main IBM Web Administration for i console page. In the Server pulldown, select the Admin2 server.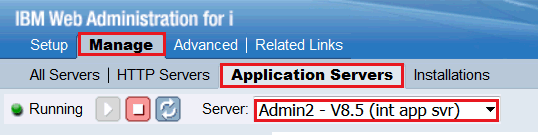 |
| 4) | In the left navigator area, expand Application Server Wizards and click on Configure TLS to begin the TLS configuration process.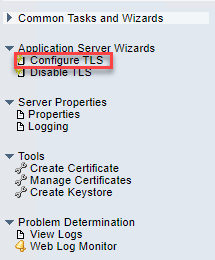 |
| 5) | A Configure TLS "Welcome - Step 1 of 9" page will be displayed. Click on the Next button to continue. |
| 6) | On "Specify TLS port and number - Step 2 of 9", you are allowed to specify the TLS port and protocol you wish to use for the application server. You also get to choose whether you want to disable the non-TLS port at this time. IBM recommends the TLS port value be set to 2005 for the ADMIN2 server since this is the default TLS ports for this servers. The TLS protocol(s) selected will limit the protocol(s) allowed to be used by client web browsers. Currently, the user is allowed to either enable all TLS protocols or enable one specific protocol. IBM recommends ensuring the TLSv1.2 or TLSv1.3 protocols is enabled.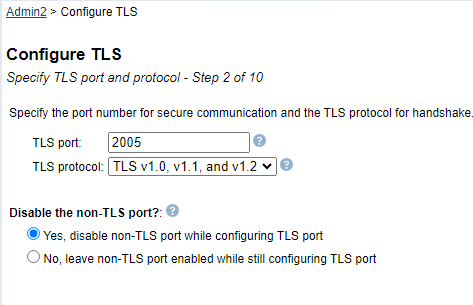 You also have the option of disabling the non-TLS port for the specific server. IBM recommends you disable the non-TLS port by selecting the "Yes, disable non-TLS port while configuring TLS port". Click the Next button when you are ready to proceed to the next step. |
| 7) |
On "Specify keystore information -Step 3 of 9", you can select what type of keystore you would like to use and if you want to use a different path for the truststore. These stores will be responsible for storing the TLS certificates used by the ADMIN2 application server when clients connect via TLS,
The default selection is "Specify keystore path and type" with a "Keystore path" value of ADMIN2 - /qibm/userdata/os/admininst/admin2/wlp/usr/servers/admin2/resources/security/key.jks and Keystore type JKS. Default password = "passw0rd" NOTE: The Default Password has the number zero in it, not the letter "O".
This configuration would use the default WebSphere Liberty keystore to store and manage the application server's personal and signer certificates. An alternative and more popular option is to select the option to "Use Digital Certificate Manager (DCM) SYSTEM Store". IBM recommends selecting the "Use Digital Certificate Manager (DCM) SYSTEM store" option due to its ease-of-use and management. NOTE: This will NOT create an application ID for this configuration in DCM. It will only create or use the TLS certificate specified. Default configuration example 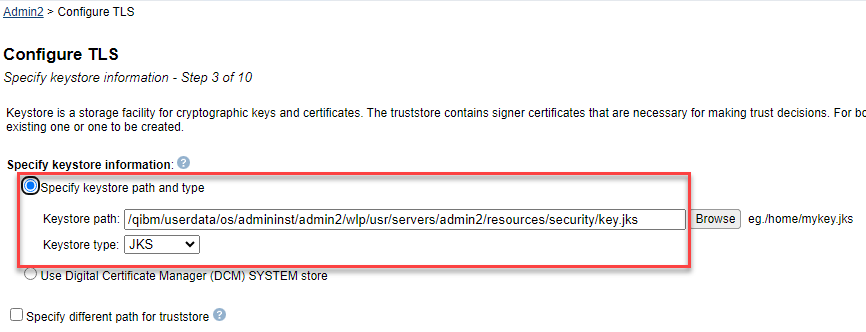 Digital Certificate Manager (DCM) SYSTEM store configuration example 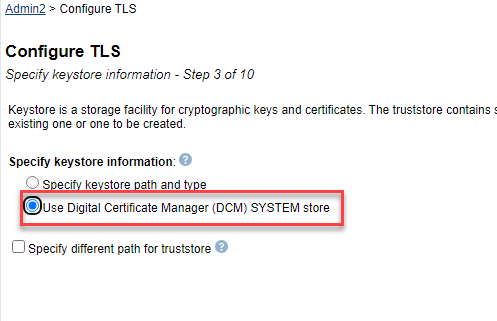 If you select the "Specify keystore path and type" option, you also have the option of customizing your truststore path and type by checking the box for "Specify different path for truststore". NOTE: IBM does not recommend you select this option. This option is for advanced configurations only and should not be used with the DCM keystore configuration. Specify different path for truststore configuration example 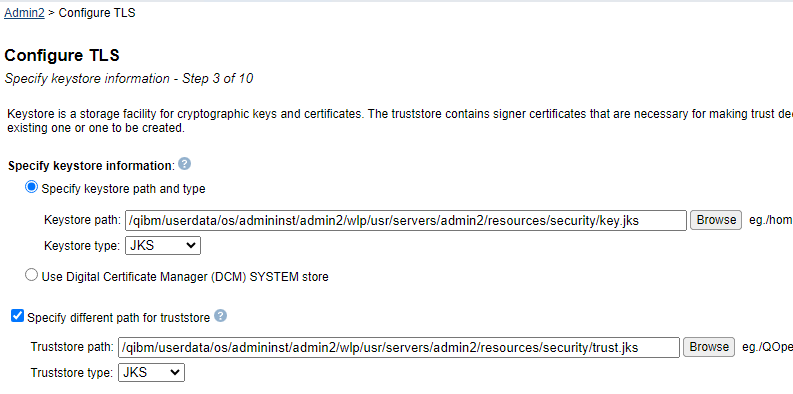 Truststore path and type suggested values: ADMIN2 - /qibm/userdata/os/admininst/admin2/wlp/usr/servers/admin2/resources/security/trust.jks and Keystore type JKS. Default password = "passw0rd" NOTE: The Default Password has the number zero in it, not the letter "O".
|
| 8) | Click the Next button when you are finished configuring your keystore information. |
| 9) | On "Specify keystore password -Step 4 of 9", provide the password for the keystore or DCM *SYSTEM store and press the Next button. For the JKS keystore, the initial password = "password". |
| 10) | If you checked the box next to "Specify different path for truststore", you will be prompted to enter the password for the truststore. If the truststore does not currently exist, it will be created with the new password specified here. If you did NOT check the box next to "Specify different path for truststore", this step will not be presented. Please continue to the next step. 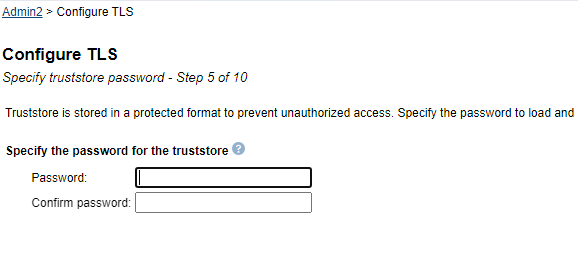 |
| 11) | On "Specify Digital Certificate - Step 6 of 9", choose either Issue a new self signed certificate or Select existing certificate from the keystore by checking the appropriate radio button. If you chose Select existing certificate from the keystore, select the appropriate certificate from the Digital certificate pull down and press the Next button to continue. If you chose Issue a new self signed certificate, press the Next button to continue.  |
| 12) | If you selected "Select existing certificate from the keystore" on the previous step, the "Add trusted CA certificates -Step 7 of 9" screen will be displayed. If you selected "Issue a new-self signed certificate", this step will not be presented. Please continue to the next step. Here you have the opportunity to add additional Certificate Authority (CA) certificates to the truststore specified for the application server. The default and IBM recommended option is "No trust certificate to import". If you want to add additional CA certificates to the application server truststore, select the "Add trusted CA certificates" radio button and then click on the "Add" button to specify the path to the certificate you wish to add. Then, click on the "Continue" button. Click on the Next button to continue when you are finished. IBM recommended option: 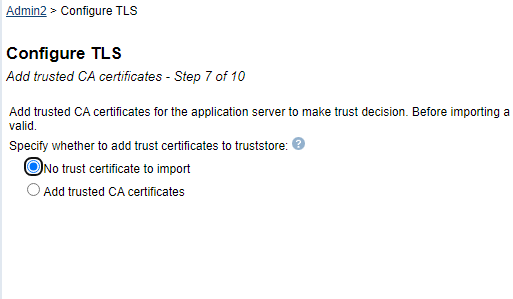 Example when selecting the "Add trusted CA certificates" option and adding a trusted certificate. 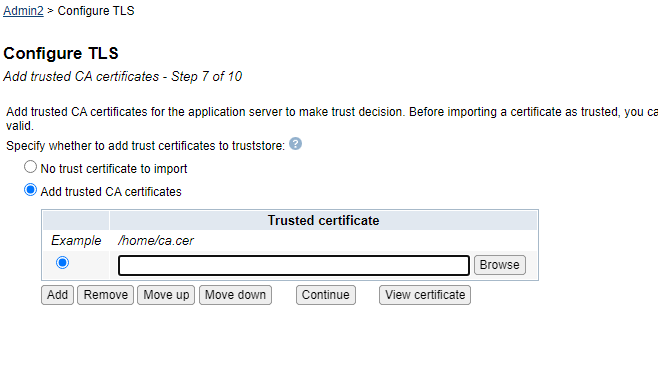 |
| 13) |
On the next screen, Step 8 of 10, for 'Specify cipher for TLS' either select 'Default Ciphers' or 'Select ciphers from available cipher list'. IBM recommends selecting 'Default Ciphers'.
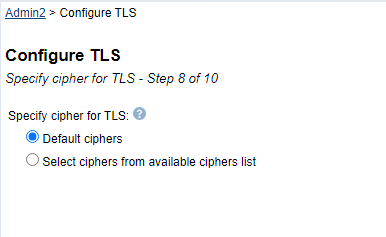 Once one of the cipher choices is selected click on the Next button.
|
| 14) |
On "Restart the server now? - Step 9 of 10", select when you would like to restart the ADMIN server.
By default, "Restart the server later by yourself" is selected. If this option is selected, you will need to perform the following steps at some point in the future to complete the TLS configuration process.
Wait for the ADMIN jobs to end in the QHTTPSVR subsystem.
Wait for the ADMIN jobs to start and their CPU consumption to go down to zero. IBM recommends selecting the "Restart the server immediately after the wizard" to restart the ADMIN server immediately and complete the TLS configuration process. Click the Next button to continue. |
| 15) | On "Summary - Step 9 of 9", a summary of the configuration properties will be displayed. Take note of the keystore and certificate name values. You might need to know these values when it comes time to renew the certificate down the road. Click the Finish button to complete the wizard. |
| 16) | Congratulations! You have successfully enabled the ADMIN2 application server for TLS communications. You can now access the application server via the following URL once the ADMIN server has been restarted. ADMIN2 - https://[server]:2005/IDSWebApp |
[{"Type":"MASTER","Line of Business":{"code":"LOB57","label":"Power"},"Business Unit":{"code":"BU058","label":"IBM Infrastructure w\/TPS"},"Product":{"code":"SWG60","label":"IBM i"},"ARM Category":[{"code":"a8m0z0000000CIcAAM","label":"IBM i Administration Server"}],"ARM Case Number":"","Platform":[{"code":"PF012","label":"IBM i"}],"Version":"7.3.0;7.4.0;7.5.0"}]
Was this topic helpful?
Document Information
Modified date:
20 December 2023
UID
nas8N1021347