Troubleshooting
Problem
This document provides information on changing the print screen assignment in the PC5250 keyboard mapping when using V5R3M0 (R530) or V5R2M0 (R520) iSeries Access for Windows, or V5R1M0 (R510) Client Access/400 Express for Windows (5722XE1).
Resolving The Problem
| Important Note: This document discusses IBM i Access for Windows, as well as older versions of "Client Access" including System i Access for Windows, iSeries Access for Windows and Client Access Express. These names essentially refer to the same product; however, the functionality and name changed over the last several releases. For the purposes of this document, the terms System i Access, iSeries Access and Client Access Express may be used interchangeably. Where a difference is important, the version of the product is used to identify the differences. |
By default, the PC5250 workstation profile (files with an extension of .WS) does not allow you to remap the Print Screen key on your keyboard. This procedure provides instructrions for modifying the workstation profile so that you can remap the Print Screen key. This is done by adding the PrtScrn switch to the [Keyboard] section in your display session profile (*.WS file).
This document was last updated on 4 April 2014.
Adding the PrtScrn Switch to Your PC5250 Display Sessions
To change this, you will first need to manually edit your *.WS files using Notepad:
| 1. | Close all PC5250 display sessions that you want to change. |
| 2. | Use Windows Explorer to navigate to where your PC5250 display sessions are stored. Note: By default, the PC5250 display sessions (or *.ws files) are saved in the C:\Program Files (x86)\IBM\Client Access\Emulator\private folder in Windows 7, or the C:\Program Files\IBM\Client Access\Emulator\private folder in Windows XP. |
| 3. | Use the left mouse button to click on the PC5250 display session profile that you want to change (in order to highlight it). |
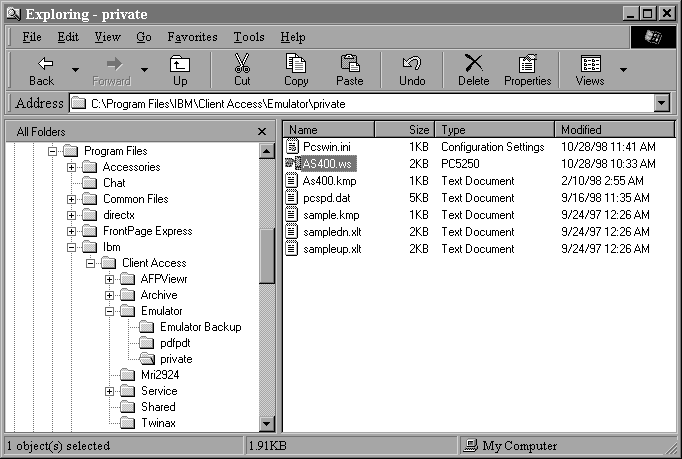
| 4. | Press and hold one of the Shift keys and then use the right mouse button to click on the PC5250 display session profile. Select Open with... on the popup (or context) menu. Note: The option Open with... does not show up on the popup menu without holding down the Shift key, and selecting Open will bring up the PC5250 display session rather than give you the option to edit the PC5250 display session file using Notepad. |
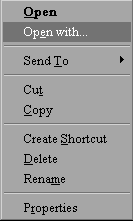
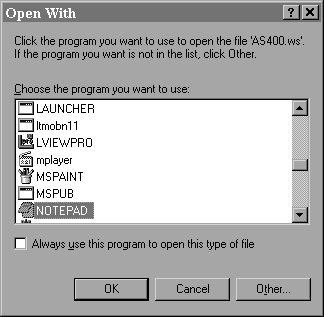
| 5. | Select NOTEPAD from the Open With dialog box, and click OK. Tip: Typing N on your keyboard will bring you down to the first program listed that starts with an N. This can save you time over simply scrolling down the list. |
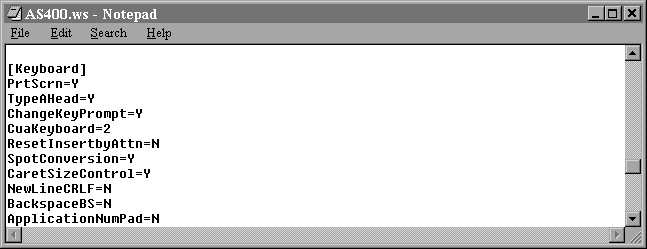
| 6. | Scroll down to the [Keyboard] section and add the PrtScrn switch on a line by itself. If this switch is not specified, PC5250 will default to a value of N (no). If you want to be able to map the Print Screen key on your keyboard, you will need to set the PrtScrn switch to a value of Y (yes). |
| 7. | Select File | Save on the Notepad menu bar to save your changes to the PC5250 display session profile, then close Notepad. |
| 8. | Repeat steps 3 through 7 for any other PC5250 display session profiles that you want to change. |
| 9. | You are now ready to change the keyboard mapping in your PC5250 display sessions. |
Changing the Print Screen Key in the Keyboard Mapping
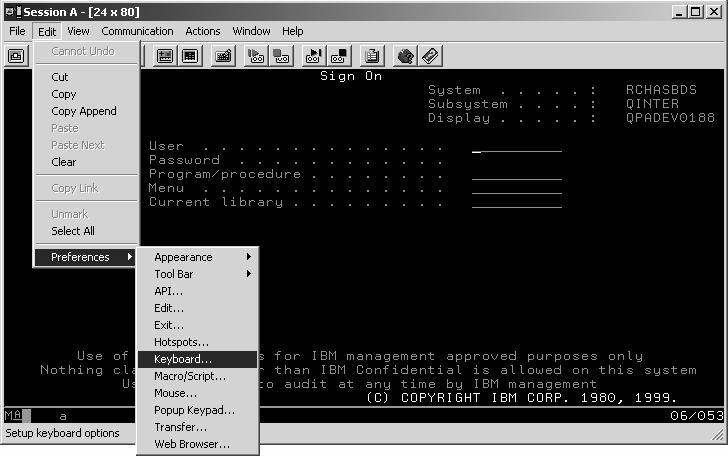
| 1. | Click on Edit | Preferences | Keyboard... on the PC5250 session window menu bar. |
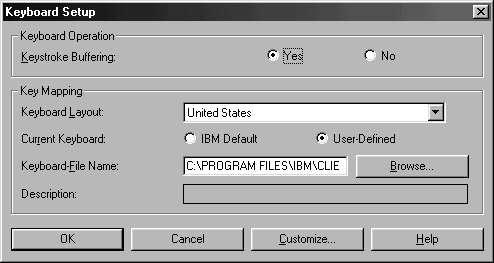
| 2. | Select User-defined for the Current Keyboard field then click on the Customize... button. |
| 3. | Click on the Print Screen key. |
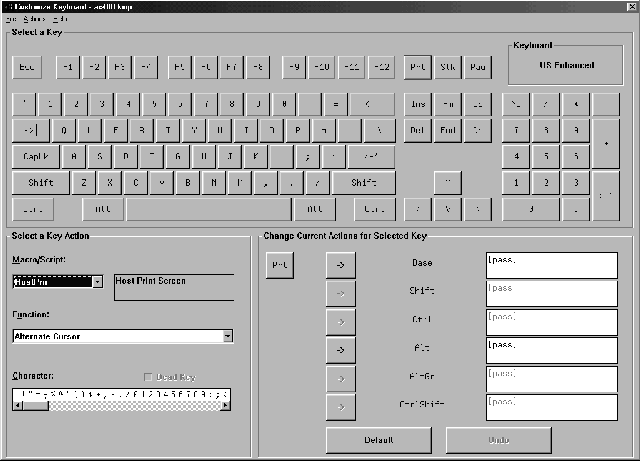
| 4. | In the Select a Key-Action area of the window, click on the down arrow to the right of the Function dialog box and select the function to assign to the key, such as Host Print or Print Screen. You can also assign a macro or character to the key. |
| 5. | In the Change Current Actions for Selected Key area of the window, click on the arrow next to the key state you want to remap (Base, Shift, and so on). |
| 6. | When you have finished remapping the keys, select Save or Save As from the File pull-down menu. |
| 7. | Type a name for the file. The extension is automatically assigned as .KMP. |
Historical Number
24261801
Was this topic helpful?
Document Information
Modified date:
18 December 2019
UID
nas8N1017257