Question & Answer
Question
The intention of this document is to explain the steps to configure user and group accounts of an Active Directory for Windows Server 2016 to be used as LDAP users and groups on the AIX operating system. The outcome is a working basic setup as a starting point. There are many elaborated configuration options in place to tailor AIX / AD integration for specific needs which are beyond the scope of this document. Please continue to read this article which provides more detailed information to guide you through the steps needed on the AD side and on the AIX side.
Answer
TARGET AUDIENCE:
Users configuring AIX as an LDAP client in order to utilize LDAP based user accounts and user groups from an Active Directory for Windows Server 2016 LDAP server.
These instructions may also apply to an Active Directory for Windows Server 2012.
OBJECTIVE:
LDAP users and group accounts of an AD server should be integrated with AIX.
LDAP user accounts integrated with AIX appear in the list of all AIX user accounts. They can be used to login by providing the according password of the AD server. After login the LDAP user account can be used to work seamlessly like with local AIX user accounts.
OVERVIEW:
Identity Management for Unix (IDMU) & NIS Server Role have been commonly used to achieve this task with older AD versions. IDMU & NIS Server Role are deprecated with an AD 2016 server (see also the references below).
This document describes the first steps to achieve such an integration without IDMU & NIS Server Role being in place on the AD server.
These steps also apply to an Active Directory for Windows Server 2012 if IDMU & NIS Server Role should not be used.
PROCEDURES:
The following instructions provide guidance to do all steps needed to create a first basic working setup on AD and AIX.
1. Install the LDAP client filesets on AIX
See Technote T1027447 in the references section below.
2. Configuration steps on the AD server
Various objects must be created in AD before the AIX system can be configured to use the AD server. They must only be performed once on an AD server, regardless of how many AIX systems are being configured.
All steps assume you are logged in as an administrative user with full rights to modify AD.
Please keep in mind that this instructions are provided from the AIX perspective. For details please check Microsoft AD documentation or consult Microsoft AD support.
All following steps are done in the "Active Directory Users and Computers management console" which can be started by running "dsa.msc".
2.1 Identify the AD domain
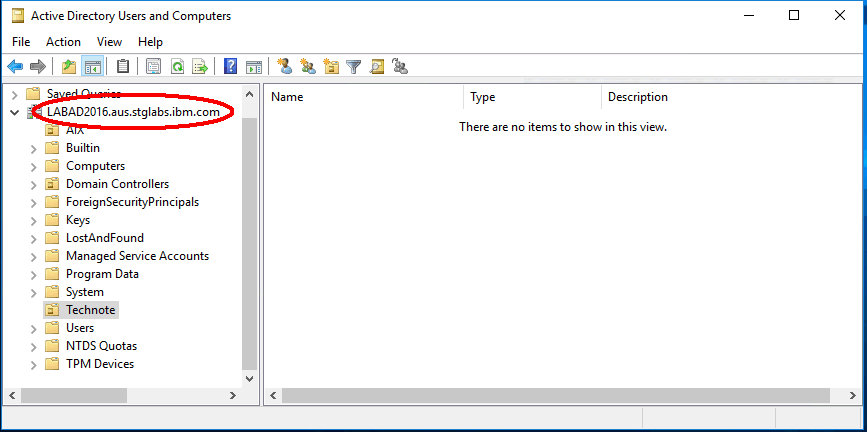
The fully qualified AD domain name in our example is "LABAD2016.aus.stglabs.ibm.com". This example system is used in the whole document.
The string identifying that domain in LDAP protocol language is "DC=LABAD2016,DC=aus,DC=stglabs,DC=ibm,DC=com".
The AD domain is an object in LDAP. All LDAP objects are identified by the LDAP term "Distinguished Name" (DN).
Consequently the DN of our AD domain is "DC=LABAD2016,DC=aus,DC=stglabs,DC=ibm,DC=com".
This domain holds or will hold the AD users/groups to be accessed as LDAP users in AIX.
2.2 Identify or create an "Organizational Units" (OU) in the domain
The OU holds or will hold the AD users/groups to be accessed as LDAP users/groups in AIX.
Remark: users and groups may reside in several OUs. To keep this document simple we only use one OU.
Steps to create a new OU:
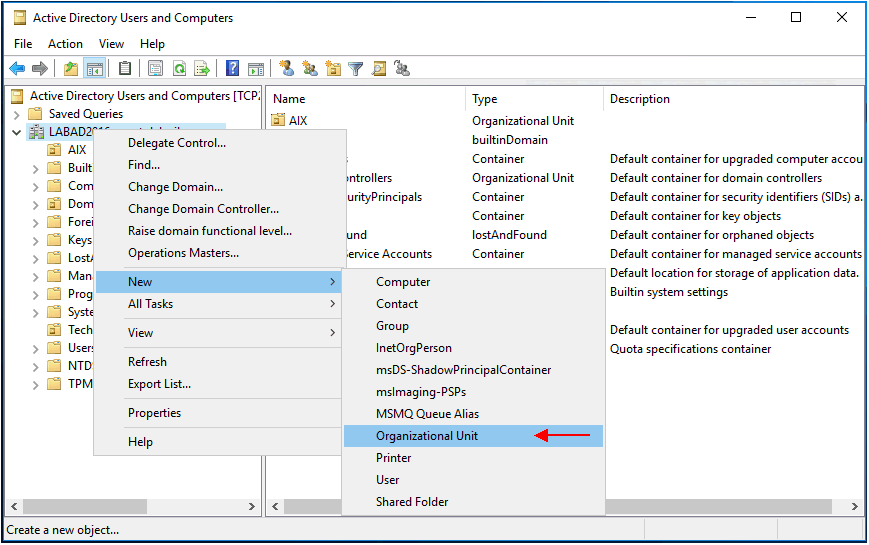
In the "Active Directory Users and Computers" window, right click the domain, then select "New" and then "Organizational Unit".
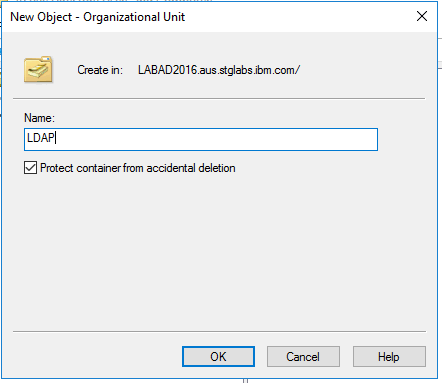
Enter the according name in the "New Object – Organizational Unit" window. "LDAP" is used in this example. Then click the "OK" button.
The “LDAP” OU will now appear in the folder tree underneath the AD domain folder:
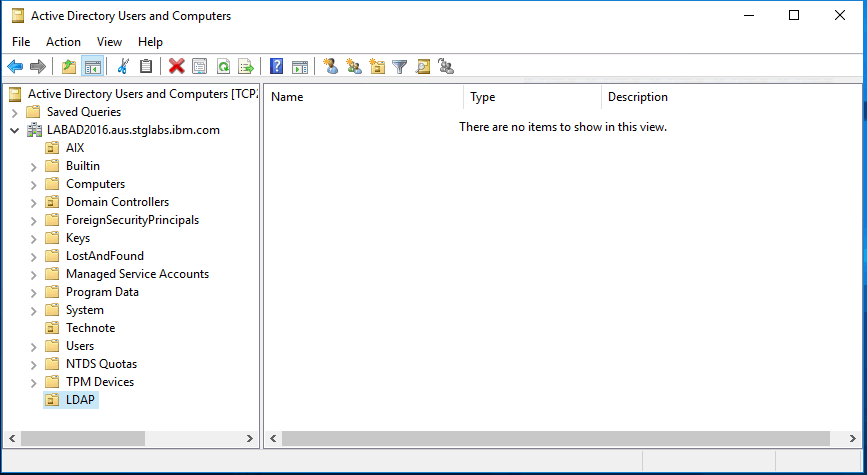
The DN of the OU is "OU=LDAP,DC=LABAD2016,DC=aus,DC=stglabs,DC=ibm,DC=com".
2.3 Identify or create an LDAP bind user on the AD server
The AD server administrator has to provide an administrative user (service account) which can be used to access the data of the AD users and groups you want to share with the AIX systems.
This permissions of that user should include at lease read permission to the OU and all the objects it contains or will contain.
In LDAP terminology this user plays the role of the bind user. It is good practice that it is not located in the shared OU identified in point 2.2.
In our example we use the following user:
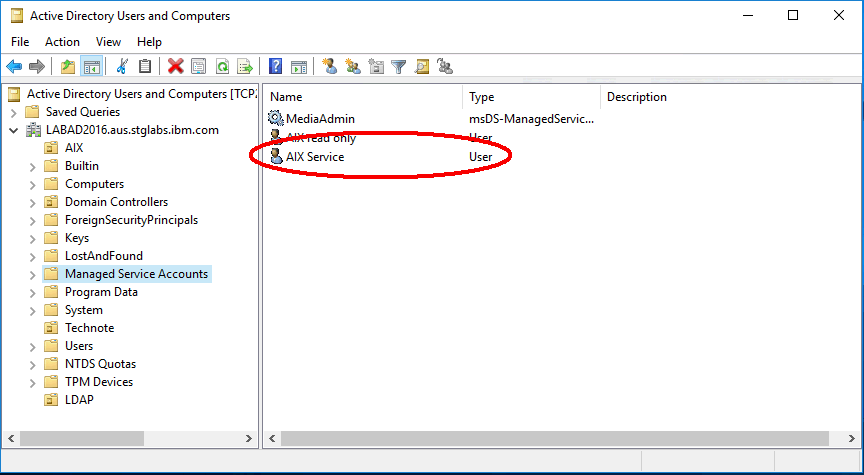
The DN of the bind user is "CN=AIX Service,CN=Managed Service Accounts,DC=labad2016,DC=aus,DC=stglabs,DC=ibm,DC=com".
(Keep in mind that an LDAP DN may hold spaces and may need quoting on the AIX command line).
2.4 Create a test user and a test group account on the AD server
Take basic AD configuration steps to achieve the following:
- create a user account in the OU ("LDAP" in our example)
- create a group which can be used as primary group for that user on the same place
The names of both user and group should not be longer than 8 characters.
Remark: if the names should be longer that 8 characters additional configuration is needed in AIX
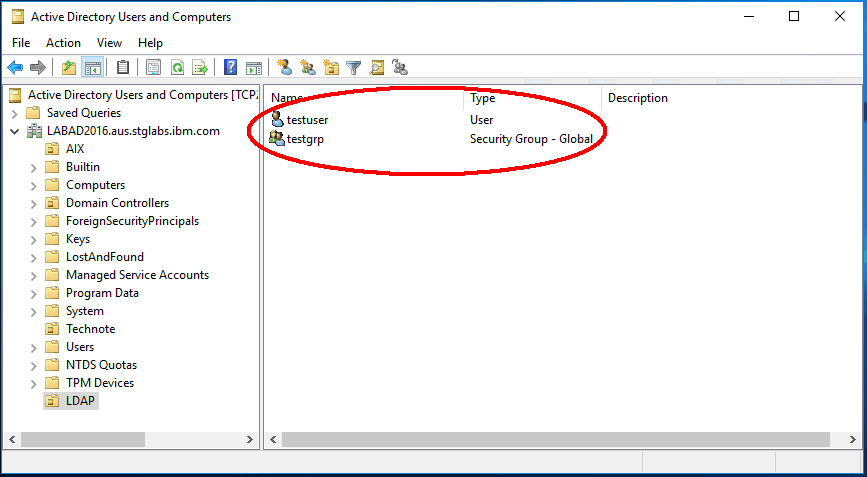
2.5 Edit the GID/UID RFC 2307 attributes of both user and group
The following attributes for each group and user are mandatory and have to be defined in order to be found by AIX. They are not in place after creating the user or group by basic AD means like we did so far.
- mandatory attribute of the group account
- gidNumber (the GID of the group - the GID is a number which identifies the group on AIX)
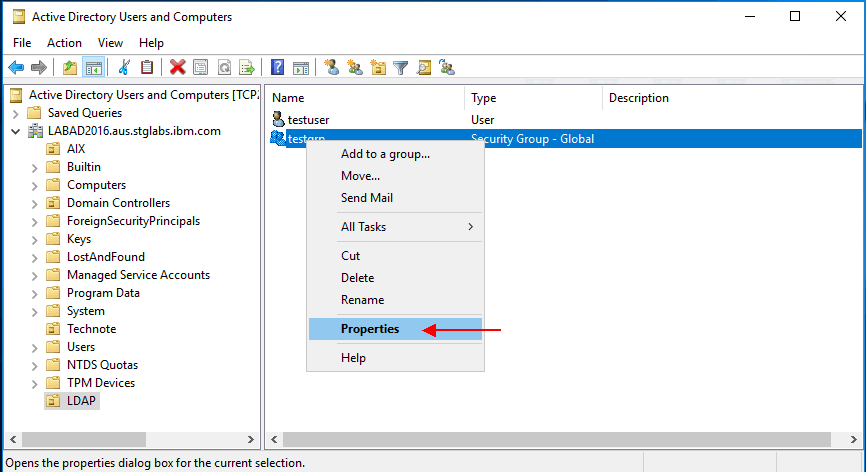
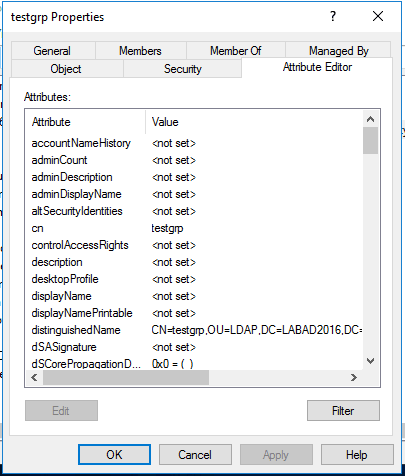
Right click on the group object and click on "Properties".
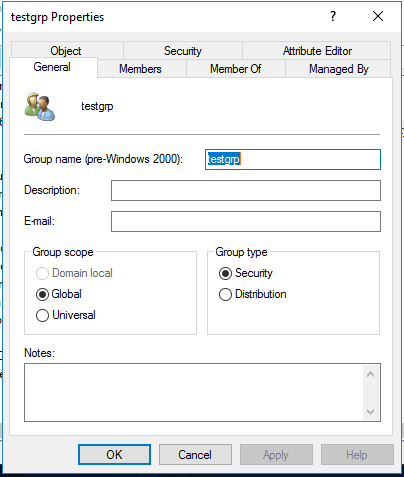
Click on the "Attribute Editor" tab:
Search for the "gidNumber" attribute:
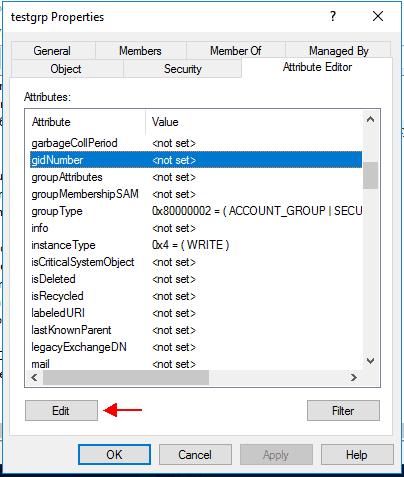
Click on edit and provide the according number. Keep in mind that it should not be in conflict with the GIDs of any local groups of the AIX systems which will use this LDAP group.
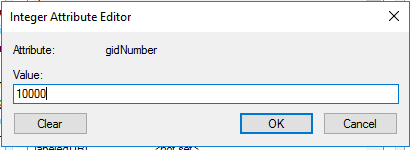
I used a value of 10000 as GID for this AIX LDAP group.
Finish the configuration change by closing all sub windows by clicking the "OK" button.
- mandatory attributes of the user account
- uid (the name of the user)
- uidNumber (the UID of the user - the UID is a number which identifies the user on AIX)
- gidNumber (the GID of its primary group which is the new group just created; 10000 in our example)
- Loginshell
- unixHomeDirectory
- attribute values used in our example:
- uid testuser
- uidNumber 1000
- gidNumber 10000
- Loginshell /usr/bin/ksh
- unixHomeDirectory /home/testuser
The steps to make that changes are done right the similar way as for the group. All attributes can be provided in the same sub window. The "uid" attribute is multi-valued. Please be prepared that its interface is slightly different.
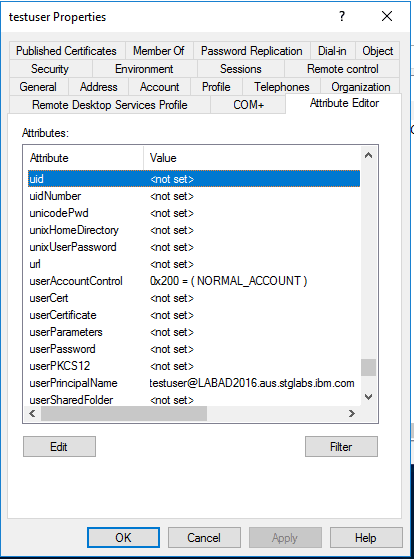
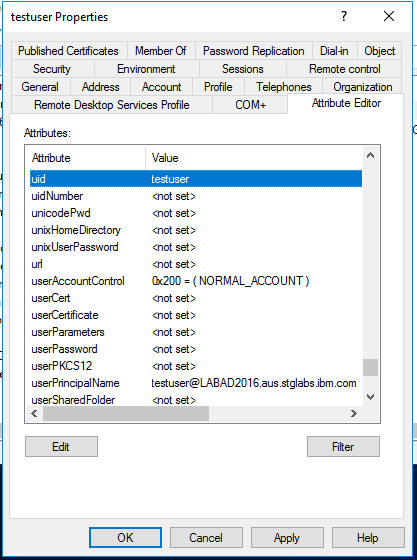
... and so on for the remaining attributes.
3. Information needed from the AD system:
- the DN of the bind user discussed above
- the password of the bind user
- the AD server hostname
- the DN of the OU which holds the shared AD user and group
In our example these are:
- the DN of the bind user: "CN=AIX Service,CN=Managed Service Accounts,DC=labad2016,DC=aus,DC=stglabs,DC=ibm,DC=com"
- the password of the bind user: XXX
- the AD server hostname: tcp233
- the DN of the OU: "OU=LDAP,DC=LABAD2016,DC=aus,DC=stglabs,DC=ibm,DC=com"
# ldapsearch -L -D <DN of the bind user> -w <password of the bind user> -h <AD server hostname> -b <DN of the OU> '(objectClass=*)' uid uidNumber gidNumber Loginshell unixHomeDirectory
In our example this is:
# ldapsearch -L -D "CN=AIX Service,CN=Managed Service Accounts,DC=labad2016,DC=aus,DC=stglabs,DC=ibm,DC=com" -w XXX -h 10.99.12.233 -b "OU=LDAP,DC=LABAD2016,DC=aus,DC=stglabs,DC=ibm,DC=com" '(objectClass=*)' uid uidNumber gidNumber Loginshell unixHomeDirectory
The output in our example looks like:
dn: OU=LDAP,DC=LABAD2016,DC=aus,DC=stglabs,DC=ibm,DC=com
dn: CN=testuser,OU=LDAP,DC=LABAD2016,DC=aus,DC=stglabs,DC=ibm,DC=com
uid: testuser
uidNumber: 1000
gidNumber: 10000
unixHomeDirectory: /home/testuser
loginShell: /usr/bin/ksh
dn: CN=testgrp,OU=LDAP,DC=LABAD2016,DC=aus,DC=stglabs,DC=ibm,DC=com
gidNumber: 10000
Important: if the output does not show both the user DN and the group DN with the according additional attributes in place the next step will fail.
5. Configure LDAP client access on AIX
# mksecldap -c -a <DN of the bind user> -p <password of the bind user> -h <AD server hostname> -d <DN of the OU> -A ldap_auth
In our example this is:
mksecldap -c -a "CN=AIX Service,CN=Managed Service Accounts,DC=labad2016,DC=aus,DC=stglabs,DC=ibm,DC=com" -p port2049 -h 10.99.12.233 -d "OU=LDAP,DC=LABAD2016,DC=aus,DC=stglabs,DC=ibm,DC=com" -A ldap_auth
There is no output if the command runs successfully.
6. Test LDAP client access on AIX
# lsuser -f -a id pgrp groups home shell SYSTEM registry testuser
testuser:
id=1000
pgrp=testgrp
groups=testgrp
home=/home/testuser
shell=/usr/bin/ksh
SYSTEM=compat
registry=LDAP
# lsgroup -f testgrp
testgrp:
id=10000
users=testuser
registry=LDAP
The "registry" attribute shows that AIX gets the information by use of LDAP.
The users "SYSTEM" attribute shows a value of "compat" which means that authentication is still attempted locally and will fail.
7. Enable LDAP user login on AIX
Run the following command to allow all LDAP user accounts which a seen by AIX to login (with their according AD passwords) in AIX:
# chsec -f /etc/security/user -s default -a "SYSTEM=compat or LDAP"
# lsuser -f -a id SYSTEM registry testuser
testuser:
id=1000
SYSTEM=compat or LDAP
registry=LDAP
The users "SYSTEM" attribute shows a value of "compat or LDAP" which means that authentication first attempted locally which fails but this with the AD LDAP server which is successful if the correct AD password for the according user is provided.
Login should now be successful.
REFERENCES:
- Technote T1027447: LDAP on AIX: Step by step instructions for installing the LDAP client filesets on AIX
- Clarification regarding the status of Identity Management for Unix (IDMU) & NIS Server Role in Windows Server 2016 Technical Preview and beyond
http://www.ibm.com/support/docview.wss?uid=isg3T102744
https://blogs.technet.microsoft.com/activedirectoryua/2016/02/09/identity-management-for-unix-idmu-is-deprecated-in-windows-server
CATEGORY:
WWLIB
SUPPORT:
If additional assistance is required after completing all of the instructions provided in this document, please follow the step-by-step instructions below to contact IBM to open a service request (PMR) for software under warranty or with an active and valid support contract. The technical support specialist assigned to your support call will confirm that you have completed these steps.
a. Document and/or take screen shots of all symptoms, errors, and/or messages that might have occurred
b. Capture any logs or data relevant to the situation
c. Contact IBM to open a support call (PMR):
- For electronic support, please visit the web page:
- For telephone support, please visit the web page:
- Please visit the IBM Support Portal web page for additional resources:
https://www-947.ibm.com/support/servicerequest/newServiceRequest.action
http://www.ibm.com/planetwide
https://www-947.ibm.com/support/entry/myportal/support
d. Provide a good description of your issue and reference this technote
e. Upload all of the details and data to your support call (PMR):
Please visit this web page for instructions: https://www.secure.ecurep.ibm.com/app/upload
FEEDBACK:
Quality documentation is important to IBM and its customers. If you have feedback specific to this article, please send an detailed message to the email address:
- aix_feedback@wwpdl.vnet.ibm.com
- This email address is monitored for feedback purposes only.
- No support for any IBM products or services will be provided through this email.
- To receive support, please follow the step-by-step instructions in the above "SUPPORT" section.
Was this topic helpful?
Document Information
Modified date:
15 September 2021
UID
isg3T1027699