Example: Applying change data by using a CDC Transaction stage

This example demonstrates how to use IBM® InfoSphere® Change Data Capture (InfoSphere CDC) to read changes that occur on tables in an Oracle database and then use IBM InfoSphere DataStage® to replicate the changes to a target DB2® database.

When you use InfoSphere CDC to capture changes, the change data includes the before and after images of the data, along with control columns. The control columns provide additional details about the change data, such as when the change occurred and the type of operation that was performed. Depending on how replication is configured, the change data might be sent in a single record that includes the before and after images, or in multiple records.

Simply inserting the change data record into the target database might not meet your business needs. To remove the extra control columns and replicate only the change data, you can create a stored procedure and call it from the target connector stage.

Setting up source and target tables for the example

For this example, you set up a source table in an Oracle database and a target table in a DB2 database. You also create a stored procedure that is called when the target DB2 connector stage runs.

Before you begin

The log retention policy for the source database must be set to retain logs.

Procedure

  1. Connect to the source Oracle database and issue the following DDL statement to create the source table, S100:
    create table S100 (C1 number(5), C2 VARCHAR2(10));
    If you want to use a DB2 database as the source instead of an Oracle database, modify the syntax of the create table statements, as required, and create the tables in a DB2 database.
  2. Connect to the target DB2 database and issue the following DDL statement to create the target table, T100:
    create table T100 (C1 decimal(5), C2 varchar(10))
  3. Issue the following DDL statement to create the bookmark table in the target DB2 database:
    create table BOOKMARKTABLE (DM_KEY smallint not null primary key, DM_BOOKMARK 
       varchar(1024))
    Important: The target database must contain a unique bookmark table for each subscription. If a table with the name BOOKMARKTABLE exists in the target database, specify a different name for this table. Use this name wherever the steps in this example indicate that you must specify BOOKMARKTABLE.
  4. Create the following stored procedure in the target DB2 database. You call this stored procedure from the target DB2 connector stage. The stored procedure uses the value of the DM_OPERATION_TYPE column to apply only the change data to the target table, T100:
    create procedure P1 (
      IN DM_OPERATION_TYPE CHAR(1),
      IN BEFORE_C1 decimal(5), 
      IN BEFORE_C2 varchar(10),
      IN AFTER_C1 decimal(5), 
      IN AFTER_C2 varchar(10)
    )
    language sql
    BEGIN
      DECLARE dummy INT;
      DECLARE SQLSTATE CHAR(5) DEFAULT '00000';
      CASE DM_OPERATION_TYPE
        WHEN 'I' THEN
          INSERT INTO T100 (C1, C2) VALUES (AFTER_C1, AFTER_C2);
        WHEN 'D' THEN 
          BEGIN ATOMIC
            DECLARE CURSOR_FOR_DELETE CURSOR FOR SELECT 1 FROM T100 
            WHERE C1=BEFORE_C1 AND C2=BEFORE_C2 FOR UPDATE;
            OPEN CURSOR_FOR_DELETE;
            FETCH FROM CURSOR_FOR_DELETE INTO dummy;
            IF (SQLSTATE = '00000') THEN 
              DELETE FROM T100 WHERE CURRENT OF CURSOR_FOR_DELETE;
            END IF;
            CLOSE CURSOR_FOR_DELETE;
          END;
        WHEN 'U' THEN
          BEGIN ATOMIC
            DECLARE CURSOR_FOR_UPDATE CURSOR FOR SELECT 1 FROM T100 
            WHERE C1=BEFORE_C1 AND C2=BEFORE_C2 FOR UPDATE;
            OPEN CURSOR_FOR_UPDATE;
            FETCH FROM CURSOR_FOR_UPDATE INTO dummy;
            IF (SQLSTATE = '00000') THEN 
              UPDATE T100 SET C1=AFTER_C1, C2=AFTER_C2 
              WHERE CURRENT OF CURSOR_FOR_UPDATE;
            END IF;
            CLOSE CURSOR_FOR_UPDATE;
          END;
      END CASE;
    END@

Setting up replication

You use the IBM InfoSphere Change Data Capture Management Console to add and configure a new subscription. Before you can perform these steps, the InfoSphere CDC software must be installed and configured.

Before you begin

Install and configure the InfoSphere CDC software.

Procedure

  1. Log on to the InfoSphere CDC Management Console.
  2. In the Access Manager perspective, add new data stores for the source and the target.
    1. Add a data store called Source to access the Oracle database.
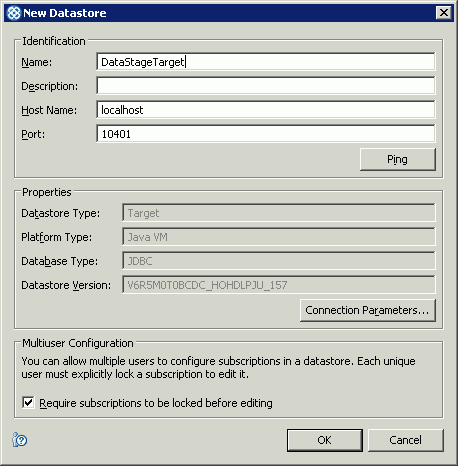
    2. Add a data store called DataStageTarget to access InfoSphere DataStage. For example, the following image shows values that are specified for the new data store.
      Screen capture of the New Datastore window with InfoSphere DataStage properties specified.
    3. In the Connection Management tab, assign a user to each data store. In the following example, the user Admin is assigned to both data stores:
      Screen capture of the Connection Management tab with the user Admin assigned to the data stores DataStageTarget and Source.
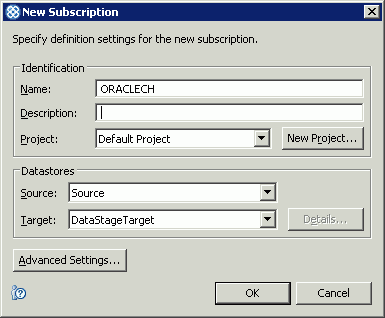
  3. In the Configuration perspective of the InfoSphere CDC Management Console, add a subscription called ORACLECH. In the Source field, select Source. In the Target field, select DataStageTarget. For example, the following image shows values that are specified for the new subscription.
    Screen capture of the New Subscription window.
  4. In the Subscriptions tab, click the subscription named ORACLECH to edit it. Right-click the subscription, and select Map Tables to map the table S100 to the target of the subscription, InfoSphere DataStage. When you run the wizard, make sure that you select the following options:
    1. In the Select Mapping Type page, select InfoSphere DataStage.
    2. In the Select InfoSphere DataStage Connection Method page, select Direct Connect.
    3. In the Select Source Tables page, select the table named S100 that you created earlier.
    4. In the InfoSphere DataStage Direct Connect page, select Single Record.
    When you finish, the table mappings for the subscription are displayed in the Table Mappings tab.
    Screen capture of the Table Mappings tab that shows the source table, S100, that is mapped to the target, InfoSphere DataStage.
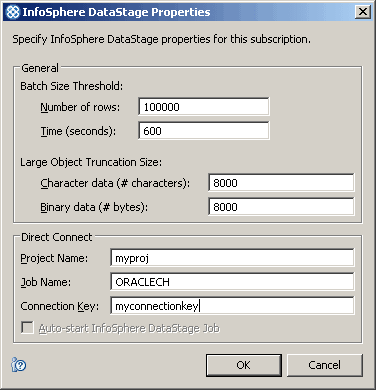
  5. In the Subscriptions tab, right-click the subscription, ORACLECH, and select InfoSphere DataStage > InfoSphere DataStage Properties. Specify the following properties:
    1. In the Direct Connect area, specify the following values for the InfoSphere DataStage job. The subscription must be open for editing when you define these properties, or your changes are not saved.
      • In the Project Name field, specify the name of your InfoSphere DataStage project.
      • In the Job Name field, specify ORACLECH.
      • In the Connection Key field, specify myconnectionkey.

      Screen capture of the InfoSphere DataStage Properties with values for the properties that are specified as described in the surrounding text.

    2. Optional: If you want to configure the job to start automatically when the subscription starts, select Auto-start InfoSphere DataStage Job. If the check box is grayed out, the InfoSphere CDC for InfoSphere DataStage server instance is disabled for auto-start. For auto-start to be enabled, the PATH environment variable must contain the path to the dsjob executable file at the time that the instance is created.
    3. Click OK.

Generating a template for the job

After you create a subscription in the InfoSphere CDC Management Console, you generate a template for the InfoSphere DataStage job.

Procedure

  1. In the Subscriptions tab of the Configuration perspective, right-click the subscription, and click InfoSphere DataStage > Generate InfoSphere DataStage Job Definition. This option is available only after the subscription is correctly set up.
  2. In the dialog box that is displayed, browse to select the file named ORACLECH.dsx, and click Save.
  3. Copy the .dsx file to a location that is accessible by the computer where InfoSphere DataStage and QualityStage Designer is installed.

Importing and configuring the job

When you generate the template job, some of the stage properties are set to values that are accurate for the subscription. However, you must update the job to specify settings that were not known when the job was generated.

Procedure

  1. In the Designer client, click Import > DataStage components, and specify the path to the .dsx file, for example: C:\ORACLECH.dsx. Click OK.
  2. In the Repository area, expand Jobs, and double-click ORACLECH to open the job.
  3. Configure the CDC Transaction stage.
    1. On the Job canvas, double-click the CDC Transaction stage.
    2. In the stage editor, select the Stage tab.
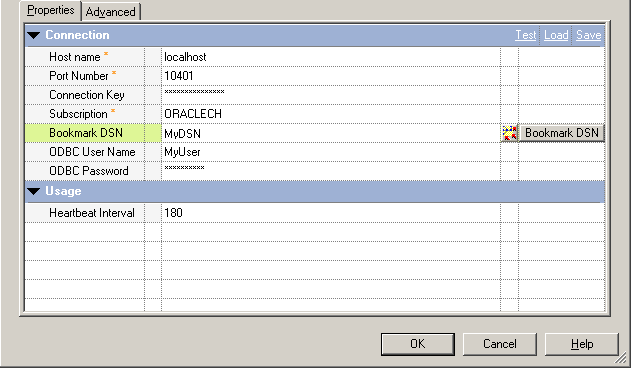
    3. In the Properties tab, update the following ODBC properties. These properties are used to retrieve bookmark information.
      Bookmark DSN
      Enter the ODBC DSN that you created for bookmark information when you configured InfoSphere CDC.
      ODBC user name
      Enter the user name that you specified for the bookmark DSN.
      ODBC password
      Enter the password for the ODBC user that you specified for the bookmark DSN.

      The values for other properties are already set based on properties that are specified in the subscription. For example, the following image shows values that are specified for CDC Transaction stage properties.

      Screen capture of the CDC Transaction stage with properties for connecting to ODBC specified.

    4. Click OK, and then save the job.
    For this example, you do not configure the CDC Transaction stage output links because they are already configured as part of the job template. Also, you do not configure the bookmark link because the table that you set up for bookmarks uses the default name that is specified in the job template.
  4. Configure the DB2 connector input links.
    1. On the Job canvas, double-click the DB2 connector stage.
    2. In the stage editor select the Link tab, and then select the link named S100, from the drop-down list.
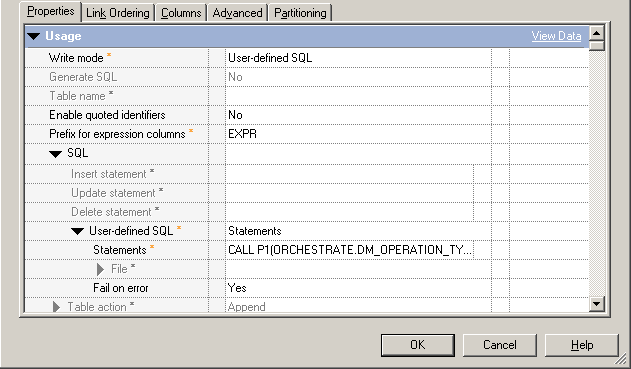
    3. In the Write mode field, select User-defined SQL.
    4. In the SQL > User-defined SQL field, select Statements.
    5. In the Statements field, enter the following procedure call:
         CALL P1(ORCHESTRATE.DM_OPERATION_TYPE,
                 ORCHESTRATE.BEFORE_C1,
                 ORCHESTRATE.BEFORE_C2,
                 ORCHESTRATE.C1,
                 ORCHESTRATE.C2)

      For example, the following image shows values that are specified for the DB2 connector input link.

      Screen capture of the DB2 connector properties tab with User-defined SQL specified.

    6. In the Link Ordering tab, specify the following link order:
      Bookmark
      S100
    You do not configure the bookmark link because the table that you set up for bookmarks uses the default name that is specified in the job template.
  5. Configure the DB2 connector stage.
    1. In the stage editor, select the Stage tab.
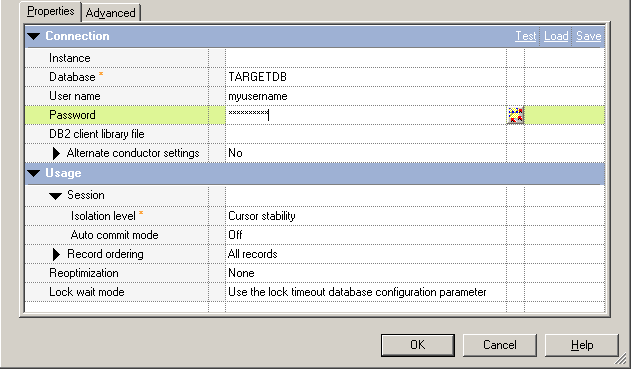
    2. In the Properties tab, specify connection details for the target database. For example, specify the instance, database, user name, and password for connecting to the target database.
      Screen capture of the DB2 connector properties with connection details specified.
    3. Click the Test link to test the connection. If the connection is not successful, enter the correct connection information, and try again. Click OK.
  6. Click OK and then save the job.
  7. Click the Compile toolbar button (or press F7). If the Compilation Status area shows errors, edit the job to resolve the errors. After you resolve the errors, click Re-compile.

Starting the subscription and running the job

You start the subscription in the InfoSphere CDC Management Console. If auto-start is selected, starting the subscription automatically starts the InfoSphere DataStage job. If auto-start is not selected, you must start the job manually.

Procedure

  1. Log on to the InfoSphere CDC Management Console.
  2. Open the Monitoring perspective.
  3. In the Subscriptions tab, right-click the subscription named ORACLECH, and select Start Mirroring.
  4. Select Continuous to replicate continuously until the subscription is stopped.
  5. If the job is not configured to start automatically, start the job. In the Designer client, open the compiled job, and click Run. When the job is running, the links turn blue, and you can see that the row count for the bookmark link increments.
  6. In Monitoring perspective of the InfoSphere CDC Management Console, verify that the state of the subscription is Mirror Continuous.

Writing change data to the target database

When you update the source database tables, InfoSphere CDC sends the change data to the CDC Transaction stage, which sends the change data to the target DB2 connector stage. The target DB2 connector stage then calls the stored procedure to replicate the change data to the target.
Procedure

  1. Connect to the source database and issue the following query to update the source table, S100:
    insert into S100 values (1, 'FIRST');
    insert into S100 values (2, 'SECOND');
    update S100 set C2='THIRD' where C1=1; 
    delete S100 where C1=2;
  2. Issue the following select statement against the source database to view the data in the S100 table:
    select * from S100;
    The select statement returns the following data:
            C1 C2
    ---------- ----------
             1 THIRD
  3. After changes are committed to the source database, connect to the target database, and issue the following queries to view the data in the target table:
    select * from T100
    The select statement returns the following data:
            C1 C2
    ---------- ----------
             1 THIRD
  4. Issue additional queries to update, insert, and delete data. Issue select statements on the target tables to see how the change data is replicated to the target.