Customize the configuration of process, log file, and script data sources.
Before you begin
- Monitoring data from a Simple Network Management Protocol (SNMP)
- Monitoring Java Management Extensions (JMX) MBeans
- Monitoring data from a Common Information Model (CIM)
- Monitoring data from Java Database Connectivity (JDBC)
- Monitoring HTTP availability and response time
- Monitoring data from a SOAP data source.
About this task
All IBM® Tivoli® Monitoring agents must be configured before they can be started. All agents must have basic configuration information such as the method of connecting to the Tivoli Enterprise Monitoring Server. Many times, an agent must have more configuration information so it has access to information specific to the system on which it is running. For example, if you must know the installation location of a software product, add configuration properties to prompt for this information. Another example of information you might prompt for is the user ID and password to access an interface,
- Matching an argument in a Process Monitor
- Matching the command line in a Process Monitor
- Forming a log file path or name
- Defining an environment variable in a script
If during data source definition your agent requires system-specific information for an area of data collection, Insert Property or Insert Configuration Property is shown.
Procedure
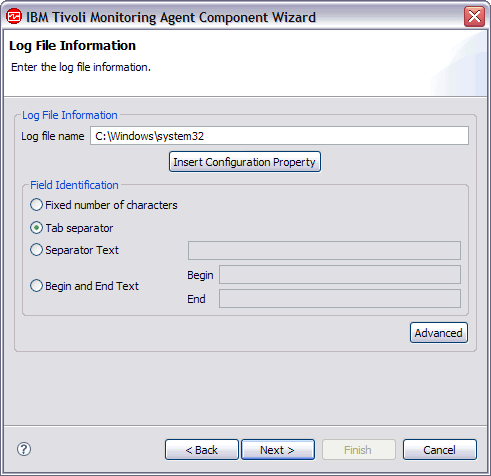
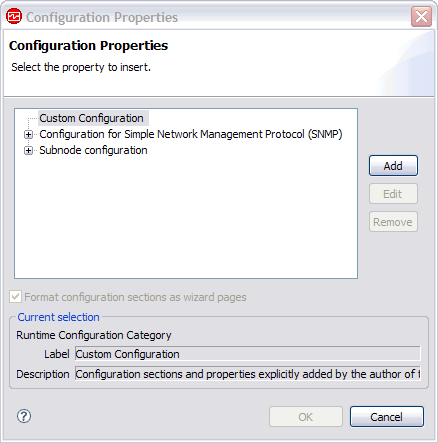
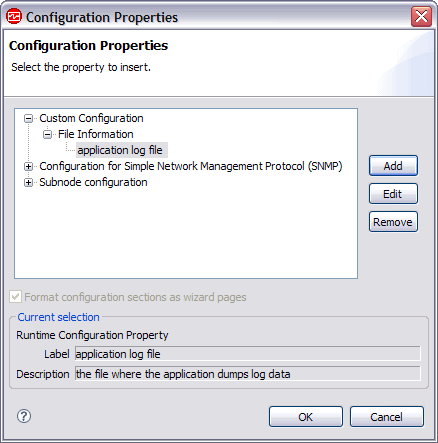
- Click Insert Configuration Property to display the Configuration Properties window
(Figure 2). Figure 2. Initial Configuration Properties window
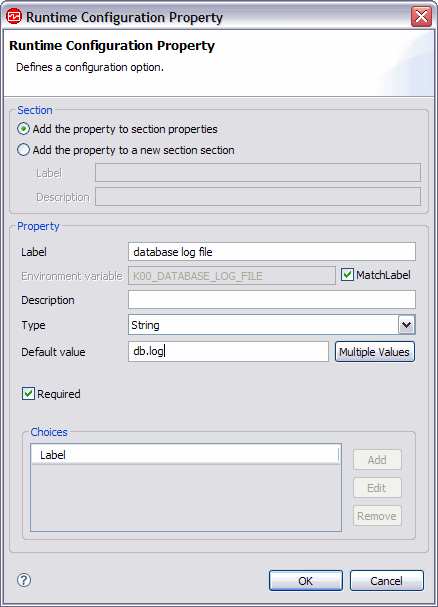
- In the Runtime Configuration
Property window (Figure 3), complete
the fields as described in this step. Figure 3. Runtime Configuration Property window
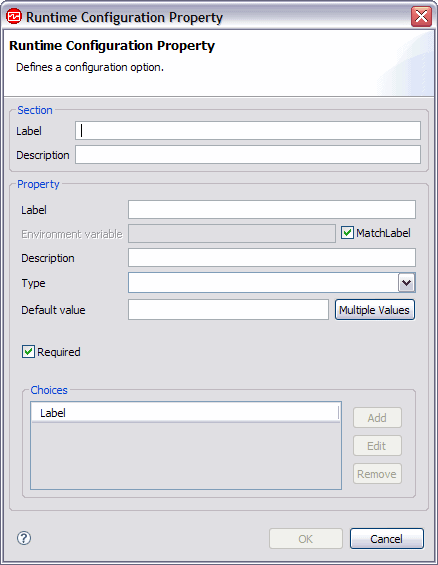
- In the Property area, complete
the following fields:
- Label
- Text that is displayed in the agent configuration panel that identifies the information you must enter.
- Environment variable
- The environment variable is displayed in the Environment variable field and is updated as you type in the label field. The Agent Builder automatically constructs the name of the environment variable from the product code and the label. If you want to change the environment variable independently from the label, you can clear Match Label.
- Description
- (optional) Description of the property that is being defined.
- Type
- Type of information that is collected, one of the following options:
- String
- For any alphabetic information that must be collected (for example, installation locations, user names, and host names).
- Password
- For any information that must be encrypted when stored. In addition to providing encryption of the data, the data that is typed into the text box is obscured by asterisks. In addition, you are required to type this information twice to validate the data.
- Numeric
- For any numeric information (for example, port numbers).
- Choice
- For a list of specific values. This option enables the Choices table. You can define specific values by clicking Add. The values that are entered are displayed in the agent configuration panel as a group of selections, you can make only one selection from the group.
- Read Only Text
- Displays text when you configure the agent, but no information is collected.
- Separator
- Displays a horizontal separator, but no information is collected.
- File Browser
- Collects a string, which is a file name. Click Browse to browse the file system for the wanted file.
- Default value
- (Optional) Specify the value that is shown
in the configuration panel at run time when the agent is configured
for the first time. If you want a default value for UNIX/Linux that
is different from a default value for Windows, click Multiple Values. In the Configuration Property Default Values window (Figure 4), specify the default values that you want for Windows and for UNIX and Linux.Figure 4. Configuration Property Default Values window
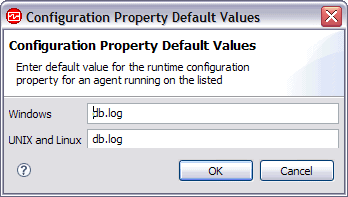 Note: Support for multiple default values is a feature that is only supported in IBM Tivoli Monitoring V6.2.1 and higher. If your agent is compatible with IBM Tivoli Monitoring V6.2, a prompt warns you about this requirement and you can cancel or continue with V6.2.1 compatibility enabled.
 - Required
- Check this field if the user must enter a value when the agent is configured. Clear this field if it is optional for the user to enter a value.
- In the Property area, complete
the following fields:
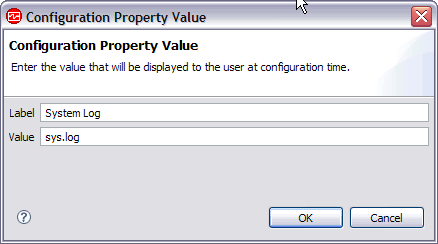
- In the Configuration Property Value window (Figure 5),
complete the Label and Value fields. The Label is displayed as one of the choices.
If this choice is taken, the value becomes the property value. Figure 5. Adding a configuration property choice
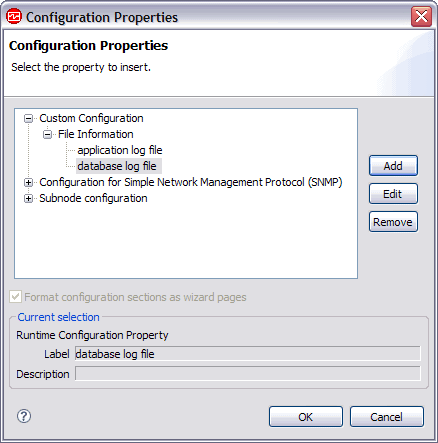
- Click OK. The new
configuration section and property are displayed in the Configuration Properties window under Custom
Configuration (Figure 6). Figure 6. New configuration property displayed
- Optional: To add another property to an existing
section, select the section or an existing property in the section
and click Add. You make the selection in the
runtime configuration tree of the Configuration Properties window. Figure 7. Adding a second property to an existing section
- Click OK. The property is inserted
into the log file name. Figure 8. Property inserted into the log file nameYou can then continue through the wizard to complete defining your log file attribute group.
 Note: Even though a configuration property is defined in the context of a log file name, it can be used in other locations. For instance, another location that accepts a configuration property is a script data source. This flexibility means that you can access the value for the configuration element File Information with the script variable $K00_APPLICATION_LOG_FILE if the product code is K00. You can also use the Windows batch file variable %K00_APPLICATION_LOG_FILE%.