IBM Security Privileged Identity Manager
Version 1.0.1
Quick Start Guide
This guide describes a quick and easy way to install the product.
National Language Version: To obtain the Quick Start Guide in other languages, access the PDF files on the Quick Start DVD.
Product overview
IBM Security Privileged Identity Manager helps organizations manage, automate and track the use of shared privileged identities.
Step 1: Access the software and documentation

This product offering includes:
- Quick Start DVD
- IBM Security Access Manager for Enterprise Single Sign-On, Version 8.2.1
- IBM Security Identity Manager, Version 6.0
- IBM Privileged Session Recorder Server, Version 1.0.1
For complete documentation, including installation instructions, see the IBM Security Privileged Identity Manager product documentation: http://www.ibm.com/support/knowledgecenter/SSRQBP_1.0.1.1/com.ibm.ispim.doc_1.0.1.1/kc-homepage.html.
Step 2: Evaluate the hardware and system configuration

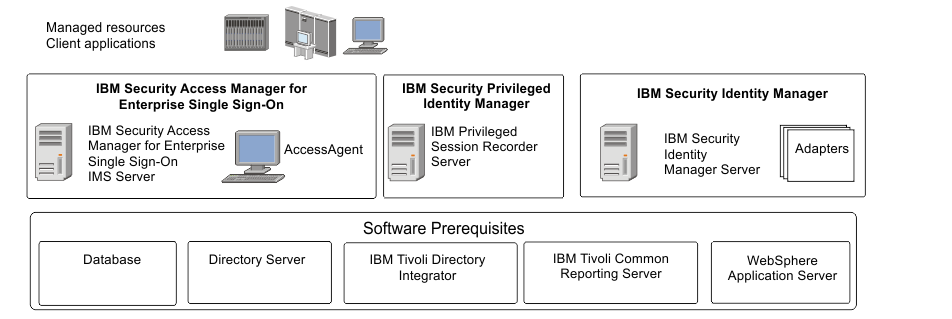
Step 3: Review the installation architecture
Step 4: Install and configure the IBM Security Identity Manager

- Install the IBM Security Identity Manager Server. See the IBM Security Identity Manager Installation Guide for more details.
- Ensure that the Shared Access module is installed.
- Go to the IBM Security Identity Manager documentation at https://www.ibm.com/support/knowledgecenter/SSRMWJ_6.0.0.2/com.ibm.isim.doc_6.0.0.2/kc-homepage.htm.
Step 5: Install and configure the IBM Security Access Manager for Enterprise Single Sign-On Server
For installation guidance, see the IBM Security Privileged Identity Manager product documentation at: http://www.ibm.com/support/knowledgecenter/SSRQBP_1.0.1.1/com.ibm.ispim.doc_1.0.1.1/kc-homepage.html.
Step 6: Install and configure the IBM Security Access Manager for Enterprise Single Sign-On Adapter
Install and configure the the IBM Security Access Manager for Enterprise Single Sign-On Adapter to manage provisioning of users to the IMS Server. To install the IBM Security Access Manager for Enterprise Single Sign-On Adapter, follow the instructions in the IBM Security Access Manager for Enterprise Single Sign-On Adapter Installation and Configuration Guide.
After you install the IBM Security Access Manager for Enterprise Single Sign-On Adapter files, you must integrate the adapter into the IBM Security Privileged Identity Manager environment by completing the required configuration tasks.
See the IBM Security Identity Manager adapter documentation at https://www.ibm.com/support/knowledgecenter/SSRMWJ_6.0.0.2/com.ibm.isim.doc_6.0.0.2/kc-homepage.htm.
Step 7: Install and configure the IBM Privileged Session Recorder Server
Install and configure the Privileged Session Recorder Server to manage and play back recordings.
For more information, see the IBM Security Privileged Identity Manager Deployment Overview Guide.
Step 8: On client workstations, install and configure the IBM Security Access Manager for Enterprise Single Sign-On AccessAgent client

Install AccessAgent. For more information, see the IBM Security Privileged Identity Manager Deployment Overview Guide.
Step 9: Test the deployment

More information

- IBM Security Privileged Identity Manager product documentation at: http://www.ibm.com/support/knowledgecenter/SSRQBP_1.0.1.1/com.ibm.ispim.doc_1.0.1.1/kc-homepage.html.
- Product support: http://www.ibm.com/support/entry/portal/overview/software/security_systems/ibm_security_privileged_identity_manager.