You use the Excel scenario files to enter the scenarios of your tests and simulations.
The Excel scenario file is the proposed format to enter the scenarios of your tests and simulations. After you have created a scenario file template, you must edit the file to populate it with all the scenarios necessary to validate your rules.
Scenario files are made up of sheets in Excel:
- Scenarios sheet
You use scenario sheets to enter the input data, that is, the scenarios for your testing or simulations. All scenario files have this sheet.
- Data entry sheets for Tabbed format
You use data entry sheets to regroup information for use in other sheets. Data entry sheets display when you generate the template using the Excel Tabbed format. Use this format when the object model has a complex hierarchical structure, or when there are too many types to present them flat in the Scenarios sheet.
- Expected Results sheet
You use this optional sheet to enter the expected results when running tests.
- Expected Execution Details sheet
You use this optional sheet to enter the expected execution details when running tests.
Do not modify the column structure of the sheets manually. Information in the BOM generates columns in the Excel scenario file. See Adding columns to the Excel file for more information.
Scenarios Sheet
Each row in the Scenarios sheet represents one scenario, and must contain all the necessary information required for your rules to execute. The following figure shows an example of a Scenarios sheet with two scenarios:
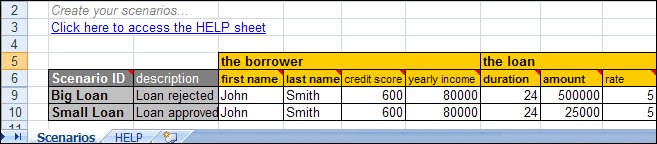
For each scenario, specify the values under the columns as follows:
Scenario ID: The name identifies each scenario and must be unique.
description: A free-text cell to enter any information that helps you describe that scenario.
input data: Enter the values to initialize the scenario input data. Bold columns and sub columns are mandatory.
Do not edit the reduced rows located between the column headers and the first scenario. You can insert rows, typically to add documentation, between the Click here to access the HELP sheet link and the first row header.
Use the following visual aids to complete your scenarios:
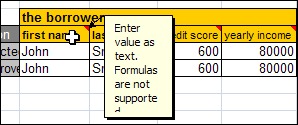
A red triangle in the upper part of the column name indicates a comment that explains the type of values you must enter, that is, text, numbers, dates, true, or false. Hover your mouse on a cell with a red triangle to display the comment.
A dark green triangle in the upper corner of the cell is sometimes displays to suggest better formatting for the cell. For example, if you enter a numerical value in a text cell, Excel suggests to format the cell for numerical values. You can ignore these suggestions to ensure the scenario runs correctly.
An arrow at the start of the column name indicates that the values must correspond to entries specified in a separate data entry sheet.
Data entry sheets
Data Entry sheets are used to regroup information to be used in other sheets.
Data Entry sheets can only be created when you generate the scenario file template using the Excel Tabbed format.
The name of each one of these sheets contains the type of data that is expected in the column of the other sheet where its entries are used. For example, in the following figure, the address sheet 1 contains different addresses for use in the addresses column 2 of the Scenarios sheet.
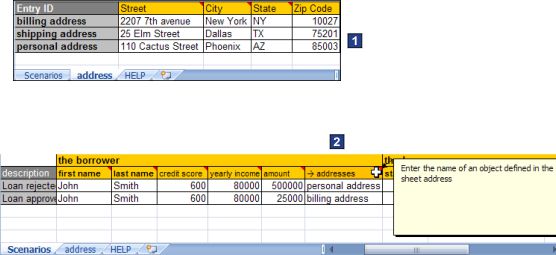
Columns that use values from data entry sheets have an arrow in their column name.
To create an entry in a data entry sheet, you complete a row, beginning with a unique name that identifies that entry in the other sheets.
Expected Results Sheet
Enter in the Expected Results sheet the results that you expect to obtain when running tests using the scenarios.
You can test many aspects of a set of rules, but the Expected Results sheet only contains the tests specified when creating the scenario file template. The following figure shows three tests:

Each blue column in the Expected Results sheet corresponds to a test. If you do not enter a value in one of the columns, that test is skipped.
You cannot create a new column from within Excel, but you can generate another empty scenario file template and then copy and paste the new column from it.
The link between the sheets containing the scenarios and their expected results is made by the name you enter in their respective Scenario ID columns. In addition to ensuring that these names match between the two sheets, it is good working practice, though not mandatory, to keep the scenarios and their expected results ordered the same.
When you test for a list of values, you enter each item in the corresponding cell on a separate row. It is not necessary to duplicate the Scenario ID for each row because the SSP uses the last ID entered.
Expected Execution Details Sheet
Enter in the Expected Execution Details sheet the execution details that you expect to obtain when running tests using the scenarios.
Examples of execution details are:
List of rules executed
List of executed ruleflow tasks
Duration of execution
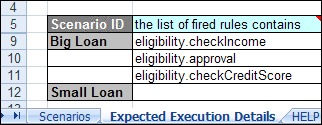
You can test many aspects of the execution, but the Expected Execution Details sheet only contains the tests that were specified when creating the scenario file template. For example:

Each green column in the Expected Execution Details sheet corresponds to a test. These tests are set when generating the scenario file template.
The link between the sheets containing the scenarios and their expected execution details is made by the name you enter in their respective Scenario ID columns.
When you test for a list of values, you enter each item in the corresponding cell on a separate row.
You do not have to duplicate the Scenario ID for each row because the SSP uses the last ID entered.
If you do not to enter a value in one of the columns, that test is skipped.