< Previous | Next >

Task 7: Deploying

Users with the correct access rights can deploy a set of rules directly from Decision Center to Rule Execution Server, which is the runtime execution environment that integrates the rule engine.

Typically, Rule Execution Server is deployed to a test platform. The IT department is then responsible for the deployment to a production platform.

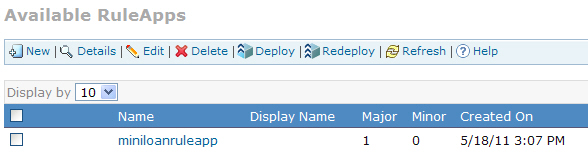
You can create the following deployment artifacts in Decision Center:

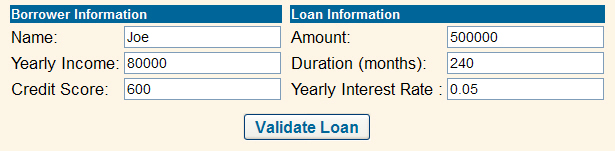
In this task, you deploy a RuleApp from Decision Center to execute it in Rule Execution Server. Then, you see how the new rules affect the Miniloan web application.

Time This task should take you about 15 to 20 minutes to complete.

Step 1: Start the miniloan web application

Note: Before starting the Miniloan application, make sure that the sample server is still running.

In this tutorial, the scenario is based on the web application of an online lender. The application is called Miniloan.

At this point, the Miniloan application uses a ruleset that was deployed to Rule Execution Server and that contains the initial state of the rules.

To start the Miniloan web application:

  1. Enter the following URL with the correct port number in a browser:

    http://localhost:<PORT>/miniloan-center

    Tip: To find out the port number to use, see the information on port numbers in Prerequisites.

    The Miniloan application is displayed:

    webapp
  2. Click Validate Loan.

    The results of the validation show that the loan is rejected because the borrower’s debt-to-income ratio is too big:

    The loan is rejected 
    Messages: 
    Too big Debt-To-Income ratio 

Step 2: Create the RuleApp

You take the role of configuration manager in Decision Center to create and deploy a RuleApp containing the rules of the miniloan-rules project. Because the changes that you made to the rule were small, you keep the version of the RuleApp as 1.0 but increase its ruleset version to 1.1. Then you see how Rule Execution Server handles these changes.

To create the RuleApp:

  1. Sign in to Decision Center as a user having configuration privileges:

    Username: rtsConfig

    Password: rtsConfig

  2. In the Decision Center Home page, change the Project in use to miniloan-rules.
  3. Click the Configure tab, and then click Manage RuleApps.
  4. Under Available RuleApps, click New icon New.
  5. In the Name field, type miniloanruleapp.
  6. Under Rulesets, click the New button.

    You will add a ruleset into the RuleApp, and specify that this ruleset comes from the miniloan-rules project.

  7. In the Name field, type miniloanrules.
  8. In the Project field, select miniloan-rules.
  9. Keep main as the branch in use.
  10. Click Save button Save to save the ruleset.

    A warning indicates that some changes have been made to the RuleApp.

  11. Click Save button Save again on the New RuleApp page to save the RuleApp.

    Your RuleApp is ready to be deployed.

    Miniloanruleapp in the Configure tab

Step 3: Deploy the RuleApp

You can now deploy the RuleApp directly to Rule Execution Server.

To deploy the RuleApp:

  1. Under Available RuleApps, select the check box next to miniloanruleapp.
  2. Click Deploy button Deploy in the toolbar.
  3. On the Deployment Baseline page, type V1.0, and then click Next.

    This creates a deployment baseline called V1.0, that is, a snapshot of the version of each element about to be deployed. A baseline captures the changes that occur in a project over time. If required, you can revert back to a certain set of rules.

  4. On the RuleApp target page, select Deploy on a Rule Execution Server, and then click Next.
  5. On the Versioning Policy page, select Increment ruleset(s) minor version.

    This keeps the RuleApp version as 1.0 but increases the ruleset version to 1.1.

    Selecting the “Increment ruleset(s) minor version” option
  6. Click Next.
  7. On the Select Server page, select the Sample server as the server where you want to deploy the RuleApp.
  8. Click Deploy.

    When processing is completed, you see that the deployment succeeded, and that the ruleset minor version was incremented.

Step 4: See the effects in the Miniloan application

Finally, you see how the business policy changes that you made are reflected back into the Miniloan application.

To see the effects in Miniloan:

  1. Switch back to the Miniloan application.
    Tip: If you have closed the Miniloan application, enter the following URL in a browser: http://localhost:<PORT>/miniloan-center. Remember to enter the correct port number.
  2. Click Validate Loan with the default values.

    This time, the loan is approved because the policy change for borrowers with an income of 500,000 has been implemented.

  3. Under Ruleset Information, change the ruleset version from Latest to 1.0, so that the 1.0 version is called by the Miniloan application:
    Entering 1.0 in the Version field
  4. Click Validate Loan again.

    This time the loan request is rejected as before, because it refers to the older version of the policy.

You have now deployed your ruleset to Rule Execution Server. You can stop the tutorial here or continue to the next task which is optional and requires the installation of Rule Solutions for Office.

< Previous | Next >