Perform the following steps to deploy the EAR file to a
Websphere application server.
Before you begin
You need to have Websphere administration skills. You might
need to refer to information in the Websphere information center at
http://www.ibm.com/software/webservers/appserv/was/library/Procedure
- Log on to the Websphere administrative console.
_______________________________________________________
- Create a new shared library.
- In the left pane, click Environment > Shared Libraries.
- Click New to add a shared library. The window
shown in Figure 1 opens.
Figure 1. The Websphere
Shared Libraries window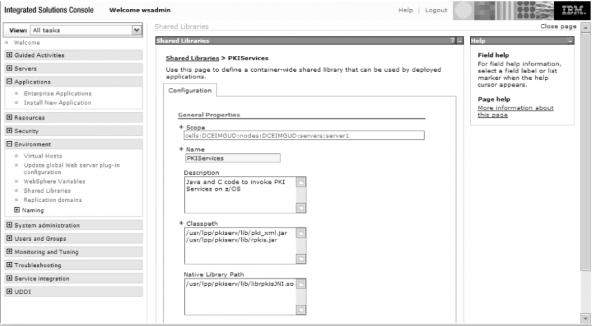
- In the Scope field, select a scope that includes
the server where you will deploy the PKI Services JSPs (PKIServ_EAR).
- In the Name field enter PKIServices.
- Optionally enter a description in the Description field;
for example, Java and C code to invoke PKI Services on z/OS.
- In the Classpath field, enter the following two
lines:
/usr/lpp/pkiserv/lib/pki_xml.jar
/usr/lpp/pkiserv/lib/rpkis.jar
- In the Native Library Path field, enter:
/usr/lpp/pkiserv/lib/librpkisJNI.so
- Click OK. A message is displayed indicating that
changes have been made to your local configuration. See Figure 2.
Figure 2. Message indicating that changes have been made
to your local configuration.
- Click Save to save the changes to the master
configuration.
_______________________________________________________
- Deploy the enterprise archive (EAR) file.
- In the left pane, click Applications > Enterprise
Applications.
- Click Install. The window shown in Figure 3 opens.
Figure 3. Window for specifying
the EAR file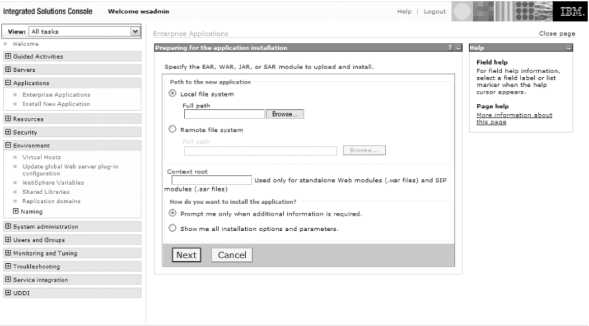
- Click Remote file system, and click Browse.
- Click the icon for the z/OS® system.
The root directory is displayed. Continue selecting until you reach:
/usr/lpp/pkiserv/pkijsp/PKIServ.ear
- Click OK and Next. Continue clicking OK and Next or Finish until
you see a message saying that the EAR was installed and the message
shown in Figure 2 indicating that
changes have been made to your local configuration. (If you have more
than one application installed into Websphere Application server,
you might see a window where you have to select a server to which
you want to map modules before you click Next.)
- Click Save to save the changes to the master
configuration.
_______________________________________________________
- Associate the PKI Services shared library
with the PKI Services application.
- In the left pane, click Applications > Enterprise
Applications. Click PKIServ_EAR. The window shown in Figure 4 opens.
Figure 4. Application
properties page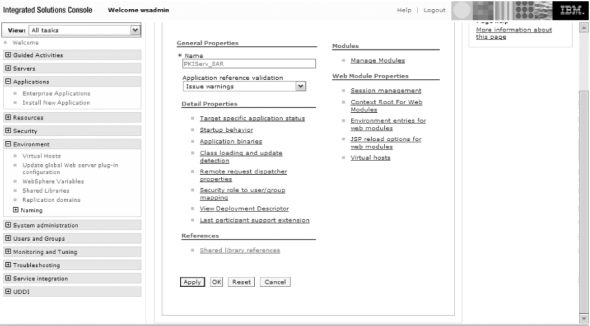
- Click Shared Library References. The window shown
in Figure 5 opens.
Figure 5. Shared library
mapping for modules page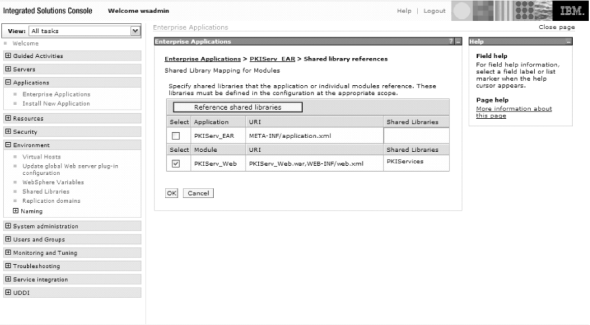
- Select the PKIServ_Web check box and click Reference
Shared Library.
- Add the PKI Services shared library
to the Selected list and click OK.
- Select the PKIServ_EAR check box and click Reference
Shared Library.
- Add the PKI Services shared library to the Selected
list and click OK.
- Again you see the message shown in Figure 2 indicating that changes have been
made to your local configuration. Click Save to save the changes
to the master configuration.
_______________________________________________________
- Add the PKI Services shared
library's location to the server's library path.
- In the left pane, click Servers > Application servers
> server1 > (Java™ and
Process Management) > Process Definition > Servant > Environment Entries
> New , where server1 is the name of your server. In the Name field
enter:
LIBPATH
In the Value field
enter:/usr/lpp/pkiserv/lib
In the Description field
enter:rpkiserv jni path
Click Apply.
See Figure 6. Figure 6. Adding the PKI Services shared library's
location to the server's library path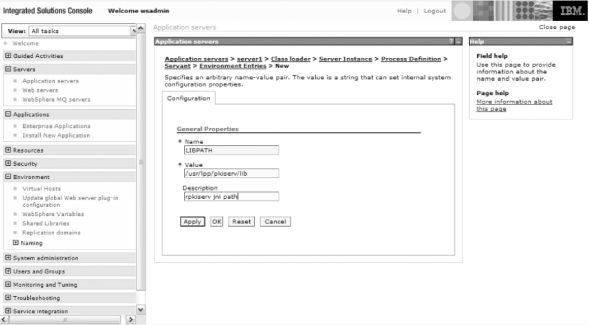
- Again you see the message shown in Figure 2 indicating that changes have been
made to your local configuration. Click Save to save the changes
to the master configuration.
_______________________________________________________
Results
When you are done, you have deployed the PKI Services JSP files
to a Websphere application server. You can now begin using the customized PKI Services Web application.
 z/OS Cryptographic Services PKI Services Guide and Reference
 z/OS Cryptographic Services PKI Services Guide and Reference


 Copyright IBM Corporation 1990, 2014