The new FICON Conversion Channels ( FCVs ), with their wider bandwidth
compared to classical ESCON channels, allow connecting more I/O equipment
to a single channel. To use the FCV channels, they must be connected
to a FICON bridge card installed in a 9032-5 ESCON director. To install
FCV channels and a FICON bridge card in an 9032-5 you must follow
some configuration rules:
- FCV channels can only be installed in specific locations in the processor and have particular CHPID numbers depending on the processor type.
- FICON bridge cards can have only one port address (and link address), on a modulo 8 + 4 port address.
- The 7 consecutive subsequent port addresses of a FICON bridge port address are used by the FICON bridge card and cannot be used for other connections.
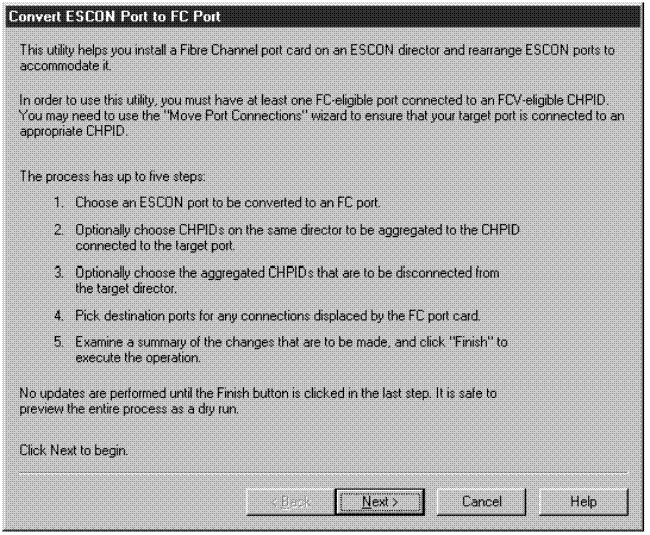
To perform the changes, proceed as follows:
- Invoke the Convert ESCON Port to FC... utility from the Utilities menu.
- The wizard will appear and explain the following steps. Click the Next > button to continue.
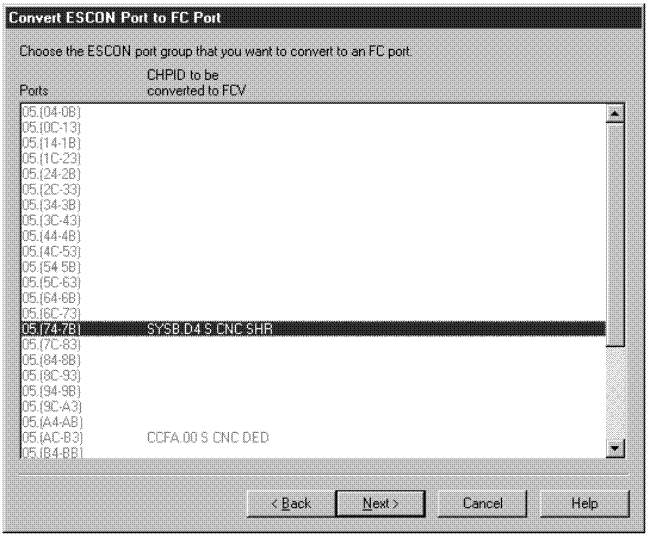
- A list of all possible ports that can be used to hold a FICON
bridge card will be shown . The only selectable ports will be
those with an appropriate port address (starting with 04 modulo
8 + 4 of 9032-5) and which are already connected to an FCV or to an
FCV-eligible CHPID (for example, a CHPID whose type can be changed
to FCV). All ports that are not usable for a FICON bridge card are
grayed out . Select port 74 of director 05 connected to CHPID D4 of processor SYSB and click Next >.
- In the following step, you have the chance to aggregate I/O equipment
of other CHPIDs to CHPID D4. Select CHPID D7 of processor SYSB to
be aggregated to D4 and click the ADD > button. In the bottom part of the window you see CHPIDs and their I/O equipment as it is aggregated. Click Next > to continue.

- In the following window, you can specify whether or not to
disconnect the just selected CHPID for aggregation of D7 from its
port of the ESCD. Click Next > to continue to displace port connections.

- You can now determine where to move port connections from connections to port addresses which must be freed, since they follow directly after the port address of the FICON bridge port address. For port address 75 connected to CHPID DF of processor SYSB, specify the new port address 06. For port address 78 connected to CHPID EA of processor SYSB, specify the new port address 07. For 79 connected to CHPID DD of processor SYSB, specify the new port address 08. You can use the prompting capability to check for free port addresses. After selecting new port addresses for connections that must be displaced, click Next > to see the final summary.
- You now see the final summary of all changes to the configuration.
This summary lists all affected objects including the changes to be
performed to the IODF. Scroll down to examine the complete list, which
will contain information such as:
- CHPID that will be the FCV
- Aggregated CHPIDs
- Possibly disconnected CHPIDs
- Control unit connections moved
- Port connections moved
- Uninstalled ports
Scroll down to see the complete summary. You can save the summary to a file to store the list of changes for archive purposes or to use the list as a worksheet for guidance for changing the cable connections directly at the hardware box. As long as you do not click the Finish button, no changes are written to the HCM configuration and no changes are made to the IODF. It is still possible to refrain from performing the specified changes. Click the Finish button to allow the wizard to complete. Confirm the configuration changes after you have examined all the listed items in the summary and agree with it.
If you save this summary to a file, you will have the following
list of configuration changes:
- CHPID SYSB.D4 's type will be changed from CNC to FCV.
- The following CHPIDs will be aggregated with SYSB.D4:
SYSB.D7 - The following CHPIDs will be disconnected :
CHPID Port SYSB.D7 05.E0 - Port names will be moved with their ports.
- The following connections will be moved :
From To SYSB.DF 05.75 05.06 SYSB.E4 05.78 05.07 SYSB.DD 05.79 05.08 - The IODF will beont BackColor="#7DFB87">updated as follows:
CHPID Type changes From To SYSB.D4 CNC FCV - The following control unit connections will be moved :
From To CU 0241 (3990-3) SYSB.D7 SYSB.D4 - Any devices using a source CHPID as the preferred CHPID will be updated to use the target CHPID.
- The following port connections will be moved :
From To SYSB.D7 05.E0 ----- SYSB.DD 05.79 05.08 SYSB.DF 05.75 05.06 SYSB.E4 05.78 05.07 - The switch configurations on director 05 (if any) will be updated as required.
- The following ports will be un installed :
  05.75
  05.76
  05.77
  05.78
  05.79
  05.7A
  05.7B