Validating client-side coaches using client-side validation

To validate data in a coach in a client-side human service without accessing a server to do the validation, use client-side validation. For example, use client-side validation to ensure that required fields contain data and before dates precede after dates.

About this task

Using client-side validation means that the client-side human service does not need to do a server call to determine whether the coach data is valid. If you do need to access a server to validate the coach data, use server-side validation. For information, see Using server-side validation.

The typical coach validation pattern consists of a client-side script for coach validation or a called service, followed by a validation decision that has a stay on page event that is attached to it. The stay on page event loops the service flow back to the coach. For an example, see Example: validating data in a coach that is used in a human service.

Procedure

To validate a coach in your client-side human service, complete the following steps:

  1. Open the client-side human service that contains the coach to be validated.
  2. Add the following elements to the diagram to create a validation pattern:
    • A client-side script to contain the code that performs the validation
    • An exclusive gateway to route the flow according to whether the data is valid
    • A stay on page event to return the flow back to the coach when the coach data is not valid
  3. Make the following connections:
    • Connect the boundary event of the coach to the script.
    • Connect the script to the exclusive gateway.
    • Connect gateway to the stay on page event. Ensure that this line is the default flow for the decision. Select the flow line and rename it to Yes.
    • Connect gateway to the rest of the human service flow. Select the line and rename it to No.
    The following screen capture shows the validation pattern. In the screen capture, the non-default branch connects to an end event. This branch of the gateway could connect to another coach, to another gateway, or any other diagram element.
    Coach validation pattern that consists of a validation script, an exclusive gateway, and a stay on page event that loops the flow back to the coach when the data is not valid
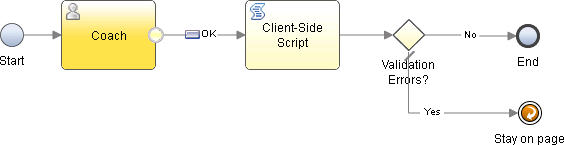
    Tip: You can have multiple boundary events with each one leading to a different validation script. The validation scripts can flow to the same exclusive gateway to reuse its logic.
  4. In the diagram, select the script of the validation pattern. In the Script properties, add JavaScript code that identifies problematic data. Use the tw.system.coachValidation.addValidationError(String variableName, String errorMessage) JavaScript API to identify the coach view that has the problematic data and provide a message that helps the user correct the problem. For example:
    if (tw.local.startDate.getTime() > tw.local.endDate.getTime())
    	tw.system.coachValidation.addValidationError("tw.local.startDate", "The start date must precede the end date. Set the start date before the end date, and try again.");
    Note:
    • If the data element that is being validated is not bound to a coach view, there is nowhere to display a validation error if one occurs.
    • If a coach view that is being validated contains rich text, the validation script must remove the formatting before validating the contents.
    • If you are validating a list and you want the error to refer to the entire list, the variableName parameter must include [] as a suffix. This matches coach view binding where [] indicates that the object is a list. For example, if a coach view is bound to tw.local.var3[], which is a list, you need code like the following example:
      tw.system.coachValidation.addValidationError("tw.local.var3[]", "Var3 has validation error");
    Tip: To reuse validation logic, you can define it once then call that logic multiple times To reuse the validation logic, add a script element to the diagram to contain the shared logic. Typically, you place this as the first element in the flow. In the script element, add a function such as the following example:
    tw.local.validationFn = function validateCutomerAndOrder ( ) {
    	// Shared logic goes here.
    }
    In the validation scripts, call the function using code such as:
    tw.local.validationFn();
  5. Select the exclusive gateway and, in its Implementation properties, create the test. The test is tw.system.coachValidation.validationErrors.length==0. The test checks for the presence of validation errors and, if there are none, routes it to the rest of the flow. If there are errors, the flow goes to the stay on page event so that the coach can show the control with the problematic data and a message.
    The implementation properties of the gateway with tw.system.coachValidation.validationErrors.length in the first field, == in the second field, and 0 in the third field.
  6. Save your changes, and then click Run Run.
  7. In the browser, test that the coach validation works correctly. At run time, the flow must go first to the validation script to do the coach data validation:
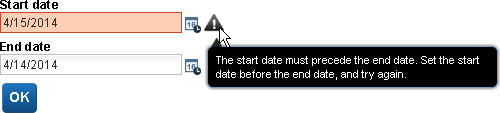
    • If the data is valid, the flow moves to the next node.
    • If the data in the coach is not valid, the coach validation pattern loops the flow back to the coach. Error information is passed to the coach, which indicates the control with the problematic data and can display the image.
      The field with the error is in a different color and has a message marker. The message is visible because the cursor is hovering on the marker.