Configuring IBM Business Process Manager V8.5.6

After you install IBM® Business Process Manager V8.5.6 and use the IBM BPM Configuration editor to modify the properties file that is used to configure the new topology, run the BPMConfig -create command to create the profiles and network deployment environment. The BPMConfig command is required for migration.
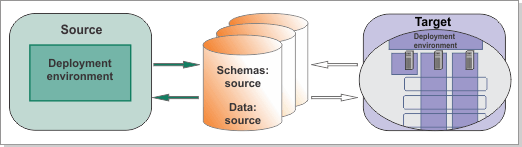
Figure 1. Sample environment after V8.5.6 is configured on the target. The source environment is running and transferring data to and from its databases. The target is not running but contains a deployment environment. The deployment environment has three clusters and is configured across two nodes.
The details of the diagram are provided in the figure caption.
Important: If your environment contains multiple deployment environments, each deployment environment requires its own properties file with a unique name; for example, BPM.DE01 and BPM.DE02.

About this task

When run with the -create -de options, the BPMConfig command performs the following tasks:
  • Creates the deployment manager node based on the values in the deployment manager properties file and starts the deployment manager.
  • For each node specified in the configuration properties file, creates a managed node based on the specified values.
  • Federates each managed node and adds the node to the deployment environment.
  • Generates the deployment environment.
  • Creates any profiles specified in the configuration properties file that do not already exist.
  • Migrates configuration data, such as fileRegistry.xml, ltpa.jceks, and Business Process Choreographer configuration files.
  • Generates SQL scripts for upgrading the databases.
Important: Run the BPMConfig command with the same properties file on all computers that will participate in the deployment environment. You must first run the command on the computer that has the deployment manager profile and then run it on each computer that has a managed node. At any given time, only one profile creation can be performed on a computer and only one node federation can be performed against a particular deployment manager. For this reason, if you are creating multiple profiles at once on different computers, you must use the federateLater option of the BPMConfig command when creating the managed node profiles and then run the command with the -create -de option sequentially on each computer to federate the managed nodes.

If you want WebSphere® Process Server functionality only, without any functionality from WebSphere Lombardi Edition, you can use the Advanced-Only deployment environment when you create your deployment environment.

Procedure

For each deployment environment in your target environment, complete the following steps:

  1. Make sure that you are using the properties file that you generated with the BPMConfig -migrate command to configure your target environment. You can check either in the IBM BPM Configuration editor or in the properties file itself. The properties with the bpm.de.sourceInfo prefix are taken from your source environment and are correct if you are using the correct properties file.
    Table 1.
    Property Editor Name in properties file
    Source version, such as 7.0.0.1 Check the title at the top bpm.de.sourceInfo.versionInfo
    Product name Check the title at the top bpm.de.sourceInfo.productType. For example, WPS7x or WPS62x.
    Properties to generate the upgrade SQL files for Business Process Choreographer By default, the database upgrade SQL files are generated without customized table space settings. If you did not use the default table spaces for features related to Business Process Choreographer or Business Process Archive in the source environment, such as template, instance, and work item, you must change the usetablespaces property to true and set the values for each table space. The usetablespaces property defines whether user table spaces are used. The tsbpcindexts and tsbpclob properties are only used for Oracle databases.

    For details about the properties that are migrated, see the reference topic.

    Update the following properties for the database configuration with BPC capability:
    bpm.de.db.*.name=BpcDb
    bpm.de.db.*.dbCapabilities=BPC
    bpm.de.db.*.usetablespaces=
    bpm.de.db.*.tsbpcindexts=
    bpm.de.db.*.tsbpcinstance=
    bpm.de.db.*.tsbpclob=
    bpm.de.db.*.tsbpctemplate=
    bpm.de.db.*.tsbpcworkitem=
  2. Optional: If you are using a DB2 for z/OS database, you can enable the optional component IBM BPM document store for DB2 for z/OS on your target environment. For instructions, see Configuring the IBM BPM document store for DB2 on z/OS.
  3. Run the BPMConfig command with the -create -de option and the properties file that you just edited. The command creates the deployment manager profile and generates the deployment environment. Use the following syntax:
    install_root/bin/BPMConfig -create -de path_to_properties_file
    Creating the deployment environment takes some time. After the deployment environment is created, the command generates SQL scripts for upgrading the databases and puts them into the correct directories for you, as well as updating the security properties and moving the properties that were exported from the XML customization files to the WebSphere Application Server configuration files. You can follow the progress of the command by reading the output, which includes the following actions:
    • Creating the deployment manager profile
    • Starting the deployment manager
    • Creating the managed node profiles
    • Federating the managed nodes
    • Generating SQL files for upgrading the databases
    • Performing security configuration
    • Creating clusters
    • Creating cluster members
    • Synchronizing the nodes
    • Stopping the deployment manager
    Note: If you see an error about invalid characters in a user name or password, change them to valid characters. Refer to the list of valid characters in the table in IBM Business Process Manager roles.

    After all actions are completed, you see a message that the command completed successfully.

  4. Start the deployment manager. Run the BPMConfig command on each computer that has one or more managed nodes, passing it the name of the same properties file. The managed node profiles are created and federated into the deployment manager cell.
    Note: For each node that is to be configured on a different machine from the deployment manager, check the soap port of the deployment manager and update the value of bpm.dmgr.soapPort in the properties file before running BPMConfig on the node.
    For each cluster member in the properties file, BPMConfig adds http and https ports to the virtual hosts list. Check the virtual hosts list after running BPMConfig to make sure that the assigned ports are acceptable.
  5. Stop the deployment manager after you have configured the target environment.

What to do next

Do not start the new deployment environment until after you have upgraded the databases.