Configuring your environment graphically with the IBM BPM Configuration editor

The IBM BPM Configuration editor is a browser-based interface for configuring your new deployment environment. You can graphically edit the configuration properties file that was exported from your source environment by the BPMConfig -migrate command. After you modify the properties file in the editor, you can use the BPMConfig -create command to create a new deployment environment that is based on the modified file.

Before you begin

You must be running Java 6 or later.

About this task
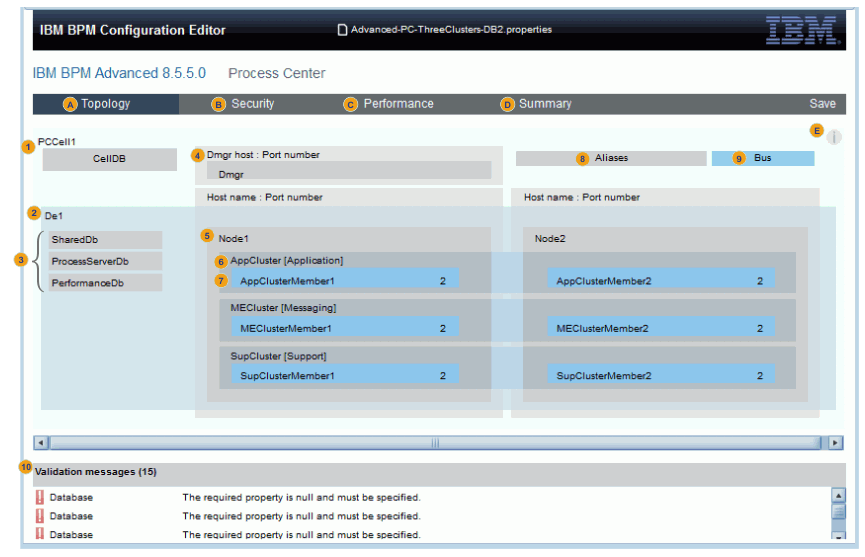
The following image and corresponding table describe the parts of the Configuration editor that you interact with when you configure your new deployment environment. For migration, the title also reflects the source and target product and version.
Screen capture of the Configuration editor. The parts are described in the following table.
Table 1. Description of labeled areas on the Configuration editor image
Label Part Description
A Topology Edit the properties of all available components, such as cells, nodes, and deployment environments. Some properties were automatically modified during export and others require manual input. Components that are incorrectly configured are shaded gray. Properties that have missing or invalid values are surrounded with a red border and are flagged with a red exclamation mark icon.
B Security Edit the properties for LDAP. Edit the customizations from WebSphere® Lombardi Edition files, including Process Admin Console, Process Server, and other custom properties. The information that you see on this tab depends on your source configuration.
C Performance Edit the properties for data sources, thread pools, activation specifications, work managers, JVM settings, connection factories, ORB data, web containers, and messaging engines.
D Summary Scroll through all available properties before you save the configuration properties file. Make further edits.
E Configuration assistance Show the context-sensitive help panel.
1 Cell Edit the cell properties, such as the cell name. Map the cell administrator role to an authentication alias.
2 Deployment environment Edit the deployment environment properties, such as the IBM BPM type. For Process Server, you can also change the Process Center connectivity properties.
3 Databases Edit the database properties or map database roles to user aliases.
4 Deployment manager Edit the deployment manager properties, such as the host name, node, profile name, and SOAP port.
5 Node Edit the properties for each node, such as the node name, host name, port, and profile name.
6 Cluster Edit the properties for each cluster.
7 Cluster member Edit the properties for each cluster member.
8 Aliases Edit the authentication alias mappings for the deployment environment administrator, database administrator, and other aliases to users and passwords.
9 Bus Edit the bus properties, such as the databases that they refer to.
10 Validation messages Correct incomplete or incorrect properties by clicking the messages in this table.

Procedure

  1. To install the IBM BPM Configuration editor, complete the following steps:
    1. Extract the BPMConfigurationEditor.zip configuration editor package to a directory. The package is in BPM_home\BPM\config\ui\.
    2. Edit the configEditor.ini file to set the JAVA_HOME location. For example, JAVA_HOME=C:\Program Files\WebSphere\AppServer\java\jre.

      You can optionally change the port that the editor uses. If you do not change the port, the default port 8888 is used. However, if you run the configEditor command and port 8888 is already being used by a different process, you will receive the error Error: listen EADDRINUSE. If you receive the error, you can either stop the process that is already using port 8888 or you can specify a new port number in the configEditor.ini file (such as port 9999).

    3. Start the server.
      • Run configEditor.bat.
    4. Open a browser to run the configuration editor. Change the port number if you changed it in the configEditor.ini file.
      http://hostname:8888/ibm/bpm/configEditor
      For example: http://localhost:8888/ibm/bpm/configEditor
  2. Click Browse and select the properties file that was created when you ran BPMConfig -migrate. For example, DE1-Advanced-PS-SingleCluster-DB2.properties. Click Open Editor to start configuring your new environment.
  3. Configure your target environment.
    • Keep track of the database properties that you choose when you are adding new database capabilities. You will create the required new databases in the next step.
      Tip: In IBM® BPM V8.5.5, the common database is split into two pieces. One is cell-scoped and is used for the entire cell. The other, which includes event sequencing and the failed event manager, is deployment-environment-scoped, and must be configured for each deployment environment.
    • The target environment will use the same databases as the source environment unless you change the defaults. If you are using cloned databases to test migration, back up the exported BPMConfig properties file so that you can restore the correct database properties after you finish and test the migration. Then, update the database information in the file to use the cloned databases.
    • For Oracle, if you are using a customized URL for an Oracle database in your source environment, the URL will be migrated. You can check the value for each database capability in the databases area of the editor on the Advanced Options tab. Update the Database URL value if needed, or set the Database Host and Port on the Basic Options tab instead. Either the Database URL property or the Database Host and Port properties must be left empty, but the Database Name property must always be set.

      If you are migrating from a release earlier than IBM BPM V8.0 and you are using an Oracle database with the service name feature enabled, you should clear the Database URL property and set the Database Host and Port properties instead, to have the default SCAN format database URLs created in the IBM BPM configuration.

    • If you use a file-based user registry in the source environment, use the same primary administrative user name for the cell administrator as you used in the source environment. Reusing the administrative user name as the cell administrator ensures that the data in the database has the same security context and can still work with the same user after migration.
    • If you are migrating more than one deployment environment, make sure that the name of the authentication alias for each database is different if there is a different user name in each deployment environment. Otherwise, the creation of the second deployment environment will fail because the authentication alias uses a different user name.
      For example, your first deployment environment has the authentication alias BPM_DB_ALIAS with user1 as the user name.
      bpm.de.authenticationAlias.3.name=BPM_DB_ALIAS
      bpm.de.authenticationAlias.3.user=user1
      bpm.de.authenticationAlias.3.password=
      Before you create the second deployment environment, check the BPMConfig properties file to make sure that the same authentication alias does not exist with a different user name. If so, change the name of the authentication alias. For example:
      bpm.de.authenticationAlias.3.name=BPM_DB_ALIAS_2
      bpm.de.authenticationAlias.3.user=user2
      bpm.de.authenticationAlias.3.password=
    • If you have a license and plan to use the Basic Case Management feature, you must create either an Advanced or Standard deployment environment. Case management is not supported in the AdvancedOnly deployment environment.
    • In IBM BPM 8.5.0.0 or later, you can only use the following characters in a deployment environment name:
      • a - z
      • A - Z
      • 0 - 9
      • ! ( ) - . ? [ ] _ ` ~ \ /
      If you migrate a pre-8.5.0.0 deployment environment to IBM BPM 8.5.0.0 or later, you must ensure that the name of the new deployment environment only uses permitted characters. Although you can export a pre-8.5.0.0 deployment environment that has unpermitted characters in the name, you will need to rename the deployment environment when you use the BPMConfig command to create the new deployment environment. If the new deployment environment name contains unpermitted characters, you may see an error message in the Validation messages pane.
    • Make sure that any special characters in the user name and password of your source environment are supported by the new version. Modify the user name and password if necessary. They must contain only the following characters:
      • a - z
      • A - Z
      • 0 - 9
      • ! ( ) - . _ ` ~ @
    • If your source environment is configured for a web server or load-balancing server, the generated properties file has entries for bpm.de.processServer. In the editor, these properties are on the Security tab in Process Server customized properties. For example:
      bpm.de.processServer.processAdminPrefix=https://mzwin7-bpm1/ProcessAdmin
      bpm.de.processServer.teamworksWebAppPrefix=https://mzwin7-bpm1/teamworks
      bpm.de.processServer.clientLink=https://mzwin7-bpm1/teamworks
      bpm.de.processServer.commonPortalPrefix=https://mzwin7-bpm1/portal
      You must change these URLs to match the target environment. If you are not sure what the new URLs are, delete these entries in the property file or remove them in the editor. After the migration is complete, follow the standard procedure for configuring the web server.
    • Fix all validation errors to ensure a correct and complete target environment.
    • Click Save to save the configuration properties file.
      Important: Save the properties file to the same location (where you created it when you ran BPMConfig -migrate), because it refers to other exported configuration files.

What to do next

When you start the IBM BPM Configuration editor, it creates a process that runs in the current command window. If you close the browser that is running the Configuration editor, the Configuration editor process will continue to run. To stop the process, you must also close the command window that you used to start the Configuration editor.