For z/OS operating system

Configuring IBM Business Process Manager for z/OS V8.5

After you install IBM® Business Process Manager V8.5, create and augment the deployment manager and empty managed node profiles, and then create the network deployment environment. This deployment environment will use the same databases as the source environment.
Figure 1. Sample environment after V8.5 is configured on the target. The source environment is running and transferring data to and from its databases. The target is not running, but contains a deployment environment that is configured across two nodes.
The details of the diagram are provided in the figure caption.

Before you begin

  • Determine your topology and collate the customization information for the profiles that you want to create in your network deployment environment. Both WebSphere® Application Server and IBM Business Process Manager customization settings must be defined.
  • Install WebSphere Customization Toolbox on a Linux or Windows workstation, and then download and install the IBM Business Process Manager extension into the toolbox. This toolbox is required for defining and processing your customization definitions.
  • Work with your database administrator or solution architect to collate the database configuration information that you will require to configure and upgrade your existing product databases for use in the target environment.
    Tip: To collate the database configuration information, you can use the properties file that was generated when you ran the BPMExtractDBConfiguration.sh command to extract data source information from your source environment. You can also locate the database design file that was initially used to define the database configuration. Both of these files can help you to create a mapping between the database configuration settings for the source and target environments.

About this task

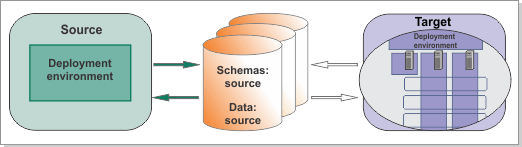
You can use one of the BPMConfig properties files, which are supplied with the product, to specify your profile customization settings and to define the database configuration for the target environment. Each sample file is formed of name-value pairs and contains property settings for a single cluster topology that includes a deployment manager and two nodes. The properties file provides input to the BPMConfig.sh script, which is invoked from a job during the configuration process, to create the deployment environment.

For a WebSphere Process Server V7.0.0.x to IBM Business Process Manager V8.5 migration, you should create an Advanced-only Process Server deployment environment as your target. The Advanced-only configuration will provide the equivalent WebSphere Process Server functionality that you require.

If you additionally require the combined functionality of the WebSphere Process Server and WebSphere Lombardi Edition products, you can create a new Advanced Process Server deployment environment, as described in Configuring IBM Business Process Manager for z/OS®.

Procedure

  1. Create and augment the deployment manager profile:
    1. Create the BPMConfig properties file by customizing one of the supplied samples:
      1. Use FTP to transfer one of the sample properties files from the z/OS file system that contains the IBM Business Process Manager product code, to a working directory on the Linux or Windows workstation where WebSphere Customization Toolbox is installed. These files are located in the default /usr/lpp/zWebSphere/V8R5/zos.migration/samples directory in the product file system. Download the file in binary format. For a V7.0.0.x migration, you must download ZOSAdvancedOnly-PS-migration-DB2zOS.properties so that you can create an Advanced-only Process Server target deployment environment.
      2. Use a text editor to edit the file and complete the values for the properties. The properties are grouped by type, and vary depending on the deployment environment type. Some values might also not be required for an IBM Business Process Manager for z/OS configuration, and can be left blank.

        By default, configuration properties are provided for two nodes in the sample file. If you require more than two nodes in the cluster, you must update the properties file to add configuration properties for any additional nodes.

        For information about the properties that you must complete in this file, see BPMConfig properties for migrating to IBM Business Process Manager for z/OS.

        To see a sample configuration for the database properties, see Example: Database configuration mapping for a WebSphere Process Server for z/OS V7.0.0.5 to IBM Business Process Manager for z/OS V8.5 migration.

      3. Save and close the properties file. If you intend to retain the file for future reference, rename the file to give it a unique and meaningful name.
    2. Create a customization definition for the deployment manager by using the z/OS Profile Management Tool (zPMT) in the WebSphere Customization Toolbox. Take note of the following considerations:
      In the Environment Selection window, select the following option under IBM Business Process Manager Advanced: Process Server for z/OS v8.5:
      • Deployment Manager: Advanced Only configuration
      When you get to the BPMConfig Properties File Location window, you are prompted for the BPMConfig properties file that defines the customization settings for IBM Business Process Manager. Complete this window as follows:
      1. Ensure that the Generate properties file from default values check box is clear.
      2. In the Location of existing properties file to be used to generate this configuration's properties profile field, specify the fully qualified file name for the properties file that you created earlier.

        This file is automatically copied to a WebSphere Customization Toolbox configuration directory on the local drive, and is then uploaded to the z/OS system when you process the customization definition. If required, you can edit this file again in the WebSphere Customization Toolbox configuration directory before you process the customization definition.

    3. Process the customization definition to generate customized jobs and other files that can be used to create and configure the profile on the z/OS system.
    4. Follow the generated customization instructions to set up the configuration file system to hold the runtime data for the profile, and then create the WebSphere Application Server default profile in the file system. The cell is also created.
    5. Augment the profile with IBM Business Process Manager functions.
  2. For each node, create and augment an empty managed node profile:
    1. Create a customization definition for the node by using zPMT. Take note of the following consideration:

      When you get to the Environment Selection window of zPMT and locate IBM Business Process Manager Advanced: Process Server for z/OS v8.5, you can select either the Managed (custom) node: Advanced configuration or Managed (custom) node: Advanced Only configuration option. You can choose either of these options regardless of the type of deployment environment (Advanced or Advanced-only) to which you want to add the node.

    2. Process the customization definition to generate customized jobs and other files that can be used to create and configure the profile on the z/OS system.
    3. Follow the generated customization instructions to set up the configuration file system to hold the runtime data for the profile, and then create the WebSphere Application Server default profile in the file system.
    4. Augment the profile with IBM Business Process Manager functions.
  3. Open the following files, which were uploaded to the DATA data set on the deployment manager node:
    • DATA(BPZPROPD): BPMConfig properties file
    • DATA(BPZRSPD): Augmentation response file

    Ensure that the character case of the bpm.cell.authenticationAlias.1.user value in member DATA(BPZPROPD) exactly matches the character case of the adminUserName value in member DATA(BPZRSPD). These two values, which are identical, are case sensitive. For example:

    File Property and value
    DATA(BPZPROPD)
    bpm.cell.authenticationAlias.1.user=wsadmin
    DATA(BPZRSPD)
    adminUserName=wsadmin
  4. In the customization instructions for the deployment manager, locate the last step, which you completed to augment the deployment manager profile.
  5. Submit job BPZCNFGD to invoke the BPMConfig.sh script, as instructed.

    The script runs with the -create -de parameters on the deployment manager node.

  6. When the job completes, view the job output to verify that the job completed successfully. Also review the log file for the BPMConfig.sh script, which is written to WAS_HOME/logs/config/BPMConfig_timestamp.log on the deployment manager node.
  7. Continue with the remaining steps in the customization instructions, but do not complete the steps that instruct you to start and run the deployment manager server.
    Important: Before you can successfully start the server, you must first configure and upgrade the existing databases for the product components.

Results

The deployment environment is created with a single cluster to support the deployment of applications and the messaging and support infrastructures.