This example shows how to add translations to a Coach View.
In this example, the Coach View has English labels. The default locale in this case is English. However, you want French-speaking users to be able to read these labels by providing translations. The Coach View contains a set of text controls for address fields:

- Create a Coach View.
- Create the localization resource for the locale:
- In the library of the Process Designer, hover over Setup for the process application and then click the Add icon. In the window that opens, select Localization Resource. The New Localization Resource wizard opens.
- Using the wizard, create the Address_resource localization resource. The editor for the Localization Resource opens.
- In the Localizations area, add the French locale. Tip: Select Français from the list.

- To create the key used to translate the Number field label, type keyAddressNumber into
the key field below the Localization Keys list
and then click Add. Repeat this step to add
keys for the other fields:
- keyAddressCity
- keyAddressNumber
- keyAddressPostalCode
- keyAddressStreet

- To provide the translation for the Number field label, select
it in the Localization Keys list. The Localization Values table lists
the default locale and the French locale.

- Click the value for the default locale and type Number.
To save this value and move to the French locale, press Ctrl+Enter.
Type Nombre and then press Alt+Enter.Repeat the previous step and this step for the other keys.

Table 1. Values for the keys Key Default value French value keyAddressCity City Ville keyAddressNumber Number Nombre keyAddressPostalCode Postal Code Code Postal keyAddressStreet Street Rue - Save the changes to the localization resource.
Tip: This example creates the content on the localization resource using the Designer. Alternatively, you can import the contents of existing resource.properties files into one or more localization resources. With a localization resource, the translations are stored as key=value pairs. - Add the localization resource to the Coach View:
- Open the Coach View to its Variables page.
- Click the Add button for the Localization Resources and then select the localization resource.
- Save the changes to the Coach View.
- Replace the existing labels with the appropriate keys from the
localization resource:
- Change to the Layout page and select the Number field.
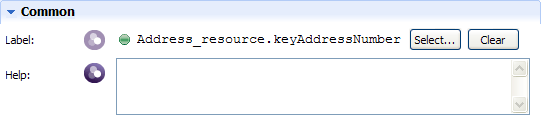
- In the General properties, click the
 button for the label.
 - Click Select. In the window that opens,
expand the Localization Resources nodes to
select the keyAddressNumber key.The key replaces the previous label text.

- Repeat the previous step to assign the appropriate keys to the other fields in the Coach View.
- Save the changes to the Coach View.
- Test your localization.
- Add your Coach View to a Coach.
- Open your browser, log in to Process Portal, and change the locale preferences to the locale that you want to test.
- Run the human service containing the Coach.
In the same way, you can localize the configuration options. That is, you create the localization resource, add the localization resource to the view, create the configuration option, and replace its label with a key name.