Install and configure the Web Server Plug-ins to allow the application server to
communicate with the web server.
Before you begin
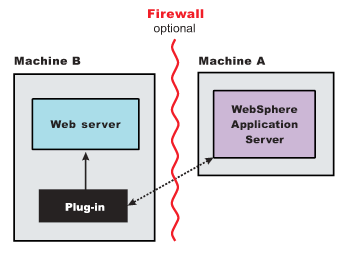
The primary production configuration for a web server is an application server on one
machine and a web server on a separate machine. This configuration is referred to as a
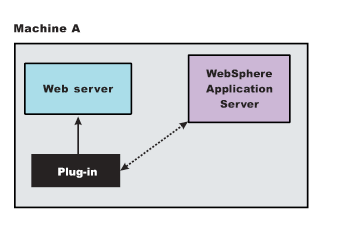
remote configuration. Contrast the remote configuration to the local
configuration, where the application server and the web server are on the same machine.
![[AIX Solaris HP-UX Linux Windows]](../images/ngdist.svg)
About this task
The Web Server Plug-ins Configuration Tool has three main tasks:
- Configures the web server configuration file on the web server machine to point to the binary
plug-in module and to the XML configuration file for the binary module.
- Installs a temporary XML configuration file for the binary module
(plugin-cfg.xml) on the web server machine in remote scenarios.
- Creates the configuration for a web server definition on the application server machine. The Web
Server Plug-ins Configuration Tool processes the creation of the web server definition differently
depending on the scenario:
Procedure
- Set up a remote web server installation.
The remote web server configuration is recommended for production environments.
The remote installation installs the web server plug-in on the web server machine when the
application server is on a separate machine, such as shown in the following graphic:
![[AIX Solaris HP-UX Linux Windows]](../images/ngdist.svg)
Remote installation scenario
Table 1. Installation and configuration . Remote installation scenario
| Step |
Machine |
Task |
| 1 |
A |
Install Installation Manager. |
| 2 |
A |
Use Installation Manager to install the WebSphere® Application Server product. |
| 3 |
A |
Create a standalone application server profile. |
| 4 |
B |
Install Installation Manager. |
| 5 |
B |
Use Installation Manager to install the following:
- Web Server Plug-ins for WebSphere Application
Server
![[AIX Solaris HP-UX Linux Windows]](../images/ngdist.svg) WebSphere Customization Toolbox WebSphere Customization Toolbox
|
| 6 |
B |
Use Installation Manager to install IBM®
HTTP Server, or install another supported web server. |
| 7 |
B |
Open the WebSphere Customization
Toolbox, and launch the Web Server Plug-ins Configuration Tool to configure the web server
plug-in. The script for creating and configuring the web server is created under the
plugins_root/bin directory.
|
| 8 |
B |
Copy the configureweb_server_name
script to paste on Machine A. If one machine is running under an operating system such as AIX® or Linux® and the other
machine is running under Windows, copy the script from the
plugins_root/bin/crossPlatformScripts directory.
|
| 9 |
A |
Paste the configureweb_server_name
script from Machine B to the app_server_root/bin directory
on Machine A. |
| 10 |
A |
Start the application server. |
| 11 |
A |
Run the script from a command line. |
| 12 |
A |
Verify that the application server is running. Open the administrative console
and save the changed configuration. |
| 13 |
A |
Create a secure connection between the web server plug-in and the internal
HTTP transport in the application server. Note: This step is required for
the web server to function properly.
For detailed instructions on creating the secure
connection, read the article on configuring the web server plug-in for Secure Sockets Layer. |
| 14 |
B |
Start the web server. |
| 15 |
B |
Run the Snoop servlet. Access the following URL in your browser:
http://host_name_of_machine_B:http_transport_port/Snoop
To
verify with your own application, regenerate and propagate the plugin-cfg.xml
file after installing the application.
|
Regeneration of the plugin-cfg.xml file
The web server plug-in configuration service regenerates the plugin-cfg.xml
file automatically.
![[AIX Solaris HP-UX Linux Windows]](../images/ngdist.svg) During configuration, the temporary plugin-cfg.xml file is
installed on Machine B in the
plugins_root/config/web_server_name
directory. To use the actual plugin-cfg.xml file from the application server,
propagate the plugin-cfg.xml file as described in the next section.
During configuration, the temporary plugin-cfg.xml file is
installed on Machine B in the
plugins_root/config/web_server_name
directory. To use the actual plugin-cfg.xml file from the application server,
propagate the plugin-cfg.xml file as described in the next section.
Propagation of the plugin-cfg.xml file
![[AIX Solaris HP-UX Linux Windows]](../images/ngdist.svg) The web server plug-in configuration service propagates the
plugin-cfg.xml file automatically for IBM
HTTP Server Version 6.0 or later. For all other web servers, propagate the plug-in configuration
file manually. Copy the plugin-cfg.xml file from the
profile_root/
config/cells/cell_name/nodes/web_server_name_node/servers/web_server_name
directory on Machine A. Paste the file into the
plugins_root/config/web_server_name
directory on Machine B.
The web server plug-in configuration service propagates the
plugin-cfg.xml file automatically for IBM
HTTP Server Version 6.0 or later. For all other web servers, propagate the plug-in configuration
file manually. Copy the plugin-cfg.xml file from the
profile_root/
config/cells/cell_name/nodes/web_server_name_node/servers/web_server_name
directory on Machine A. Paste the file into the
plugins_root/config/web_server_name
directory on Machine B.
- Set up a local web server configuration.
The local web server configuration is recommended for a development or test environment.
A local installation includes the web server plug-in, the web server, and the Application Server
on the same machine:
![[AIX Solaris HP-UX Linux Windows]](../images/ngdist.svg)
Local installation scenario
Table 2. Installation and configuration . Local installation scenario
| Step |
Machine |
Task |
| 1 |
A |
Install Installation Manager. |
| 2 |
A |
Use Installation Manager to install the following:
- WebSphere Application Server product
- Web Server Plug-ins for WebSphere Application
Server
- WebSphere Customization Toolbox
|
| 3 |
A |
Use Installation Manager to install IBM
HTTP Server, or install another supported web server. |
| 4 |
A |
Create a standalone application server profile. |
| 5 |
A |
Open the WebSphere Customization
Toolbox, and launch the Web Server Plug-ins Configuration Tool to configure the web server plug-in
and create the web server definition. The web server definition is automatically created and
configured during the configuration of the plug-in.
|
| 6 |
A |
Start the application server. |
| 7 |
A |
Verify that the application server is running. Open the administrative console
and save the changed configuration. |
| 8 |
A |
Create a secure connection between the web server plug-in and the internal
HTTP transport in the application server. Avoid trouble: This step is
required for the web server to function properly.
For detailed instructions on creating the
secure connection, read the article on configuring the web server plug-in for Secure Sockets
Layer. |
| 9 |
A |
Start the web server. |
| 10 |
A |
Run the Snoop servlet. Access the following URL in your browser:
http://host_name_of_machine_A:http_transport_port/Snoop
To
verify with your own application, regenerate and propagate the plugin-cfg.xml
file after installing the application.
|
Regeneration of the plugin-cfg.xml file
The web server plug-in configuration service regenerates the plugin-cfg.xml
file automatically.
![[AIX Solaris HP-UX Linux Windows]](../images/ngdist.svg) The plugin-cfg.xml file is generated in the
profile_root/config/cells/cell_name/nodes/web_server_name_node/servers/web_server_name
directory. The generation occurs when the web server definition is created.
The plugin-cfg.xml file is generated in the
profile_root/config/cells/cell_name/nodes/web_server_name_node/servers/web_server_name
directory. The generation occurs when the web server definition is created.
Propagation of the plugin-cfg.xml file
The local file does not require propagation.
What to do next
Tip: If you use a nonstandard web server port (that is, a port other than the default
port of 80) you must also perform the following procedure:
- Using the administrative console, add the nonstandard port to any required virtual host in
WebSphere Application Server, including the
default_host if applications are mapped
to it.
- Regenerate the plug-in.
- Propagate the plug-in.
- Restart the application server.
- Restart the web server.
![[AIX Solaris HP-UX Linux Windows]](../images/ngdist.svg) See Web server configuration for more information about the files
involved in configuring a web server.
See Web server configuration for more information about the files
involved in configuring a web server.
![[AIX Solaris HP-UX Linux Windows]](../images/ngdist.svg) See Plug-ins configuration for information about the logic behind
the processing scenarios for the Web Server Plug-ins Configuration Tool.
See Plug-ins configuration for information about the logic behind
the processing scenarios for the Web Server Plug-ins Configuration Tool.
![[AIX Solaris HP-UX Linux Windows]](../images/ngdist.svg) See Editing web server configuration files for information about how the Web
Server Plug-ins Configuration Tool configures supported web servers.
See Editing web server configuration files for information about how the Web
Server Plug-ins Configuration Tool configures supported web servers.
![[AIX Solaris HP-UX Linux Windows]](../images/ngdist.svg) See Installing and configuring web server plug-ins for information about other installation
scenarios for installing Web Server Plug-ins.
See Installing and configuring web server plug-ins for information about other installation
scenarios for installing Web Server Plug-ins.
![[AIX Solaris HP-UX Linux Windows]](../images/ngdist.svg)
![[AIX Solaris HP-UX Linux Windows]](../images/ngdist.svg)
![[AIX Solaris HP-UX Linux Windows]](../images/ngdist.svg) Tip: As an alternative to using the Web Server Plug-ins Configuration
Tool, you can use the pct command-line tool with a response file to configure a web server. Read
Configuring a web server plug-in using the pct tool for more information.
Tip: As an alternative to using the Web Server Plug-ins Configuration
Tool, you can use the pct command-line tool with a response file to configure a web server. Read
Configuring a web server plug-in using the pct tool for more information.![[AIX Solaris HP-UX Linux Windows]](../images/ngdist.svg)
![[AIX Solaris HP-UX Linux Windows]](../images/ngdist.svg)
![[AIX Solaris HP-UX Linux Windows]](../images/ngdist.svg)
![[AIX Solaris HP-UX Linux Windows]](../images/ngdist.svg)

