When installing DB2® Enterprise Server Edition using
the DB2 Setup wizard, there
are several panels. The following leads you through these panels.
Before you begin
Before starting the
DB2 Setup wizard,
check the installation prerequisites by using the
db2prereqcheck command.
Procedure
- To start the IBM® DB2 Setup Launchpad, run the db2setup command
from the directory where the DB2 installation
image resides. For example,
setup.exe -l C:\tmp\install.log -t C:\tmp\install.trc
The -l and -t recommended
parameters enable DB2 logging
and tracing.
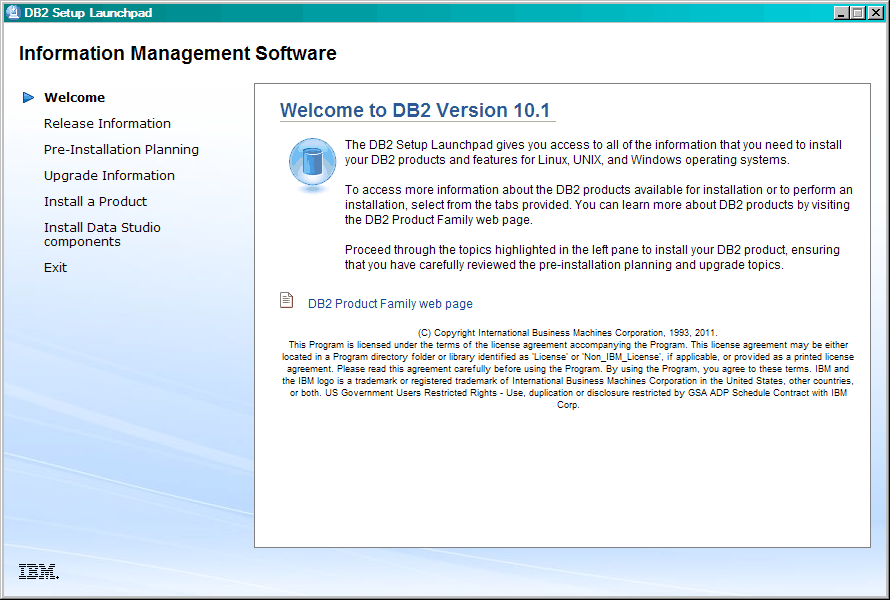
Where the IBM DB2 Setup Launchpad opens.
From this window, you can view the DB2 Enterprise Server Edition release
information, upgrade options, and pre-installation planning, or you
can proceed directly to the installation.
Figure 1. DB2 Setup Launchpad
- To install a DB2 product,
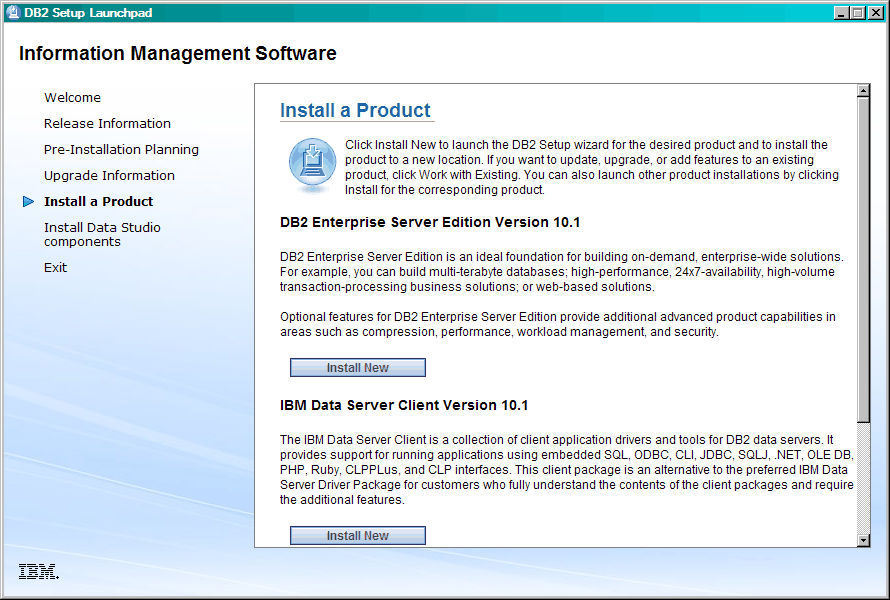
click Install a Product. The Install
a Product panel displays. This window displays the products
available for installation.
Figure 2. Install
a Product window
Click Install New. The Welcome Panel
displays.
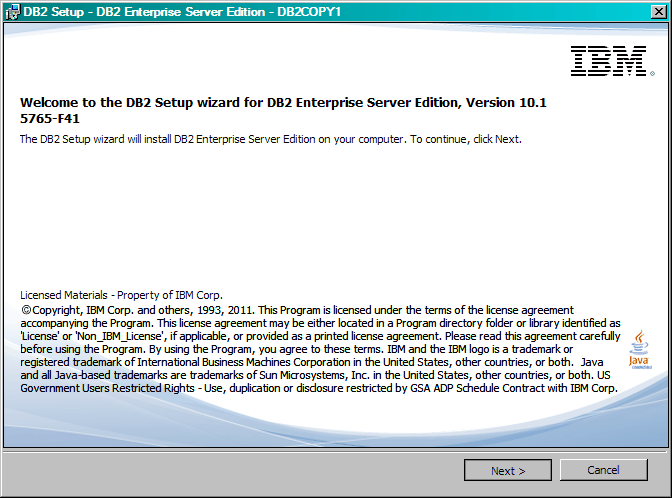
- The Welcome Panel. This panel displays
the DB2 product that you chose
to install.
Figure 3. DB2 Setup wizard Welcome Panel
To end the installation, you can click you can click Cancel at
any time.
Click Next to continue.
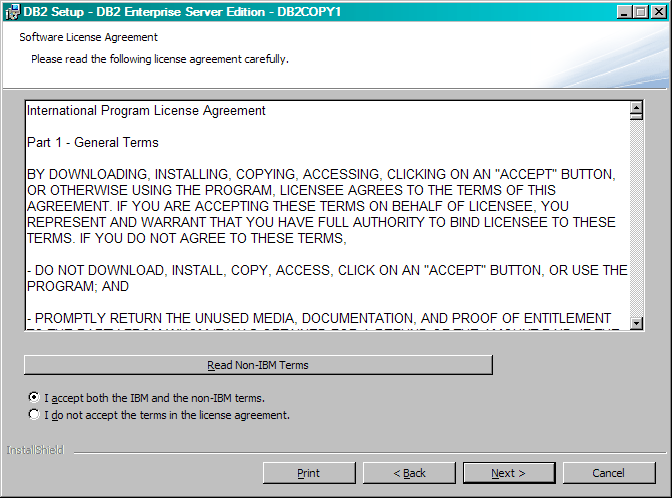
- The Software License Agreement Panel.
This panel displays the IBM and
non-IBM licensing terms.
Figure 4. Software License Agreement Panel
After reviewing the software licensing agreement, select Accept to
accept the terms.
Click Next to continue.
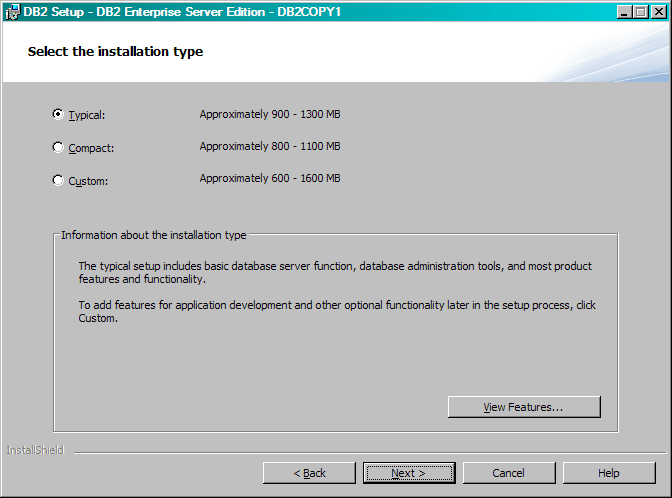
- The Select the installation type Panel.
On this panel, you specify the type of installation to perform. You
can also view the features to be installed.
Figure 5. Select the installation type Panel
You can use the DB2 Setup
wizard to specify :- The typical setup includes basic database server function,
database administration tools, and most product features and functionary.
To add features for application development and other optional functionality
later in the setup process, select Custom.
- The Compact setup includes basic DB2 features
and functionality, and minimal configuration is performed.
- For Custom setup, if you are already familiar with DB2 features and settings, you can
select features that you want installed and specify your configuration
preferences. The default settings for a custom installation are the
same as those for a typical installation, but you can customize optional
features and configuration parameters.
- If you choose to set up using a default setting, you must
specify the Typical field.
To view the features to be installed, click View
Features. The View Features dialog
box opens and displays the features to be installed.
Installation
help can guide you through each of the installation panels. To invoke
the installation help, click Help or press F1.
Click Next to
continue.
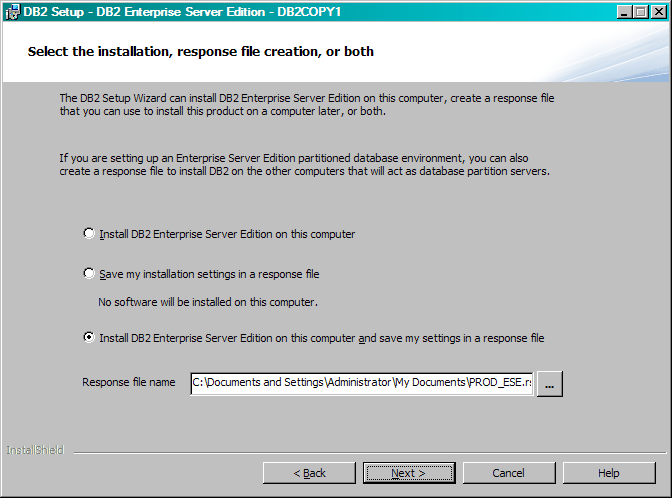
- The Select installation, response file creation,
or both Panel. From this panel, you can choose to perform
the installation now or, save the installation settings to a response
file for installation later or, perform both (perform the installation
now and save the installation settings to a response file).
Figure 6. Select installation, response file creation,
or both Panel
You can use the DB2 Setup wizard
to: - Install the product. When you are finished stepping through
the DB2 Setup wizard, your DB2 database product is installed on your system.
Response file is not saved.
- Create and save the installation settings in a response file,
but not install the product. You can use this response file to install
this product later. The DB2 database
product is not installed. The DB2 Setup wizard
only generates the response file that is based on your selections.
- Install the product and create and save a response file that
you can use as a record of your choices.
If you choose to create a response file, you can specify the
name and location of the response file in the Response
file name field. This same response file can be updated
to use on another set of hosts as well.
Click Next to
continue.
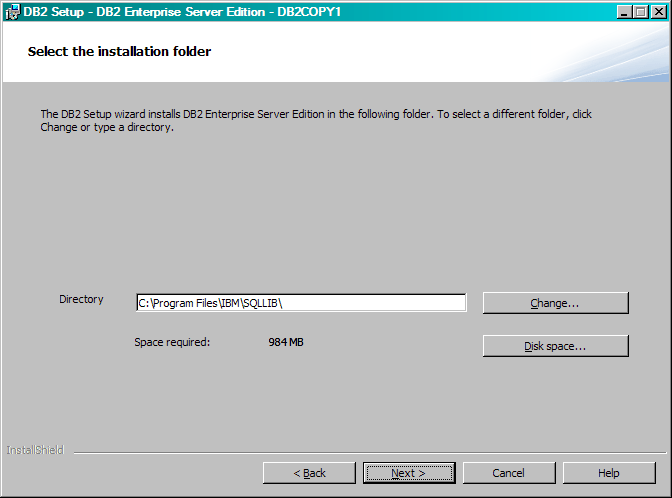
- The Select installation directory Panel.
On this panel, you specify the directory where you want to install
your DB2 database product.
Figure 7. Select installation directory
Panel
To view the disk space that is required for the
installation of the selected features click Disk space.
The Disk Space Requirement dialog box opens and displays the available
disk space for the currently selected features.
Click Next to
continue.
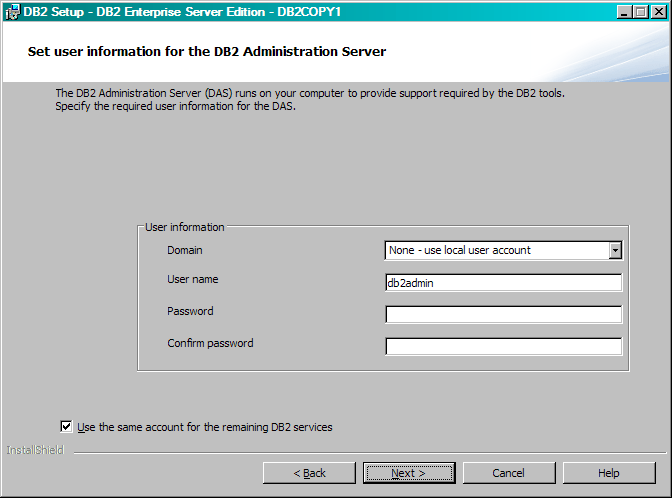
- The Set user information for the default DB2
Administration Server (DAS). On this panel you to specify
the domain, user name and password for the DB2 Administration Server.
Figure 8. Set user information for the default DB2 Administration Server
The DAS runs on your computer to provide support
that is required by the DB2 tools.
Specify the user information for the DAS.
Click Next to
continue.
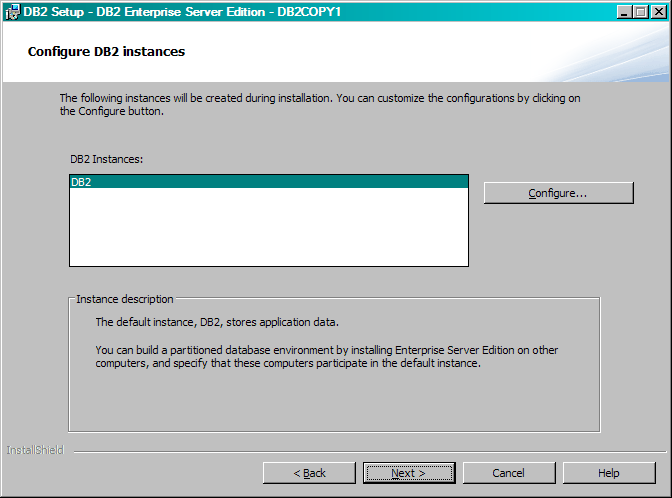
- The Configure DB2 instances Panel.
On this panel, you can view and change the DB2 instances.
Figure 9. Configure DB2 instances
Panel
To view and change the DB2 instance configuration panel, click Configure.
The TCP/IP port number is used by a DB2 instance
to listen for incoming DB2 connections.
The port number value must be in the range 1024 - 65535 and must be
available on all hosts.
Click Next to
continue.
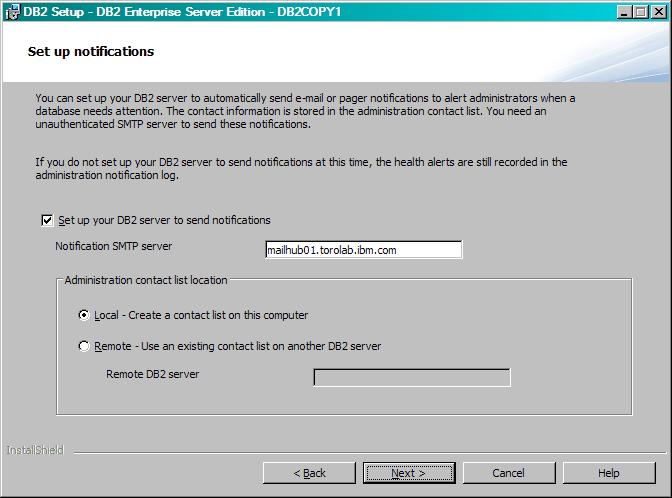
- The Set up notifications Panel. In
this panel you can manually configure your notifications to be sent
to local or to remote contact list.
Figure 10. Set up notifications Panel
You can set up your DB2 server to automatically send notifications
to alert administrators when a database needs attention. The contact
information is stored in the administration contact list. You need
an unauthenticated SMTP server to send these notifications. If you
do not set up your DB2 server
to send notification currently, the health alerts are still recorded
in the administration notification log.
You can set the administration
contact option to be local (create a contact list on this computer)
or remote (use an existing contact list on another DB2 server). You must specify the remote DB2 server.
Click Next to
continue.
Note: The Set up notifications Panel is
unavailable in the Typical Install GUI option for DB2 Express® Edition
and DB2 Express - C Edition. If you want this panel
to be available during the installation process, you must choose the
Custom Install GUI option.
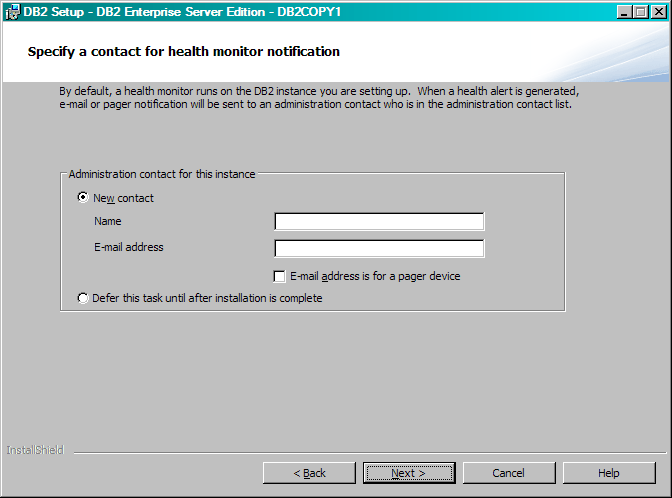
- The Specify a contact for health monitor notification
Panel. On this panel, you can choose to create an administration
contact.
Figure 11. Specify a contact
for health monitor notification Panel
By default, a health monitor runs on the DB2 instance you are setting up.
You can either specify the administration contact for this instance
or defer this task until after the installation is complete.
Click Next to
continue.
Note: The Specify a contact for health monitor notification
Panel is unavailable in the Typical Install GUI option
for DB2 Express Edition and DB2 Express -
C Edition. If you want this panel to be available during the installation
process, you must choose the Custom Install GUI option.
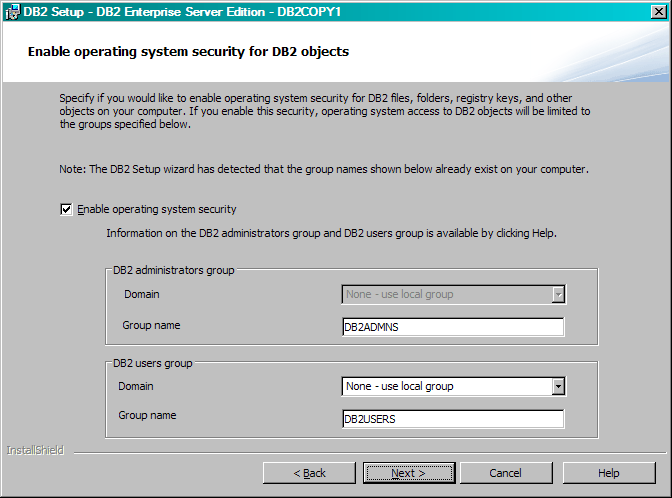
- The Enable operating system security for DB2
objects Panel. This panel enables operating system security.
Figure 12. Enable operating system security
for DB2 objects Panel
To enable the operating system security, specify
the administrator and user group information.
Click Next to
continue.
Note: The Enable operating system security for DB2
objects Panel is unavailable in the Typical Install GUI
option for DB2 Express Edition and DB2 Express -
C Edition. If you want this panel to be available during the installation
process, you must choose the Custom Install GUI option.
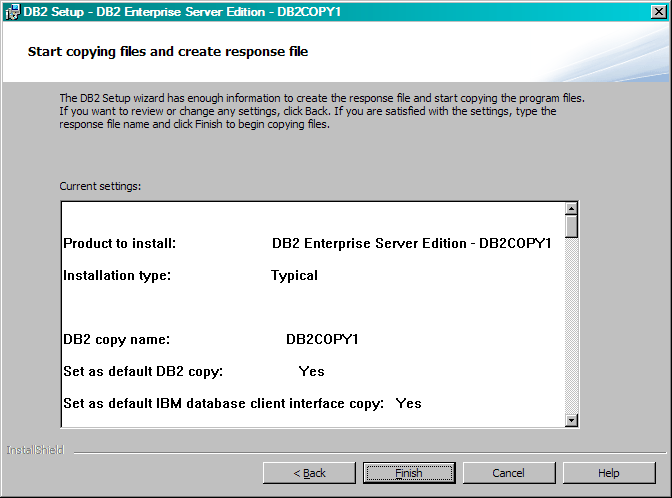
- The Start copying files and create response file
Panel. This panel outlines the information that you need
to create the response file. This is the final step before the installation
wizard starts copying the program files.
Figure 13. Start copying files and create response
file Panel
This panel displays the choices necessary to complete
the DB2 installation or to create
a response file. Review all the features that are listed in this panel
before clicking Finish. To change any of these
settings, click Back to go back to the previous
pages in the DB2 Setup wizard and change your
choices. To start the installation process across all specified hosts,
click Finish.
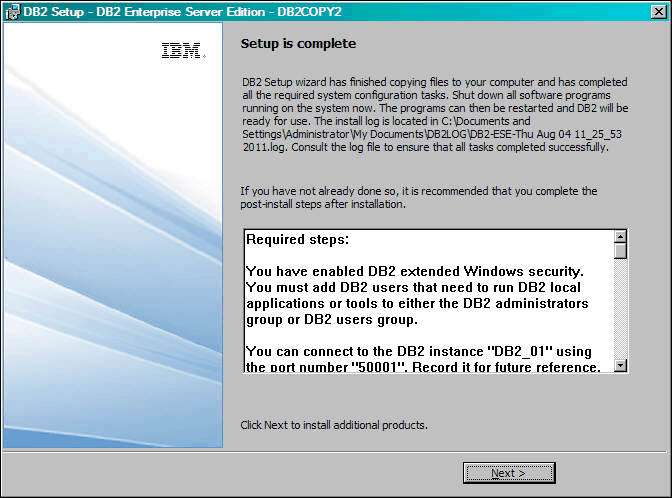
- The Setup is Complete Panel. This
panel indicates the DB2 files
are copied to your computer and the system configuration is complete.
Figure 14. Setup is Complete Panel
The installation log is located at C:\Documents
and Settings\Administrator\My Documents.
To use
your DB2 database product, you
must have a valid license. For information about obtaining and applying DB2 license files, see DB2 database
product licensing and support.
To start using your DB2 database product, shut down
all the software programs that are running on the system and restart
the program.
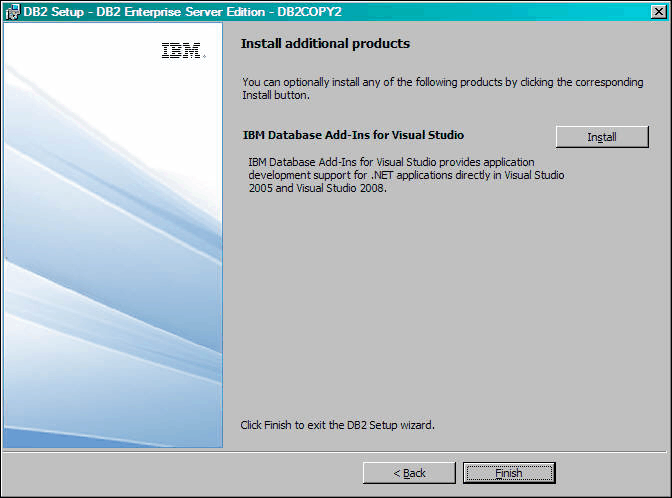
- The Install additional products Panel.
This panel displays the additional products that can be installed
after the DB2 database product
installation.
Figure 15. Install additional
products Panel
You can optionally install any of the following product by clicking
the corresponding Install button. IBM Database
Add-Ins for Visual Studio provides application development support
for .NET applications directly in Visual Studio 2008. To launch the
installation process of IBM Database
Add-Ins for Visual Studio, click Install. After the installation is complete, you can review the post-installation
steps, the log file for more details on what was set up, and the status
of each remote host.
Click Finish to exit.
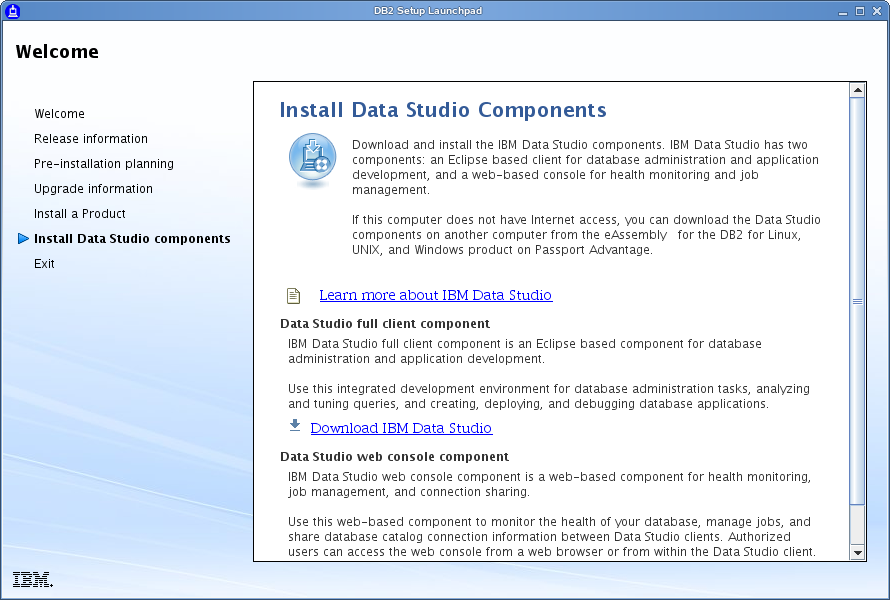
- Optional. The Install Data Studio components
Panel. Optionally, you can install the Data Studio components.
Figure 16. Install Data Studio components
Panel
To install the Data Studio components, restart
the IBM DB2 Setup Launchpad by running the db2setup command.
Click Install Data Studio components. The Install
Data Studio components panel displays the products available
for installation.
