 Directory Integrator, Version 7.1.1
Directory Integrator, Version 7.1.1
Directory Integrator, Version 7.1.1
Returning to the example scenario outlined in the introduction, you will now create an AL that migrates information from D1 to D3, ignoring for the moment the joining of data from D2.

The 'Tutorials' folder (that you should have copied from TDI installation directory/examples to your Solution Directory) contains a file named People.csv:
First;Last;Title
Bill;Sanderman;Chief Scientist
Mick;Kamerun;CEO
Jill;Vox;CTO
Roger
Gregory;Highpeak;VP Product Development
Ernie;Hazzle;Chief Evangelist
Peter;Belamy;Business Support Manager
You can see from the above listing that this is in character separated value format (CSV). This file represents our D1 input data source. Your AL will extract this data and transfer it to an XML document which will be our D3 output target.
Click on New AssemblyLine in the topmost toolbar and call the new AL 'CSV2XML'.
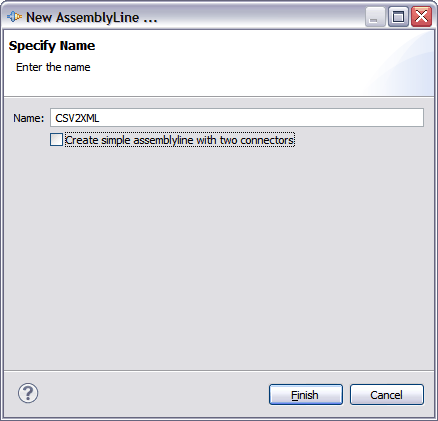
Now press the Finish button to open the AL in an AssemblyLine editor tab.

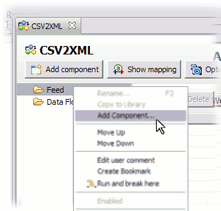
The left part of the AL editor contains the list of components that make up this AssemblyLine and is empty right now except for the section names: Feed and Data Flow. The right-hand area displays all Attributes being mapped in and out of the AL.
To understand these AssemblyLine sections, consider for a moment what we want this new AL to do: For each line in the CSV file, create a new node in the XML document. This looping behavior is provided for you automatically by the Tivoli® Directory Integrator kernel, driving components listed under the AL Data Flow section as long as there is input data coming from Connectors in the Feed section1.
Let's take advantage of this functionality by adding a Connector to the Feed section to read in our CSV input file. Do this by right-clicking on the Feed section folder and selecting Add Component...
You will be presented with the Choose Component wizard.
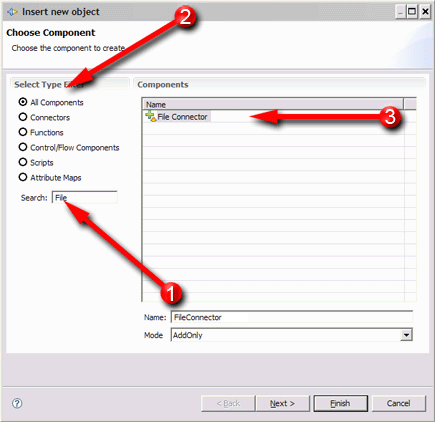
The new Connector is automatically named 'FileSystemConnector' for you. Change this to 'Read_CSV_File' so that it has more meaning in the context of your solution2 and then select Iterator from the Mode drop-down.
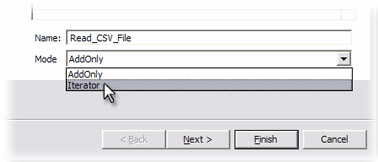
It's the Mode setting of a Connector that tells the built-in AL execution logic what role this component plays in the flow. Iterator Mode results in the for-each behavior you need in order to drive the data from the CSV file, one entry at a time, to the components you will add to the Data Flow section.
Now press the Next button to continue on to the configuration panel for the selected Connector.
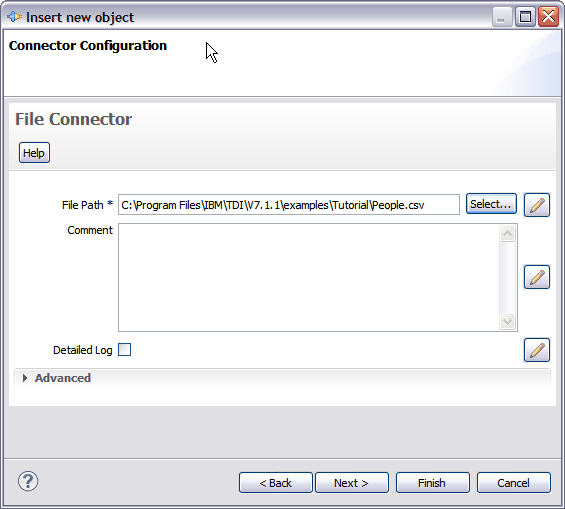
Each component provides its own set of configuration parameters. The ones shown onscreen now are for the File Connector and it has only one required parameter: File Path. Type in the path to the People.csv file – either the full path, or the relative path from your Solution Directory as shown in the screenshot above3 – or press the Select button to bring up a file browser to locate this file.
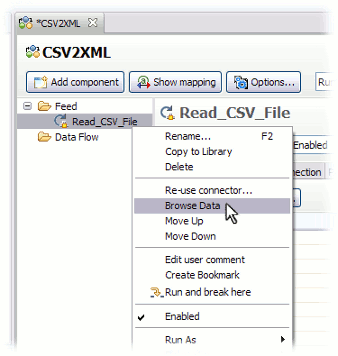
Because a formatted text file is a byte stream and not a structured data source like a database or directory, you must set up a Parser to interpret the formatting of the stream as it is read. Tivoli Directory Integrator provides a powerful and versatile Data Browser feature for interactively testing your Connector/Parser selection and configuration.
We'll take a look at this in a moment, but first you need to complete this wizard by pressing Next again and proceeding to Parser Configuration. Here you click on the CSV Parser to select it.
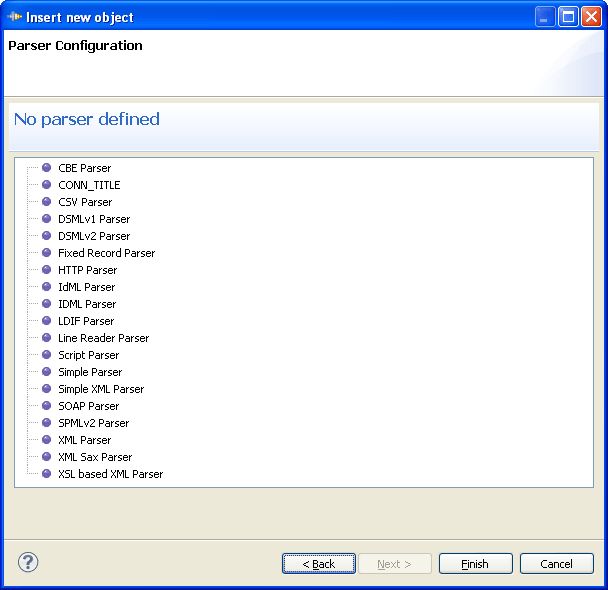
Once you have selected the CSV Parser then press Finish to close the wizard. You will now see the Parser Configuration panel. Since you don't need to change the default settings, simply press Finish again to complete the wizard.
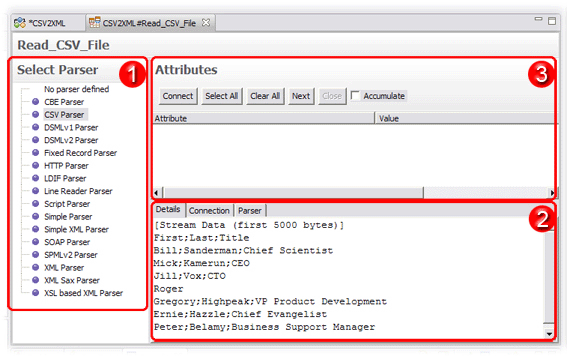
The area labeled 1 in the above screenshot is for choosing – and changing – the selected Parser. Area 2 provides a Details tab that shows you the raw byte stream that will be parsed. There are also tabs for changing the Connector's Connection parameters, as well one for configuring the chosen Parser.
The last section of this dialog (#3 in the screenshot) is for connecting to the data source and discovering which Attributes are available. Do this now by first pressing Connect and then the Next button.
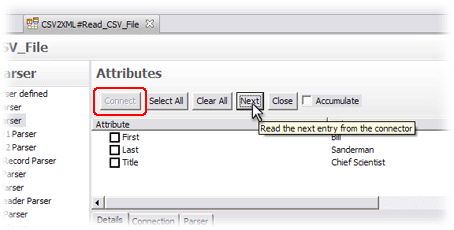
You have now discovered the schema of this file. Select the Attributes you want to map in, which in this case is all of them, by either selecting the checkbox next to each one, or using the Select All button.
Use the Ctrl-W shortcut to close the Data Browser tab, or simply click on the 'Close' symbol (X) at the right edge of the tab and return to the AssemblyLine editor where your AL should look like the screenshot below5.
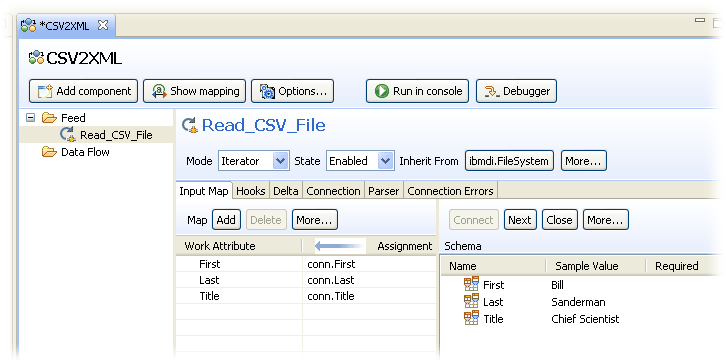
Details for the selected component are shown to the right of the AL component list, including the three mapping rules you just set up in the Input Map. Each Attribute Map item has an Assignment, which is a snippet of script that is evaluated in order to set the value (or values) of the target Attribute.
conn.Firstreturn conn.getAttribute("First");7
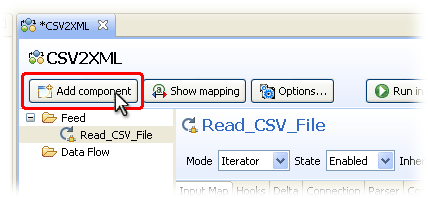
Getting back to the exercise, you now you need to add your output Connector for creating the target XML document (data source D3). This time try using the Add component button at the top of the AssemblyLine Components panel.
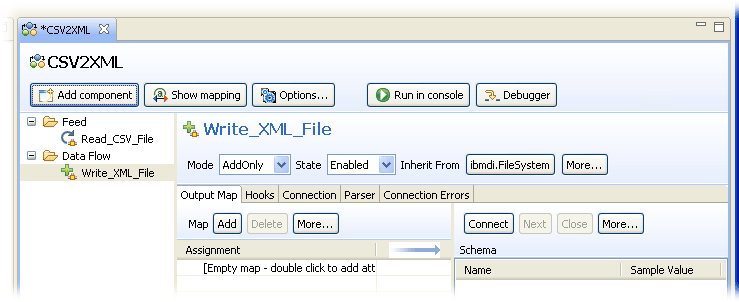
Again choose the File Connector, renaming it to 'Write_XML_File'. Leave the Mode setting as AddOnly and then press Next.
In the Connector Configuration panel, set the File Path parameter to write to a file called Output.xml in the Tutorial folder. Then choose 'XML Parser' in the next Wizard panel. Now you can press Finish since you don't need to change the XML Parser configuration. Note that in the case of your output Connector, you can't do Schema Discovery since there is no Output.xml file to discover from.
You may have noticed that when you select a component, its details appear in the right part of the editor screen. Whenever you select either the 'Feed' or the 'Data Flow' folder, you are presented with the overview of all Attribute Maps for this AssemblyLine. This is a handy display for copying your input Attributes to the Output Map of your latest Connector, so bring up this screen now by clicking on either 'Feed' or 'Data Flow'.
Here you see the list of Attributes (three in total) that are being brought into your AL by the Iterator-mode Connector. Select these Input Map Attributes8 and drag them down to the Output Map of the 'Write_XML_File' Connector, completing the data flow.
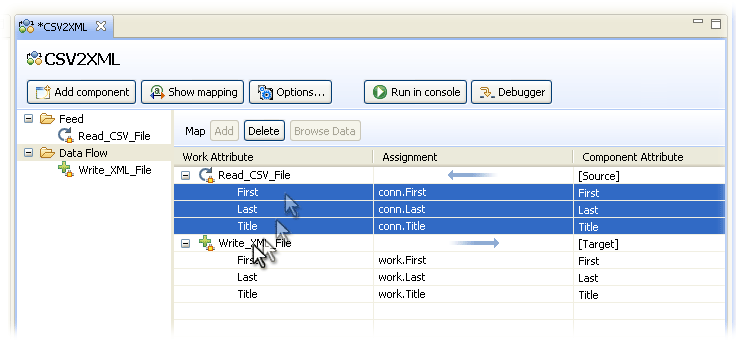
Notice how the Assignment is automatically converted from input format to output. For example, the first map item in the Input Map of your 'Read_CSV_File' Connector will create an Attribute in the Work Entry named 'First' to hold any values found in conn.First (that is, the Attribute called 'First' that was read into the Conn Entry). When you drag this input mapping rule to an Output Map then its assignment is changed so that the value now comes from the Work Entry instead, and it is creating a target Attribute in the Connector's cache (the Conn Entry).
If you want to change the source for any mapping rule then edit the assignment. In order to change the name of the Attribute being mapped to, simply right-click and rename it. Do this now for the first two Output Map rules.
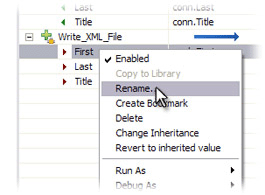
Change 'First' to 'FirstName' and 'Last' to 'LastName'.
Now add a new map item to this Output Map by right-clicking on the 'Write_XML_File' Output Map itself and choosing Add Attribute.
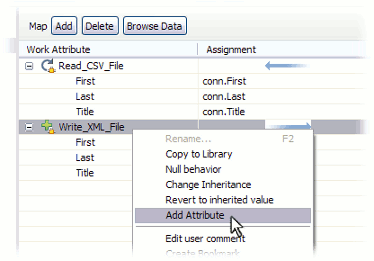
Call the target of this new mapping rule 'FullName', press OK and then double-click on it to edit its assignment.. This opens up the Script editor panel and presents you with a default assignment script: work.FullName. Of course there is no 'FullName' Attribute in the Work Entry, so this map will not be able to set any values. Instead, you must compute this value by changing the script so that it concatenates the First and Last Attributes, leaving a single space between these values:
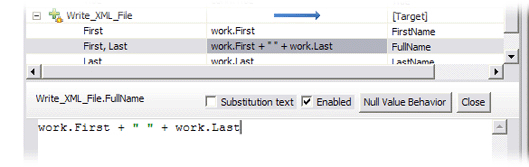
work.First + " " + work.LastNote that no terminating semi-colon is required for one-liner Attribute Map assignment scripts like this9. Press the Close button at the top-right of the Script editor panel when you are done.
ret.value = conn.getAttribute("First")