About this task
To set up the integration with the change management provider:
Procedure
- In Rational Integration Tester, click Project > Project Settings.
- In the Change Management tab, click Add.
- In the Select Provider dialog, select
one of the supported providers and click OK.
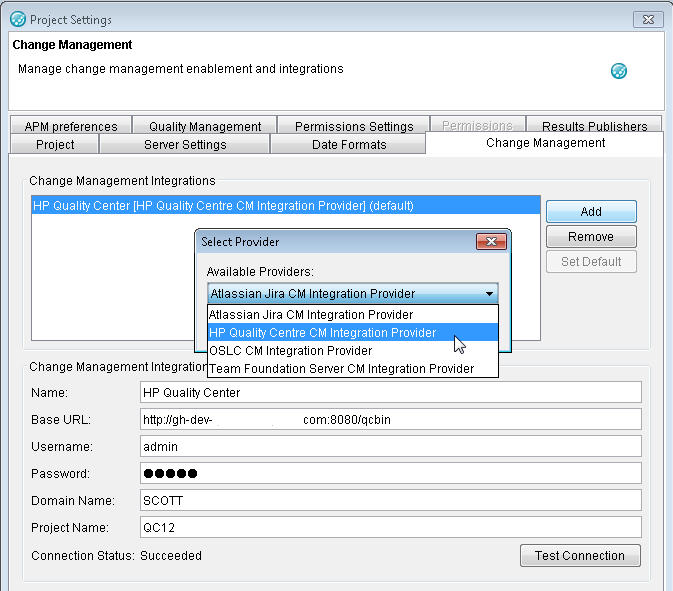
- Specify the change management provider details for enabling
the integration with the tool.
Table 1. Change management integration provider details Change Management Provider Configuration details Team Foundation Server CM Integration providers For Team Foundation Server providers, enter the following configuration details:
- Name: A descriptive name for the selected instance, used to identify the integration in a meaningful way when you are creating defects.
- Base URL: The URL (http://<hostname>:<port>/tfs) of the Team Foundation instance. You can find the Base URL from the Administration console of the Team Foundation Server tool.
- Username and Password: The user name and password to be used when you are accessing protected resources on the selected provider and when you are creating defects.
- Domain Name: The Windows domain name to log in to access the tool.
- Project Name: The project in the Team Foundation Server to associate the defects into.
To verify the configuration details, click Connect. If you are unable to connect to the selected instance, verify the provided configuration details and try again.
OSLC CM Integration providers For OSLC providers, enter the following configuration details:
- Name: A descriptive name for the selected OSLC instance, used to identify the integration in a meaningful way when you are creating defects.
- Root Services URI: A URI that points to the root services document on the selected integration from which service discovery takes place. For example, http://rtcp.local:7819/RTCP/rootservices.
- Username and Password: The user name and password to be used when you are accessing protected resources on the selected provider and when you are creating defects.
Important: You can integrate with the OSLC CM tools that supports OSLC-Service Provider version 1 and also the Root Services specification.- For information about Service Provider specifications, see http://open-services.net/bin/view/Main/OslcServiceProviderCatalogV1.
- For information about the specifications, see https://jazz.net/wiki/bin/view/Main/RootServicesSpec#Change_Management_Service_Provid.
Atlassian JIRA Integration providers For Atlassian JIRA providers, enter the following configuration details:
- Name: A descriptive name for the selected JIRA instance, used to identify the integration in a meaningful way when you are creating defects.
- Base URL: The URL (http://<hostname>:<port>/jira) for all relative links on the JIRA server (this URL must match the Base URL that is set in the server configuration).
- Username and Password: The user name and password to be used when you are accessing protected resources on the selected provider and when you are creating defects.
To verify the configuration details, click Connect. If you are unable to connect to the selected instance, verify the provided configuration details and try again.
Important: The selected JIRA server must permit remote access by Rational Integration Tester. You can permit remote access by enabling the "Accept remote API calls" setting under General Configuration, Options in the server configuration.Once you are successfully connected to the specified JIRA instance, you can set the following default options to use when you are creating defects.- Default Project ID: Select one of the available projects that were configured on the selected instance.
- Default Issue Type: Select one of the available issue types on the selected instance.
- Default Priority: Select one of the available priorities on the selected instance.
HP Quality Center Integration providers For HP Quality Center providers, enter the following configuration details:
- Name: A descriptive name for the selected HP Quality Center instance, used to identify the integration in a meaningful way when you are creating defects.
- Base URL: The URL (http://<hostname>:<port>/qcbin) of the HP Quality Center instance. You can find the Base URL from the Administration console of the HP Quality Center Server tool.
- Username and Password: The user name and password to be used when you are accessing protected resources on the selected provider and when you are creating defects.
- Domain Name: The HP Quality Center domain name to log in to access the tool.
- Project Name: The project in the HP Quality Center to associate the defects into.
To verify the configuration details, click Test Connection. If you are unable to connect to the selected instance, verify the provided configuration details and try again.
Important: The selected HP Quality Center server must permit remote access by Rational Integration Tester. You can permit remote access by completing the setup of the HP Quality Center and IBM Rational Integration Tester integration. For more information about setting up the HP Quality Center to work with IBM® Rational Integration Tester, see Integrating Rational Integration Tester with HP Quality Center. - Click OK to save the changes and
close the Project Settings dialog. Tip: If multiple change management integrations are configured for a project, you can override an inherited integration (from an operation or service component higher up the project resource tree) or the default integration in the Change Management tab for the selected test suite or the test. You must save the test or the test suite after you change this setting.