< Previous | Next >

Lesson 2: Creating a job and adding steps

A job is a series of steps that, together, complete an activity, such as building a project. When a project runs, the steps run one at a time in the order that you specify.

Before you begin

Before you begin this lesson, make sure that you complete the steps that are described in Configure the tutorial system.

About this task

In this lesson, you create a job and add steps to it that download source code, builds artifacts, runs tests, creates a component versions in IBM UrbanCode Deploy, and assigns a status to the component. The job will be used by the workflow that you create later in the tutorial. As you create the job, you define several properties that will be used later when you create and run the project.

Creating a job

Most job steps are created from plug-ins. Plug-in steps can be thought of as distinct pieces of automation.

About this task

By combining steps from various plug-ins, you can create fully automated build processes. The number of steps that are provided by a particular plug-in can vary, and each step has a variable number of properties. Property values can be supplied when you define a step or at process run time.
Note: Several plug-ins are included in the product, and you can download other plug-ins as described earlier in the tutorial. Some steps, such as Assign Status and Create Stamp, are not derived from plug-ins, but you use them in the same way that you use plug-in steps.

Create a job by completing these steps:

Procedure

  1. On the IBM UrbanCode Build dashboard, click Templates > Jobs.
  2. On the Jobs page, click Create.
  3. In the Create a Job window, name the job Ant Build Job.
  4. Click Save. The Main tab for the new job is displayed.

Results

You use the job's Main tab to add steps to the job. Except for the first step, steps can be inserted before or after other steps. You can rearrange the steps and change their order. When you run the job, the steps are run in the order that you specify.

Cleaning the workspace

To ensure that no files from a previous build get incorporated into the new one, add a step to clean the agent's workspace. This step is part of most build jobs.

Procedure

  1. If the Main tab for the Ant Build Job is not displayed, then from the IBM UrbanCode Build dashboard, click Templates > Jobs, and then click Ant Build Job.
  2. Click Create Step.
  3. Using the Steps dialog box, click Source. The Source list expands to display the available source-related steps and plug-ins.
  4. In the Steps dialog box, click Clean Workspace, and then click Select. The Change Source dialog box is displayed. The dialog box that is displayed after you select a step contains options that are related to the selected step. Some of the options are unique to the step, while others are common to all steps.
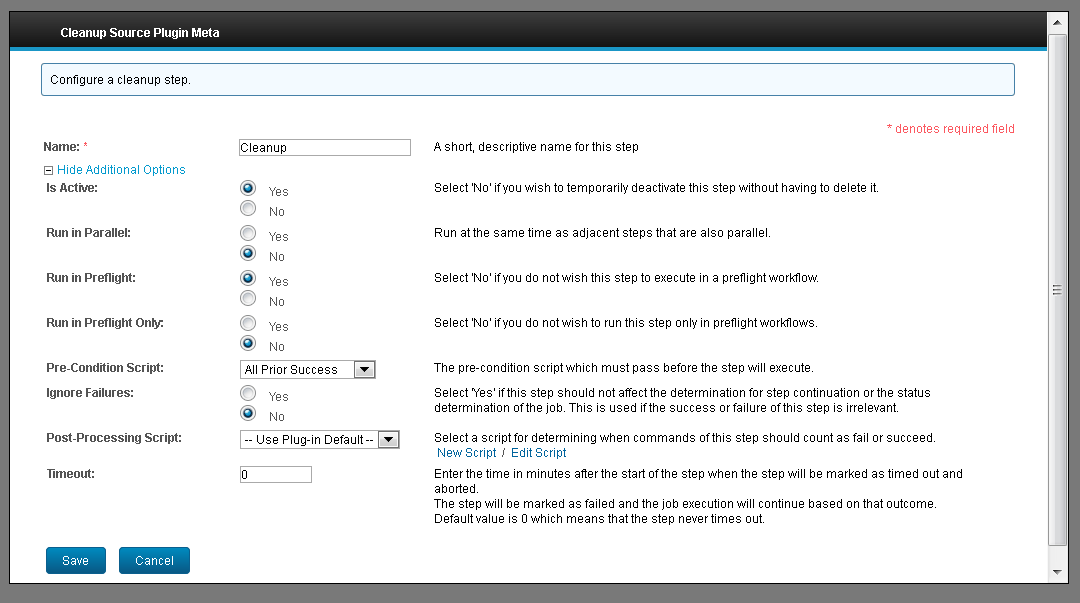
    Note: Each step dialog box has more options available than are initially displayed. To see the other options, click Show Additional Options. The additional options are the same for all steps and are set to default values that are acceptable for most jobs. For example, the default value for the Pre-Condition Script field is All Prior Success, which means that the step runs only if the preceding steps succeed. The additional options are shown in the following figure. For most of the steps in this tutorial job, the default values are fine.
    Cleanup Source plug-in options
  5. On the Cleanup Source dialog box, in the Name field, type Cleanup.
  6. Click Save.

Results

The Cleanup step is listed on the Main tab for the job.

After a job has a step, the Create Step push button is no longer used and actions are used instead to insert steps.
Populating the workspace

This step places the checked-out code, which is defined later in the project's source configuration, in the agent's workspace.

Procedure

  1. Use the Insert After action for the Cleanup step.
    The Insert After action
  2. In the Steps dialog box, click Source, and then click Populate Workspace.
  3. Click Select.
  4. Using the Populate Workspace dialog box, in the Name field, type Populate Workspace.
  5. In the Date String field, type the ${bsh:WorkspaceDate.get()} BeanShell script line. This script sets the date to the date that the source is checked out. The default date is the workspace.date property on the job.
  6. Click Save.

Results

The Populate Workspace step is added to the job, as shown in the following figure
The Populate Workspace step added to the job

Creating a stamp step

A stamp is an identifier that is applied to a build. Stamps are often used in addition to the automatically generated build life identifiers. A stamp step is part of most jobs.

Procedure

  1. If the Main tab for the AntBuild Job is not displayed, then from the IBM UrbanCode Build dashboard, click Templates > Jobs, and then click Ant Build Job.
  2. Use the Insert After action for the Populate Workspace step.
  3. Using the Steps dialog box, click Build. The Build list expands to display the available build-type steps and plug-ins.
  4. In the Build list, click Create Stamp, and then click Select. The Stamp dialog box is displayed.
  5. In the Name field, type Create Stamp.
  6. In the Stamp field, enter a script to define the stamp: ${p:product.version}.${gvy:BuildLifeLookup.current.id}. The Groovy script looks up the current build-life ID, which is part of every build life, and appends it to the product.version property. You create the product.version property later in the tutorial when you create the build process.
  7. Click Save.

Results

The Create Stamp step is listed on the Main tab for the job, as shown in the following figure:
The Create Stamp step that is listed on the Main tab

Creating a get changelog step

This step retrieves source changes that were saved since the last build. The prior build life is located by using status or stamp parameters.

Procedure

  1. Click the Insert After action for the Create Stamp step.
  2. In the Steps dialog box, click Source, and then click Get Source Changes.
  3. Click Select.
  4. In the Get Changelog Source Plugin Meta dialog box, in the Name field, type Get Changelog.
  5. Select Success on the Start Status list. The value that is selected determines which source items are retrieved. In this case, only items with a Success value are retrieved.
  6. Ensure that Save Changes in Database is selected, it is selected by default. This parameter makes the data available to the web application's user interface, and for reporting.
  7. Click Save.

Results

The Get Changelog step is inserted into the job after the Populate step, as shown in this figure:
The Get Changelog step is inserted into the job.

Creating an Ant build step

Create a step that runs an Ant build process.

About this task

This step runs an Ant build. Like most steps, the Ant build step is defined by the properties that you specify. Many properties that you define for this step are placeholders and their values will be specified by other templates or at run time.

Procedure

  1. Click the Insert After action for the Get Changelog step.
  2. In the Steps dialog box, click Build > Build Tools > Ant > Ant, and then click Select.
  3. In the Plugin Command window, in the Name field, type Ant Build.
  4. In the Working Directory Offset field, type ${p?:dir.offset}. The question mark character, ?, can be used to reference properties. The format is ${p?:propertyName}. In this instance, if the user specifies a value for the dir.offset property, this script returns the value. Otherwise, it returns an empty string.
  5. In the Ant Script File field, type ${p:build.script.name}.
  6. In the Targets field, type ${p?:ant.targets}.
  7. In the Properties box, type ${p?:build.properties}.
  8. In the Ant Properties box, type ${p?:ant.properties}.
    Note: The ANT_HOME and JAVA_HOME fields are set to default values for the computer where the agent is located.
  9. Click Save.

Results

The Ant Build step is inserted into the job after the Get Changelog step, as shown in this figure:
The Ant Build step inserted into the job

Creating the publish JUnit tests step

JUnit is a testing framework for Java™. This step runs tests and reports the results.

Before you begin

Before you begin this lesson, make sure that you install the JUnit plug-in as described in Configure the tutorial system.

About this task

Unlike most of the other steps in the Ant Build job, this step is configured to always run even if the preceding step fails. Test reports are displayed on the Tests tab for build life.

Procedure

  1. Click the Insert After action for the Ant Build step.
  2. In the Steps dialog box, click Quality > Unit Testing > JUnit, and then click JUnit Report.
  3. Click Select.
  4. In the Name field, type Publish JUnit Report.
  5. In the Report Name field, type JUnit Report.
  6. In the Source Directory field, type ${p:junit.report.base.dir}. Reports are written to the specified location.
  7. In the Include Patterns field, type TEST*.xml. Test files that match the specified pattern are written to the same directory.
  8. Display the Pre-Condition Script list by clicking Show Additional Options, and then select Always.
  9. Click Save.

Results

The Publish JUnit Report step is inserted into the job after the Ant Build step, as shown in this figure:
The Publish JUnit Report step inserted into the job

Creating the upload artifacts step

Create a step that uploads the build artifacts into the artifact repository, CodeStation.

Procedure

  1. Click the Insert After action for the Publish JUnit Report step.
  2. In the Steps dialog box, click Build Systems > CodeStation > >Upload All Artifacts, and then click Select.
  3. In the Name field, type Upload All Artifacts.
  4. Accept the default values for the other fields and click Save.

Results

The Upload All Artifacts step is inserted into the job after the Publish JUnit Report step, as shown in this figure:
The Upload All Artifact step inserted into the job

Creating the step to upload artifacts to IBM UrbanCode Deploy

Create a step to upload the build artifacts to IBM UrbanCode Deploy.

Before you begin

Make sure that you created an integration with IBM UrbanCode Deploy, and created a component that is named Ant as described in Configure the tutorial system.

About this task

This step creates a component version and loads the build artifacts into the IBM UrbanCode Deploy Ant component that you created when you configured the tutorial system.

Procedure

  1. Click the Insert After action for the Upload All Artifacts step.
  2. In the Steps dialog box, click Deploy > Tools > IBM UrbanCode Deploy > Upload All Artifact Sets, and then click Select.
  3. In the Name field, type Upload All Artifact Sets to UCD.
  4. In the Component Name field, type ${p:project/name}.
    Note: This property value loads the artifacts into an IBM UrbanCode Deploy component with the same name as the project that runs the build. Later you create a tutorial project that is named Ant. If you name your project something else, make sure that you name a component in IBM UrbanCode Deploy with the name that you use for the project.
  5. In the Component Version field, type ${p:buildlife/latestStamp}. This value generates a version number for the IBM UrbanCode Deploy component version. The component version ID that is created in IBM UrbanCode Deploy is equal to the value that the Create Stamp job step creates.
  6. In the IBM UrbanCode Deploy Server list, select the server that you integrated with IBM UrbanCode Build.
  7. Accept the default values for the other fields and click Save.

Results

The Upload All Artifact Sets to UCD step is inserted into the job after the Upload All Artifacts step, as shown in this figure:
The Upload All Artifact Sets to UCD step inserted into the job

Creating the component version status step

Create a step that sets the component version status in IBM UrbanCode Deploy.

Before you begin

Before you begin this lesson, make sure that you created a component version status with a value of Success in IBM UrbanCode Deploy, as described in Configure the tutorial system.

About this task

This step adds a status to the component version that was created in IBM UrbanCode Deploy in the previous step.

Procedure

  1. Click the Insert After action for the Upload All Artifact Sets to UCD step.
  2. On the Steps dialog box, click Deploy > Tools > IBM UrbanCode Deploy > Add Component Version Status, and then click Select.
  3. In the Name field, type Set Component Version Success Status.
  4. In the Component Name field, type ${p:project/name}.
  5. In the Version Name field, type ${p:buildlife/latestStamp}.
  6. In the Status Name field, type Success. The status value is applied to the component version that was created in the previous step. The value must equate to an existing status value in IBM UrbanCode Deploy. If you enter a value for which there is no corresponding status value, the step fails.
  7. In the IBM UrbanCode Deploy Server list, select the server that you integrated with IBM UrbanCode Build.
  8. Accept the default values for the other fields and click Save.

Results

The Set Component Version Success Status step is inserted into the job after the Upload All Artifact Sets to UCD step, as shown in this figure:
The Set Component Version Success Status step inserted into the job

Creating the assign success step

If all previous steps succeed, this step assigns a status of Success to the entire job. If the preceding steps fail, this step does not run, and the next step runs instead.

Procedure

  1. Click the Insert After action for the Set Component Version Success Status step.
  2. In the Steps dialog box, click Build, and then click Assign Status.
  3. In the Name field, type Assign Success.
  4. In the Status list, select Success.
  5. Click Save. Because the Pre-Condition Script field is set to All Prior Success by default, you can accept the value.

Results

The Assign Success step is inserted into the job after the Set Component Version Success Status step, as shown in this figure:
The Assign Success step inserted into the job

Creating the assign failure step

This step assigns a status of Failure to the job. The step runs if any of the preceding steps fail.

Procedure

  1. Click the Insert After action for the Assign Success step.
  2. In the Steps dialog box, click Build, and then click Assign Status.
  3. In the Name field, type Assign Failure.
  4. In the Status list, select Failure.
  5. Display the Pre-Condition Script list, and select Any Prior Failure.
  6. Click Save.

Results

The Assign Failure step is inserted into the job after the Assign Success step.

Lesson checkpoint

In this lesson, you created job and added steps to it.

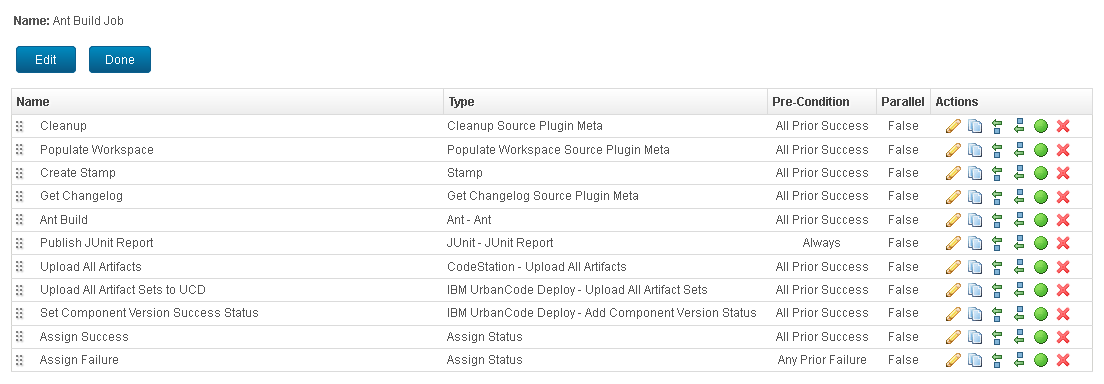
This job retrieves source from GitHub and runs an Ant build process on it. It uploads the artifacts into IBM UrbanCode Deploy and generates JUnit test reports. Steps are configured individually as you insert them into a job.

The steps for the completed Ant Build Job are shown in this figure:

The finished Ant Build Job

< Previous | Next >

Feedback