Using filters
When you define transactions for Transaction Tracking, or Web Response Time agents, you also define one or more filters that refine the definitions of transactions and group them into logical business transactions and business applications.
Filters are defined with a set of properties and value that you select and configure, along with an indication of whether to include or exclude transactions that match the specified property values. Each agent type has a predefined set of properties that you can choose from and customize with values that make sense for your environment.
AgentType = TO
ApplicationGroup = IBM_HTTP_Server/6.0.2 Apache/2.0.47 (Win32)
ApplicationInstance = FREAKY5/PID=0000004188
ApplicationName = IBM Webserving Plugin
HostInfo = localhost
Hostname = freaky5
IP = 9.53.24.168
IPV4ClassASubNet = 9*
IPV4ClassBSubNet = 9.53*
IPV4ClassCSubNet = 9.53.24*
IPV6 = 9.53.24.168
PluginType = Websphere
Port = 80
ProcessID = 4188
Protocol = HTTP/1.1
QueryString =
RemoteAddress = 127.0.0.1
RemoteUser =
Scheme = http
ServerName = freaky5
ServerVersion =
ThreadID = 300
TransactionName = WebRequest
URI = /PlantsByWebSphere/images/poweredby_WebSphere.gif
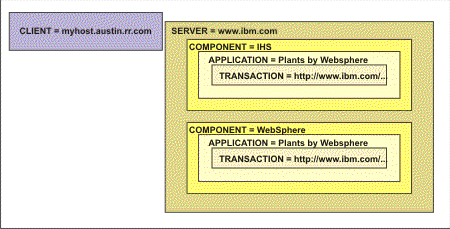
User =You can use filter properties to specify what to monitor or what to exclude from monitoring. You can also use filter properties for ARM-type transactions to build a description of how you want the transaction reported in workspaces. Transactions are grouped and displayed in reports using the following categories (also known as reporting values): server, component, application, transaction, and client. This is illustrated in the following diagram which shows the hierarchical relationship between categories.
Before you begin
- Create appropriate applications and transactions as needed, if you have not already done so. (See Defining applications for profiles and Defining transactions for profiles
- You must be familiar with certain information about your applications and transactions that you intend to monitor so you can specify appropriate values for the various properties that you choose to filter.
- Filters should be as specific as possible, with a minimum number of wildcards. Remember that to reach the default filter of "URL=*", every other filter must first fail.
- When using multiple Web Response Time agents, rather than place all Applications in the default profile, create a number of profiles and distribute a minimal set of Applications to each Web Response Time agent.
In addition to these sections, see Extended filtering for the Transaction Collector.
Procedure: Creating filters
- In the Application Management Configuration Editor, if you have not already done so, access the transaction for which you want to create a filter. (See Procedure: Modifying an existing transaction)
- If you have not already done so, click the Filters tab.
- Click
 . The Filter window is displayed, similar to the following
example:
. The Filter window is displayed, similar to the following
example: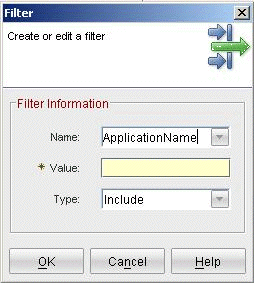
- By default, a filter property is displayed in the Name field.
To select a different property, click
 in the Name field
and choose a filter property from the list of available properties
for the selected agent type. To see the complete list of available
properties for supported agent types, see Available filter properties.
in the Name field
and choose a filter property from the list of available properties
for the selected agent type. To see the complete list of available
properties for supported agent types, see Available filter properties. - In the Value field, type the matching pattern to use for
this filter. This is whatever the string value is that you want to
match for that particular property. You can include asterisk (*)
characters in the value to act as wildcard characters:
- If you include an asterisk (*) at the beginning of the string, everything that follows the * must match the transaction.
- If you include an asterisk (*) at the end of the string, everything that precedes the * must match the transaction.
- If you include an asterisk (*) at the beginning and end of the string, everything between the two * characters must match the transaction.
- If you include an asterisk (*) anywhere else, the string being matched must contain an * in that position for the match to succeed.
If you define multiple filters that potentially match the same transaction, the agent to which the situation was deployed sends a warning message that indicates you have set up overlapping situations and tells you which one takes precedence. Precedence is determined by the length of the defined pattern. A longer pattern will take higher precedence over a shorter pattern. You can use this behavior to intentionally overlap patterns. For example:- http://www.ibm.com/* is a general situation that monitors the entire IBM website.
- http://www.ibm.com/hr/* is a specific situation that monitors only the HR portions of the IBM website.
- Transactions that match both patterns are grouped under the HR website situation.
- Transactions that match only one are grouped under that specific situation.
- Click at Type and choose either Include or Exclude:
- Include means that data is collected for all transactions that match the pattern specified by Value.
- Exclude means that data is not collected for any transactions that match the pattern.
Matching multiple filters: If any one of the Exclude filters are matched, then the transaction definition does not apply to that transaction. The transaction must match all of the defined Include filters for the transaction definition to apply to the transaction, except when the same filter property is defined multiple times in the table. In this case, the transaction must match any one of the filters with the repeating property name.
In Boolean logic this is expressed as follows:
if ( (Include1 OR Include1 OR Include1) AND Include2 AND Include3 AND Include4)
 AND NOT (Exclude1 OR Exclude2 OR Exclude3 OR Exclude4) )
where: Include# is a unique property name, when # is repeated, the properties pattern value might be different.
For example, suppose you define the following filters for a transaction:
Include Properties:
ApplicationName=Websphere/Version=9
ApplicationName=Webpshere/Version=10
TransactionName=http://www.ibm.com/*

Exclude Properties:
TransactionName=http://www.ibm.com/hr/
Now suppose the following conditions apply:
Transaction 1 occurs with properties:
ApplicationName=Websphere/Version=10
TransactionName=http://www.ibm.com/sales/index.html

Transaction 2 occurs with properties:
ApplicationName=Websphere/Version=9
TransactionName=http://www.ibm.com/hr/index.html
Transaction 1 would match the transaction definition, because its properties match at least one of the values for the ApplicationName include filter, and matches the TransactionName include filter, and does not match the Exclude filter.
Transaction 2 would not match the transaction definition because while it passes the Include property tests, it matches one of the Exclude filters. In this case the transaction definition does not apply to this transaction.
Matching multiple transactions with the same transaction type: You might have multiple transactions that are associated with the same transaction type, but with different filters. Consider the following example:Transaction Definition 1 occurs with these properties: ServerName include * ComponentName include * Application include * TransactionName include * ServerName exclude python* Transaction Definition 2 occurs with these properties: ServerName include python1The definitions for transactions are not combined, but rather sorted in priority order. The priority order is defined by the sum of the lengths of the include pattern values for the filters. For the examples above, Transaction Definition 1 has four include filters, each with a value of *, for a length of 1. So its priority is 4. Transaction Definition 2 has a single include pattern value, python1, which has a length of 7, so the priority for Transaction Definition 2 is 7. The transactions are sorted and when a match is attempted, the transaction definitions are tested in priority order, highest to lowest.
So transactions are tested against Transaction Definition 2 first, and if a match is found, the rules used for monitoring the transaction are governed by Transaction Definition 2. If no match is found, the transaction is tested against Transaction Definition 1. For the example above, no transactions with a ServerName that starts with python will be monitored, except for a transaction with the ServerName python1.
- Click OK. The Filter window is closed, and the filter is added to the filter table.
- Click Apply to save your changes and continue using the Application Management Configuration Editor.
- When you are finished, click OK to close the Application Management Configuration Editor.
Procedure: Removing filters from the transaction definition
- In the Application Management Configuration Editor, if you have not already done so, access the transaction for which you want to remove a filter. (See Procedure: Modifying an existing transaction)
- If you have not already done so, click the Filters tab.
- A table showing the list of defined filters is displayed in the
Filters tab:
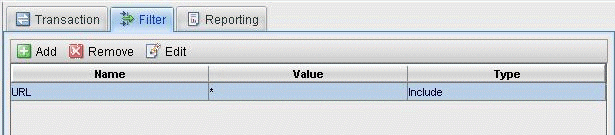
You can sort the list of filters by clicking on the Name, Value, or Type column headers in the title bar. You can select multiple filters by holding down the Ctrl key as you click a filter.
- After selecting one or more filters to remove, click
 . The selected filters are removed from the table.
 - Click Apply to save your changes and continue using the Application Management Configuration Editor.
- When you are finished, click OK to close the Application Management Configuration Editor.