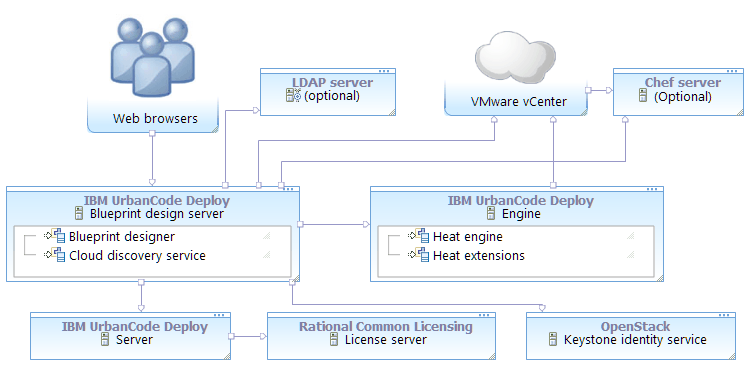
Connecting the blueprint design server to VMware v Center v5.5 to 6.0
To connect the blueprint design server to VMware vCenter, map the VMware vCenter account information to a functional ID. Then, assign that functional ID to a team.
- Obtain a Heat engine and an OpenStack Keystone server. The engine version must match the version of the Keystone server. In most cases for deploying to non-OpenStack clouds, install a Heat engine and Keystone server through IBM® UrbanCode® Deploy. See Installing an engine in silent mode or Installing an engine in interactive mode.
- Create a functional user account on the Keystone server. This user account
must be a member of the administrative tenant on the Keystone server. If you use the Keystone server
that was supplied with the engine, you can use the default administrative tenant credentials. The Keystone server's
default administrative tenant user name is
adminand the default password isopenstack1. Later, you associate the vCenter account information with this functional ID. With this account, users can authenticate to vCenter. - The vCenter account must have the following permissions:
- System.View permission for the root folder
- Datastore.Browse and Datastore.FileManagement permissions for the datacenter
- Datastore.Browse and Datastore.FileManagement permissions for the datastore
- By default, images are provisioned to a cluster. The target cluster must have enabled support for DRS (Distributed Resource Scheduler). Provisioning to a non-DRS cluster causes an error at provisioning time. As an alternative, you can provision images to a resource pool, as described in Modeling environments for VMware vCenter.
- Install the blueprint design server. See Installing the blueprint design server.
- Connect the blueprint design server to the server. See Connecting the blueprint design server to the server.
- Configure an authentication realm for the blueprint design server. You can import users from a variety of sources, including LDAP servers, Keystone identity services, the IBM UrbanCode Deploy server, or from the internal authentication realm. See Creating authentication realms for the blueprint designer.
- Ensure that the blueprint design server can connect to the cloud. You can verify the connection path with the curl or telnet commands. For example, make sure that no firewall, proxy, or security settings prevent communication between the blueprint design server and the cloud.
